Corona Shiny Project 4 - Visusalization (Map Chart)
공지
이번에 준비한 튜토리얼은 제 강의를 듣는 과거-현재-미래 수강생분들을 위해 준비한 자료이다. 많은 도움이 되기를 바란다
이번에 준비한 Tutorial 코로나 세계현황을 Shiny Dashboard로 만들어 가는 과정을 담았다.
I. Shiny Tutorial 소개
처음 shiny를 접하거나 shiny의 전체 튜토리얼이 궁금한 사람들을 위해 이전 글을 소개한다.
- shiny tutorial 01 - get started
- shiny tutorial 02 - Shiny Structure
- shiny tutorial 03 - HTML content
- shiny tutorial 04 - Shiny Layouts
- shiny tutorial 05 - Sharing Apps
- shiny tutorial 06 - shinydashboard
- shiny tutorial 07 - flexdashboard
- shiny tutorial 08 - HTML, CSS 적용
II. Shiny Project
현재 진행중인 프로젝트가 궁금하다면 아래를 확인해보자.
- Corona Shiny Project 1 - Get Data
- Corona Shiny Project 2 - Visusalization (Time Series)
- Corona Shiny Project 3 - Visusalization (Bubble Chart)
III. Leaflet 소개
leaflet 패키지에 관한 간단한 소개에 강사가 작성한 글이 있다. 구체적인 내용은 여기에서 참고하기를 바란다.
VI. 지도 시각화 작업에 앞서서 고려할 내용
(1) 지도 데이터 수집하기
지도 시각화를 작업하려면, 필수적으로 위도와 경도가 담긴 데이터를 확보해야 한다. 이번 프로젝트에서 관건이 되는 건 국가별 위도 경도 데이터를 확보하는 소스코드를 작업해야 한다.
원소스부터 수집하는 방법 등 다양한 방법이 있지만, 강사는 아래와 같이 진행했다.
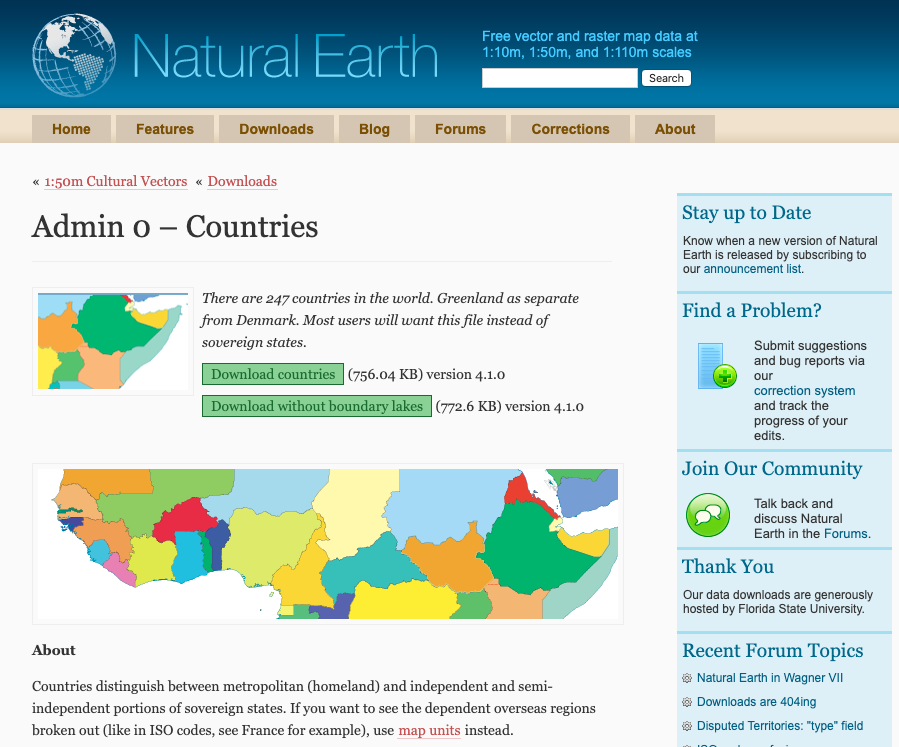
먼저 Natural Earth Data에서 Download Countries데이터 파일을 다운로드 받은 후 적정 경로에서 데이터를 로드 한다.
- 폴더 트리 구조
.
├── ne_50m_admin_0_countries.README.html
├── ne_50m_admin_0_countries.VERSION.txt
├── ne_50m_admin_0_countries.cpg
├── ne_50m_admin_0_countries.dbf
├── ne_50m_admin_0_countries.prj
├── ne_50m_admin_0_countries.shp
└── ne_50m_admin_0_countries.shx
각각의 확장명이 있는데, 각각의 확장명을 이해하려면 또다른 공부를 해야 한다. (현재 시점에서 강사는 관심이 크게 없다!)
countries 코드는 그대로 실행해준다.

library(rgdal)
## Loading required package: sp
## rgdal: version: 1.4-8, (SVN revision 845)
##  Geospatial Data Abstraction Library extensions to R successfully loaded
##  Loaded GDAL runtime: GDAL 2.4.2, released 2019/06/28
##  Path to GDAL shared files: /Library/Frameworks/R.framework/Versions/3.6/Resources/library/rgdal/gdal
##  GDAL binary built with GEOS: FALSE
##  Loaded PROJ.4 runtime: Rel. 5.2.0, September 15th, 2018, [PJ_VERSION: 520]
##  Path to PROJ.4 shared files: /Library/Frameworks/R.framework/Versions/3.6/Resources/library/rgdal/proj
##  Linking to sp version: 1.3-2
countries <- readOGR(dsn ="~/Desktop/ne_50m_admin_0_countries",
                     layer = "ne_50m_admin_0_countries",
                     encoding = "utf-8",use_iconv = T,
                     verbose = FALSE)

class(countries)
## [1] "SpatialPolygonsDataFrame"
## attr(,"package")
## [1] "sp"
countries의 class는 sp로 일반적인 data.frame 형태가 아닌 것을 확인할 수 있다.
(2) Countries data 시각화
일단, 뭔지는 몰라도 실제 시각화 되는지 확인해보자. 이 때에는 leaflet package를 활용한다.
library(leaflet)
leaflet(data = countries) %>%
  addTiles() %>%
  setView(0, 30, zoom = 3)

오! 신기하게 되었다. 이 소스코드가 실제로 R Markdown에서도 적용되는지 확인해본다. 그러려면, countries 데이터를 저장한 후, R Markdown코드에서 불러오는 걸 수행해야 한다. 어떻게 수행하면 좋을까? MySQL과 같은 RDB로는 저장이 당연히 되지 않는다. 그러면, NoSQL로 데이터를 Input 하면 된다. 왜 강사가 MongoDB로 작업하는지 이 때 비로써 아! 하면 충분하다.
(3) MongoDB에 저장하기
이 데이터를 MongoDB에 실제로 저장되는지 확인해본다.
이 때 작업해야 하는 것은 sp class를 MongoDB 형태인 JSON 형태로 바꿔져야 하는 작업이 남았는데, 어려운 것은 아니니, 소스 코드를 참고한다.
다행히 R은 GIS 형태의 sp class를 다룰 수 있도록 도와주는 패키지를 지원하고 있다.
- 참고로 해당 패키지 설치 과정에서는
gdal및sf버전 관련 에러가 나올 확률이 크다. 이런 경우, sf 공식문서 문서를 참조하기를 바란다.
Facing similar problem I have followed the steps below:

1. On Terminal: gdalinfo --version to check which gdal version do you have. Mine was GDAL 2.2.0, released 2017/04/28 after brew update and brew upgrade

2. From here: https://github.com/r-spatial/sf, instructions for macOS, as I have already gdal installed, I have used only brew unlink gdal and then brew link --force gdal2

3. I reinstalled rgdal on R: install.packages("rgdal", repos = "http://cran.us.r-project.org", type = "source") and I have confirmed it was compiled with configure: GDAL: 2.2.0

4. Finally, install.packages("sf") and it required to be compiled: binary source needs_compilation sf 0.5-3 TRUE
Again, I have confirmed configure: GDAL: 2.2.0 and checking GDAL version >= 2.0.0... yes

After that, I have the new version installed: library(sf) Linking to GEOS 3.6.2, GDAL 2.2.0, proj.4 4.9.3

I hope it could be a solution for you too.
에러를 잘 다루는 사람이 일의 성과도 높다! 일의 해결법은 대부분 공식문서에 있다.
install.packages("sf", configure.args = "--with-proj-lib=/usr/local/lib/")
install.packages("geojsonio", dependencies = TRUE)
remotes::install_github("ropensci/geojsonlint")
library(geojsonio)

# json
county_json <- geojson_json(countries)

> class(county_json)
[1] "geofeaturecollection" "geojson"
[3] "geo_json"             "json"
geon_json 형태로 데이터가 변환된 것을 확인할 수 있다.
library(mongolite)
collection <- "countries"
db <- 'learningspoons'
mongo_id <- Sys.getenv("MONGO_ID") # 보안 유지를 위해 가렸다.(실무에서는 이렇게 작업하라고 권유하는 것임!)
mongo_pw <- Sys.getenv("MONGO_PW") # (실무에서는 이렇게 작업하라고 권유하는 것임!)

mongo_url <- paste0('mongodb+srv://', mongo_id, ':',mongo_pw,'@learningspoons-rhpei.gcp.mongodb.net/')

conn <- mongo(collection = collection,
              db = db,
              url = mongo_url)

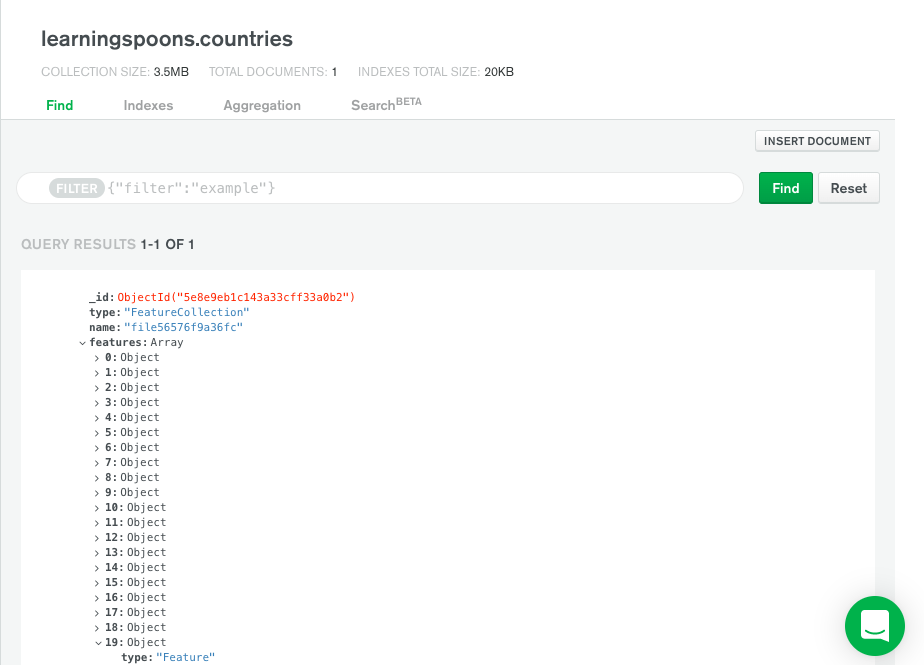
conn$insert(county_json)

실제로 MongoDB에 잘 들어간 것을 확인할 수 있다.
(4) ShapeFile 저장 및 불러오기
MongoDB에 저장하는 방법이 싫다면, 매우 간단히, .RData 형태로 저장해도 된다. 이렇게 다양한 형태로 저장할 수 있음을 확인한다.
save(countries, file="shapeFile.RData")
load("shapeFile.RData")
V. 국가별 인구 데이터 지도 시각화 예제
수집된 데이터를 통해서 다양한 시각화를 진행할 수 있다. 지도 시각화 관한 다양한 예제는 leaflet 확인한다.
특히, 주의해야 하는 것은 데이터의 형태가 sp 형태인지, 아니면 geojson 형태인지에 따라 조금씩 달라지니, 여기에 주의하면서 관련 공식문서를 읽도록 한다.
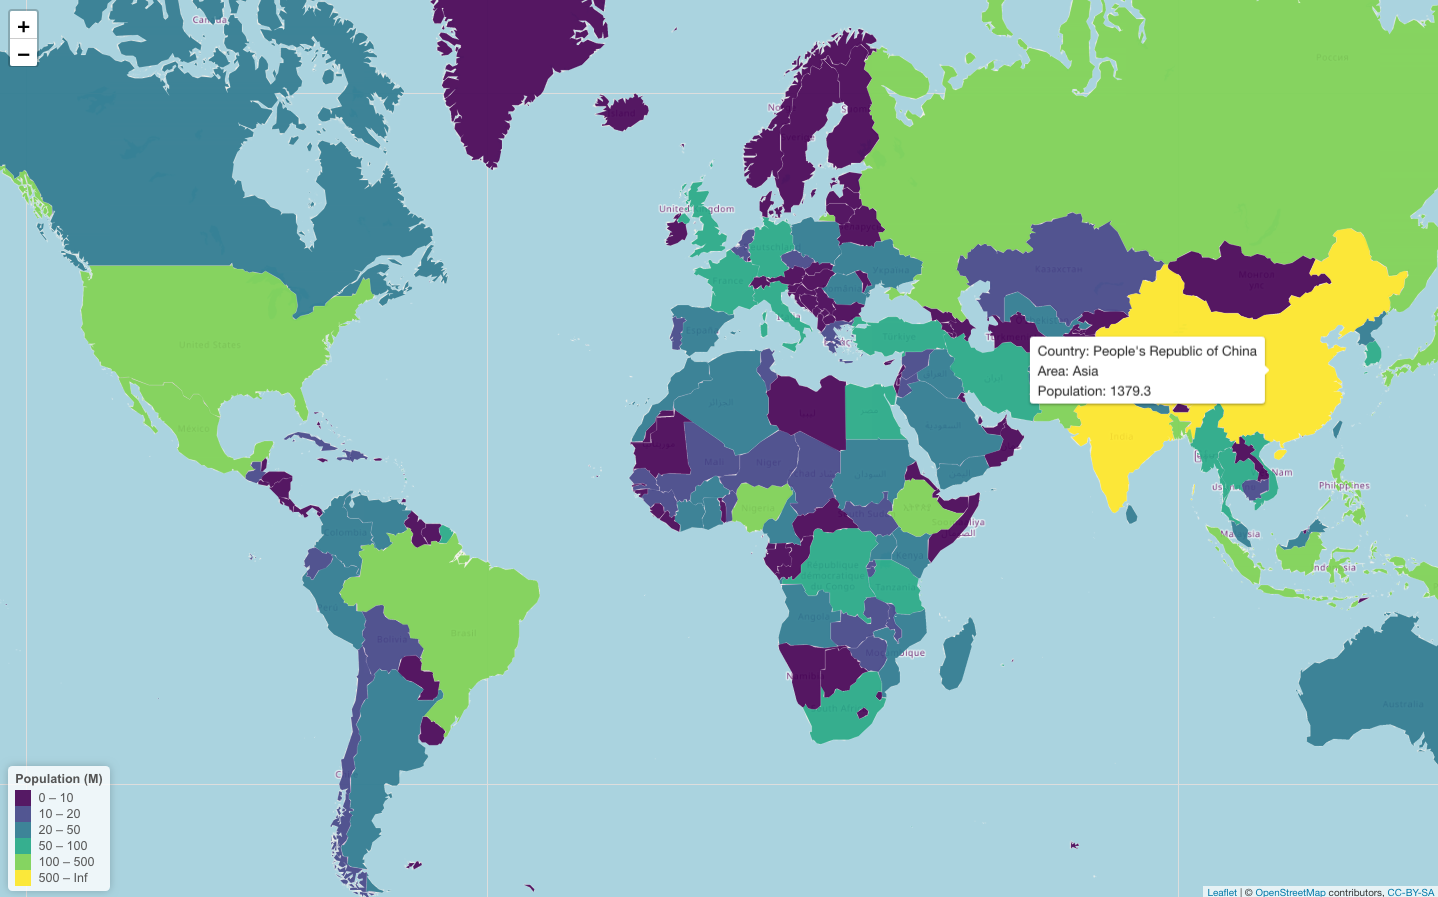
(1) 소스 코드 실행
# 패키지 로드
library(rgdal)
library(leaflet)
library(viridis)
library(RCurl)
library(dplyr)
library(RColorBrewer)

# 지도 데이터 수집
countries <- readOGR(dsn ="~/Desktop/ne_50m_admin_0_countries",
                     layer = "ne_50m_admin_0_countries",
                     encoding = "utf-8",use_iconv = T,
                     verbose = FALSE)

# 인구수 데이터 가공
countries@data$POP_EST[which(countries@data$POP_EST == 0)] = NA
countries@data$POP_EST <- as.numeric(as.character(countries@data$POP_EST)) / 1000000 %>% round(2)

# 색상, 범례에 사용할 것
mybins <- c(0,10,20,50,100,500,Inf)
mypalette <- colorBin(palette="YlOrBr", domain=countries@data$POP_EST, na.color="transparent", bins= mybins)

# 국가 클릭 시, 아래 내용으로 출력
mytext <- paste(
  "Country: ", countries@data$NAME_EN,"<br/>",
  "Area:  ", countries@data$CONTINENT, "<br/>",
  "Population: ", round(countries@data$POP_EST, 2),
  sep="") %>%
  lapply(htmltools::HTML)

# 마지막으로 Mapping
leaflet(countries) %>%
  addTiles()  %>%
  setView( lat=20, lng=0 , zoom=4) %>%
  addPolygons(
    fillColor = ~mypalette(POP_EST),
    weight = 2,
    opacity = 1,
    color = "white",
    dashArray = "3",
    fillOpacity = 0.7,
    highlight = highlightOptions(
      weight = 5,
      color = "#666",
      dashArray = "",
      fillOpacity = 0.7,
      bringToFront = TRUE),
    label = mytext,
    labelOptions = labelOptions(
      style = list("font-weight" = "normal", padding = "2px 7px"),
      textsize = "13px",
      direction = "auto"
    )
  ) %>%
  addLegend(pal=mypalette, values=~POP_EST, opacity=0.9, title = "Population (M)", position = "bottomleft" )

(2) 소스 코드 설명
-
인구수 데이터 가공: 0인 데이터는 NA로 처리한 뒤, 인구수가 인구수는 단위가 크기때문에, 백만명 단위로 처리했다.
-
색상, 범례에 사용할 것: 국가별 인구수에 색상의 차별화를 하려면
mybins <- c(0,10,20,50,100,500,Inf)에 따라 차별화를 두었다. 만약 기준이 다르다면, 다른 기준점을 적용하면 된다. -
Leaflet Mapping:
Leaflet + Choropleths검색을 하면 다양한 예제가 나오니 거기에서 응용하면 된다.
VI. Apply To R Markdown.
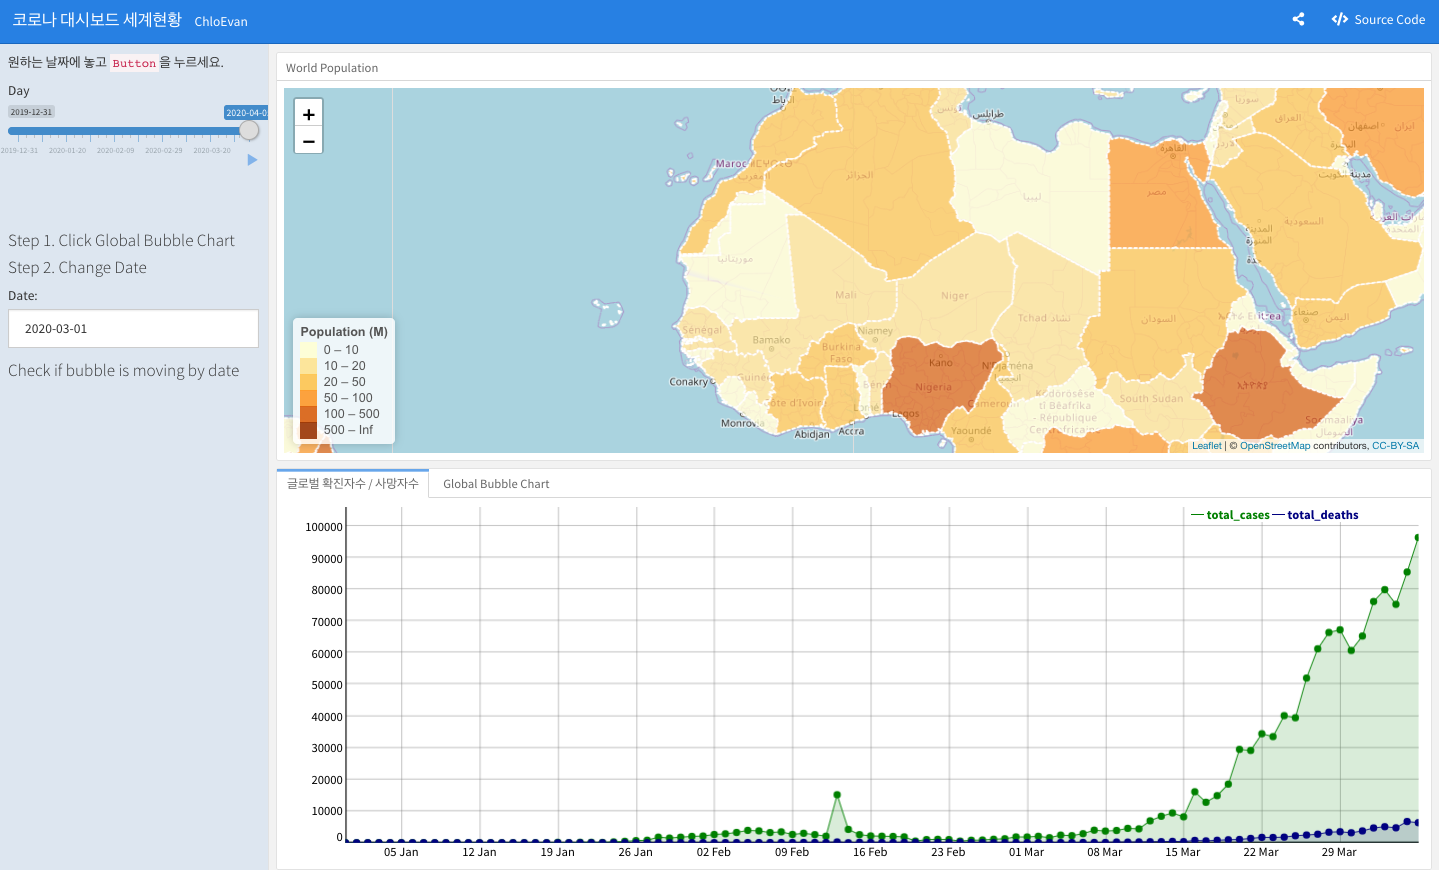
이제 위 데이터를 활용해서 실제로 flexdashboard 패키지에 적용되는지 확인해보자. 다행히 leaflet과 R Markdown은 연동이 매우 잘되서, Editor에서 작업한 소스 코드를 그대로 응용해도 무방하다. 단, reactive 데이터 셋은 당연히 renderLeaflet()을 활용한다.
Row
-----------------------------------------------------------------------

### World Population

```r
# Final Map
leaflet(countries) %>%
  addTiles()  %>%
  setView( lat=20, lng=0 , zoom=4) %>%
  addPolygons(
    fillColor = ~mypalette(POP_EST),
    weight = 2,
    opacity = 1,
    color = "white",
    dashArray = "3",
    fillOpacity = 0.7,
    highlight = highlightOptions(
      weight = 5,
      color = "#666",
      dashArray = "",
      fillOpacity = 0.7,
      bringToFront = TRUE),
    label = mytext,
    labelOptions = labelOptions(
      style = list("font-weight" = "normal", padding = "2px 7px"),
      textsize = "13px",
      direction = "auto"
    )
  ) %>%
  leaflet::addLegend(pal = mypalette, values=~POP_EST, opacity=0.9, title = "Population (M)", position = "bottomleft" )
```

VII. 결론
이번 포스트에서는, leaflet 패키지를 활용한 지도 시각화 실전에 준하는 과정을 만들었다. 지도 데이터를 다루는 것은 사실 쉬운 것은 아니다. 강사가 GIS 개념을 다루는 데 참조했던 원문 링크를 보고 참고하기를 바란다.
이글을 읽는 사람들에게 작게나마 도움이 되기를 바란다.
Pray for Victims of Covid_19. Contribution to them with this tutorial.
VIII. Reference
Moraga, P. (n.d.). Geospatial Health Data: Modeling and Visualization with R-INLA and Shiny. from http://www.paulamoraga.com/book-geospatial/index.html
