Development Settings

M1 Mac Tensorflow Installation in R

개요

  • M1 Mac에서 텐서플로를 설치 한다.
  • 필자의 현재 M1 환경은 아래와 같다.
sessionInfo()
R version 4.1.2 (2021-11-01)
Platform: aarch64-apple-darwin20 (64-bit)
Running under: macOS Big Sur 11.6

Matrix products: default
LAPACK: /Library/Frameworks/R.framework/Versions/4.1-arm64/Resources/lib/libRlapack.dylib

locale:
[1] en_US.UTF-8/en_US.UTF-8/en_US.UTF-8/C/en_US.UTF-8/en_US.UTF-8

attached base packages:
[1] stats     graphics  grDevices utils     datasets  methods   base     

other attached packages:
[1] ggplot2_3.3.5    dplyr_1.0.7      tfdatasets_2.7.0 keras_2.7.0     
[5] reticulate_1.22  tensorflow_2.7.0

loaded via a namespace (and not attached):
 [1] Rcpp_1.0.7        compiler_4.1.2    pillar_1.6.4      prettyunits_1.1.1
 [5] base64enc_0.1-3   tools_4.1.2       progress_1.2.2    digest_0.6.28    
 [9] zeallot_0.1.0     nlme_3.1-153      gtable_0.3.0      jsonlite_1.7.2   
[13] lifecycle_1.0.1   tibble_3.1.6      lattice_0.20-45   mgcv_1.8-38      
[17] pkgconfig_2.0.3   png_0.1-7         rlang_0.4.12      Matrix_1.3-4     
[21] cli_3.1.0         rstudioapi_0.13   withr_2.4.2       generics_0.1.1   
[25] vctrs_0.3.8       hms_1.1.1         rprojroot_2.0.2   grid_4.1.2       
[29] tidyselect_1.1.1  glue_1.5.0        here_1.0.1        R6_2.5.1         
[33] fansi_0.5.0       farver_2.1.0      purrr_0.3.4       magrittr_2.0.1   
[37] whisker_0.4       splines_4.1.2     scales_1.1.1      tfruns_1.5.0     
[41] ellipsis_0.3.2    colorspace_2.0-2  labeling_0.4.2    utf8_1.2.2       
[45] munsell_0.5.0     crayon_1.4.2 

Miniforge3 설치

Google Colab with R

I. 들어가며

  • 빅데이터 시대에 맞춰서 다양한 툴이 나오는 가운데, Google Colab은 가히 혁명적이라 할 수 있다.
  • 과거 높은 사양의 컴퓨터에서만 수행할 수 있었던 머신러닝과 딥러닝을 구글 코랩의 환경에서 무료로 배울 수 있는 기회를 구글이 제공하기 시작했다.
  • 간단하게 아래 소스코드를 실행하여 CPU와 GPU의 연산속도를 비교 해보자.

II. Google Colab with R

  • Google Colab은 매우 편리하다. 실제 강의를 시작하면서 파이썬 관련 모든 강의안은 Google Colab으로 제작중이다.
  • 문제는 현재로써는 Google Colab만 지원한다는 점이다.
  • RStudio가 개발용으로 매우 훌륭한 도구이지만, 교육 목적으로는 조금 부족한 감이 있다. (UI 관점에서)
  • 일단 환경이 다르면 강의하는 입장에서는 여러가지로 어렵다.
  • 그래서 이번에 온라인 Tutorial을 제작하면서, Google Colab에서 R을 실행하고 또한 이를 바탕으로 강의를 제작하기로 했다.

III. Set up

  • 다음 소스코드를 그대로 실행한다.
%load_ext rpy2.ipython
The rpy2.ipython extension is already loaded. To reload it, use:
  %reload_ext rpy2.ipython
  • 간단한 EDAJupyter에서 실행할 수 있다.

IV. R 소스코드 실행

  • 이제 간단하게 R 소스코드를 실행해보자.
  • 이 때, 임시적으로 %%R 매직 command를 활용한다.

(1) 패키지 설치

  • R에서 필요한 필수 패키지를 설치한다.
  • EDA를 위한 tidyverse 패키지와 머신러닝을 위한 caret패키지를 설치한다.
%%R
# 1. 패키지가 설치 function
install_pkgs <- function(pkg){
  new.pkg <- pkg[!(pkg %in% installed.packages()[, "Package"])]
  if (length(new.pkg)) 
    install.packages(new.pkg, dependencies = TRUE)
  sapply(pkg, require, character.only = TRUE)
}

pkgs <- c("tidyverse", "nycflights13", "mlbench")
install_pkgs(pkgs)
R[write to console]: Installing packages into ‘/usr/local/lib/R/site-library’
(as ‘lib’ is unspecified)

R[write to console]: trying URL 'https://cran.rstudio.com/src/contrib/nycflights13_1.0.1.tar.gz'
.
.

   tidyverse nycflights13      mlbench 
        TRUE         TRUE         TRUE 

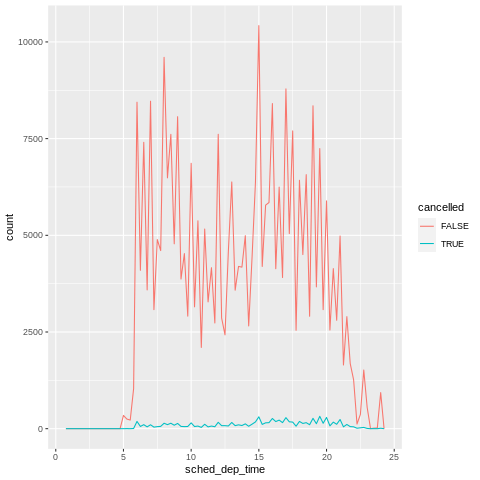
(2) EDA with tidyverse

  • tidyverse 패키지를 활용하여 간단한 EDA를 작업해보자.
%%R
nycflights13::flights %>% 
  mutate(
    cancelled = is.na(dep_time),
    sched_hour = sched_dep_time %/% 100,
    sched_min = sched_dep_time %% 100,
    sched_dep_time = sched_hour + sched_min / 60
  ) %>% 
  ggplot(mapping = aes(sched_dep_time)) + 
    geom_freqpoly(mapping = aes(colour = cancelled), binwidth = 1/4)

png