MLOps

MLFlow with Scikit-Learn

개요

  • Scikit-Learn 모델을 만든 후, MLFlow로 모델을 배포한다.
  • 머신러닝 코드에 대한 설명은 생략한다.
  • 가상환경 설정에 관한 내용도 생략한다.

라이브러리 불러오기

  • 기존 코드에서 mlflow 라이브러리만 추가한다.
%matplotlib inline

import numpy as np 
import pandas as pd 
import matplotlib as mpl
import matplotlib.pyplot as plt 
import sklearn
import seaborn as sns
import mlflow 
import mlflow.sklearn
from sklearn.linear_model import LogisticRegression
from sklearn.model_selection import train_test_split, KFold
from sklearn.preprocessing import StandardScaler
from sklearn.metrics import roc_auc_score, plot_roc_curve, confusion_matrix 

print(f"numpy version {np.__version__}")
print(f"pandas version {pd.__version__}")
print(f"matplotlib version {mpl.__version__}")
print(f"seaborn version {sns.__version__}")
print(f"sklearn version {sklearn.__version__}")
print(f"MLFlow version {mlflow.__version__}")
numpy version 1.23.1
pandas version 1.4.3
matplotlib version 3.5.2
seaborn version 0.11.2
sklearn version 1.1.1
MLFlow version 1.27.0

데이터 불러오기

  • 데이터를 불러오도록 한다.
DATA_PATH = "C:\\Users\\your_id\\Desktop\\mlops_tutorial\\data\\creditcard.csv"

df = pd.read_csv(DATA_PATH)
print(df.head())
   Time        V1        V2        V3        V4        V5        V6        V7  \
0   0.0 -1.359807 -0.072781  2.536347  1.378155 -0.338321  0.462388  0.239599   
1   0.0  1.191857  0.266151  0.166480  0.448154  0.060018 -0.082361 -0.078803   
2   1.0 -1.358354 -1.340163  1.773209  0.379780 -0.503198  1.800499  0.791461   
3   1.0 -0.966272 -0.185226  1.792993 -0.863291 -0.010309  1.247203  0.237609   
4   2.0 -1.158233  0.877737  1.548718  0.403034 -0.407193  0.095921  0.592941   

         V8        V9  ...       V21       V22       V23       V24       V25  \
0  0.098698  0.363787  ... -0.018307  0.277838 -0.110474  0.066928  0.128539   
1  0.085102 -0.255425  ... -0.225775 -0.638672  0.101288 -0.339846  0.167170   
2  0.247676 -1.514654  ...  0.247998  0.771679  0.909412 -0.689281 -0.327642   
3  0.377436 -1.387024  ... -0.108300  0.005274 -0.190321 -1.175575  0.647376   
4 -0.270533  0.817739  ... -0.009431  0.798278 -0.137458  0.141267 -0.206010   

        V26       V27       V28  Amount  Class  
0 -0.189115  0.133558 -0.021053  149.62      0  
1  0.125895 -0.008983  0.014724    2.69      0  
2 -0.139097 -0.055353 -0.059752  378.66      0  
3 -0.221929  0.062723  0.061458  123.50      0  
4  0.502292  0.219422  0.215153   69.99      0  

[5 rows x 31 columns]

로지스틱 모형 만들기

  • 기존 코드를 참조하여 모델을 만든다.
  • 데이터셋 분리를 한다.

normal = df[df['Class'] == 0].sample(frac=0.5, random_state=42).reset_index(drop=True)
anomaly = df[df['Class']==1]

normal_train, normal_test = train_test_split(normal, test_size = 0.2, random_state=42)
anomary_train, anomary_test = train_test_split(anomaly, test_size = 0.2, random_state=42)

normal_train, normal_validate = train_test_split(normal_train, test_size = 0.25, random_state=42)
anomary_train, anomary_validate = train_test_split(anomary_train, test_size = 0.25, random_state=42)

normal_train.shape, normal_validate.shape, anomary_train.shape, anomary_validate.shape
((85294, 31), (28432, 31), (294, 31), (99, 31))
  • 최종 학습, 테스트 및 검증 세트를 생성하기 위해 각각의 정상 및 이상 데이터 분할을 연결해야 한다.
X_train = pd.concat((normal_train, anomary_train))
X_test = pd.concat((normal_test, anomary_test))
X_validate = pd.concat((normal_validate, anomary_validate))

y_train = np.array(X_train["Class"])
y_test = np.array(X_test["Class"])
y_validate = np.array(X_validate["Class"])

X_train = X_train.drop("Class", axis = 1)
X_test = X_test.drop("Class", axis = 1)
X_validate = X_validate.drop("Class", axis = 1)

X_train.shape, X_validate.shape, X_test.shape, y_train.shape, y_validate.shape, y_test.shape
((85588, 30), (28531, 30), (28531, 30), (85588,), (28531,), (28531,))
  • 표준화를 진행한다.
scaler = StandardScaler()
scaler.fit(X_train)

X_train = scaler.transform(X_train)
X_test = scaler.transform(X_test)
X_validate = scaler.transform(X_validate)

MLFlow를 통한 학습 및 평가

  • MLFlow 기능으로 검증에 사용하는 사용자 정의 함수를 만들어 본다.
  • 여기서 핵심은
    • mlflow.log_metric() 함수를 통해 지표를 로깅할 수 있음
    • mlflow.log_artifact() 함수를 통해 그래프를 저장할 수 잇음.
def train(sk_model, X_train, y_train):
    sk_model = sk_model.fit(X_train, y_train)
    train_acc = sk_model.score(X_train, y_train)
    mlflow.log_metric("train_acc", train_acc)
    
    print(f"Train Accuracy: (train_acc:.3%)")
    

def evaluate(sk_model, X_test, y_test):
    eval_acc = sk_model.score(X_test, y_test)
    preds = sk_model.predict(X_test)
    auc_score = roc_auc_score(y_test, preds)
    mlflow.log_metric("eval_acc", eval_acc)
    mlflow.log_metric("auc_score", auc_score)
    
    print(f"Auc Score : {auc_score:.3%}")
    print(f"Eval Score : {eval_acc:.3%}")
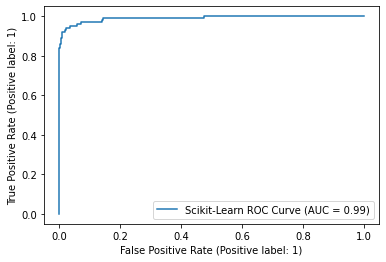
    roc_plot = plot_roc_curve(sk_model, X_test, y_test, name="Scikit-Learn ROC Curve")
    plt.savefig("sklearn_roc_plot.png")
    plt.show()
    plt.clf()
    conf_matrix = confusion_matrix(y_test, preds)
    ax = sns.heatmap(conf_matrix, annot=True, fmt='g')
    ax.invert_xaxis()
    ax.invert_yaxis()
    plt.ylabel("Actual")
    plt.xlabel("Predicted")
    plt.title("Confusion Matrix")
    plt.savefig("sklearn_conf_matrix.png")
    mlflow.log_artifact("sklearn_roc_plot.png")
    mlflow.log_artifact("sklearn_conf_matrix.png")

MLFlow 실행 로깅 및 확인

  • 실제 실험 이름을 설정하고, MLFlow 실행 시작. 해당 코드를 모두 실행한다.
# 모델 설정
sk_model = LogisticRegression(random_state=None, max_iter=400, solver='newton-cg')

# 실험 이름 설정
mlflow.set_experiment("sklearn_experiment")

# 해당 이름으로 실행 배치
with mlflow.start_run():
    train(sk_model, X_train, y_train)
    evaluate(sk_model, X_test, y_test)
    
    # 하나의 MLFlow 실행 컨텍스트에서 모든 코드를 묶을 수 있음. 
    # 참조 : https://mlflow.org/docs/latest/models.html#model-customization
    mlflow.sklearn.log_model(sk_model, 'log_reg_model')
    
    # 본질적으로 모델과 지표가 로깅되는 현재 실행을 가져오고 출력함. 
    print("Model run: ", mlflow.active_run().info.run_uuid)
mlflow.end_run()
Train Accuracy: (train_acc:.3%)
Auc Score : 86.355%
Eval Score : 99.888%


C:\Users\your_id\Desktop\mlops_tutorial\venv\lib\site-packages\sklearn\utils\deprecation.py:87: FutureWarning: Function plot_roc_curve is deprecated; Function :func:`plot_roc_curve` is deprecated in 1.0 and will be removed in 1.2. Use one of the class methods: :meth:`sklearn.metric.RocCurveDisplay.from_predictions` or :meth:`sklearn.metric.RocCurveDisplay.from_estimator`.
  warnings.warn(msg, category=FutureWarning)

png

AirFlow ch01. 개요

인프런 강의

공지

  • Airflow 2.0 원서 나온 것을 공부용으로 활용합니다.

Airflow Project

Airflow%20Project%20ad0ddb927b43444a9837279ad7ea27fe/book_cover.png

  • 이 책에 나온 내용을 Chapter별로 요약하여 정리하려고 한다.
  • 원서 구매 페이지는 아래와 같다.
  • 구매 페이지: Data Pipelines with Apache Airflow

Chapter 1. Apache Airflow Introduction

Airflow%20Project%20ad0ddb927b43444a9837279ad7ea27fe/figure_1-1.png

AirFlow 설치 및 실행 with M1

인프런 강의

미니 프로젝트 개요

  • 목적: Airflow와 빅쿼리를 활용하여 ETL 및 대시보드를 만들어보는 과정을 설계
  • 환경: MacOS M1

Part I. Docker and Airflow

  • Docker와 Airflow를 설치 및 실행한다.

  • 필자는 가상환경을 선정하고, 그 위에 도커를 추가로 설치하였다.

[MLOps] Weight & Biases 소개 및 사용 방법

인프런 강의

1줄 요약

  • wandb로 MLOps를 배워봅니다.

References

초기 설정

Custom Containers with AI Platform Training

인프런 강의

1줄 요약

  • UCI Machine Learning Repository 데이터를 활용해서 MLOps를 구축해본다.
  • 본 장에서는 MLOps의 간단한 흐름을 파악하는데 주력한다.
  • 실제로는 하나부터 열까지 모든 코드를 따 짜야 한다.
  • 관련 내용은 추후에 여유가 될 때 업데이트를 해보도록 한다.

감사 인사

  • God Google 감사합니다.
  • God Coursera 감사합니다.

Objectives

  • Create a train and a validation split with BigQuery.
  • Wrap a machine learning model into a Docker container and train it on AI Platform.
  • Use the hyperparameter tuning engine on Google Cloud to find the best hyperparameters.
  • Deploy a trained machine learning model on Google Cloud as a REST API and query it.

Task 0: Setup

  • 클라우드 창에서 Cloud Shell을 활성화 합니다. (그림 생략)
  • 현재 프로젝트가 잘 연결이 되어 있는지 확인합니다.
$ student_02_2523be913322@cloudshell:~ (qwiklabs-gcp-02-9960bd90e36a)$ gcloud auth list
           Credentialed Accounts
ACTIVE  ACCOUNT
*       student-02-2523be913322@qwiklabs.net

To set the active account, run:
    $ gcloud config set account `ACCOUNT`
  • 만약 실제 프로젝트에서 연결이 안되어 있다면 gcloud config set에서 참고합니다.

Task 1: Enable Cloud Services

  • 여러 형태의 클라우드 서비스를 실행해야 하는 코드를 작성한다.
  • 먼저, Cloud Shell에서 프로젝트 ID를 Google Cloud Project로 설정하려면 다음 명령을 실행합니다.
$ export PROJECT_ID=$(gcloud config get-value core/project)
$ gcloud config set project $PROJECT_ID
  • 필요한 클라우드 서비스를 활용하기 위해 다음 명령어를 추가합니다.
$ gcloud services enable \
cloudbuild.googleapis.com \
container.googleapis.com \
cloudresourcemanager.googleapis.com \
iam.googleapis.com \
containerregistry.googleapis.com \
containeranalysis.googleapis.com \
ml.googleapis.com \
dataflow.googleapis.com
  • Cloud Build 서비스 계정에 대한 Editor 사용 권한 추가 합니다.
$ PROJECT_NUMBER=$(gcloud projects describe $PROJECT_ID --format="value(projectNumber)")
CLOUD_BUILD_SERVICE_ACCOUNT="${PROJECT_NUMBER}@cloudbuild.gserviceaccount.com"
gcloud projects add-iam-policy-binding $PROJECT_ID \
  --member serviceAccount:$CLOUD_BUILD_SERVICE_ACCOUNT \
  --role roles/editor

Updated IAM policy for project [qwiklabs-gcp-02-9960bd90
e36a].
bindings:
- members:
  - serviceAccount:qwiklabs-gcp-02-9960bd90e36a@qwiklabs
-gcp-02-9960bd90e36a.iam.gserviceaccount.com
  - user:student-02-2523be913322@qwiklabs.net
  role: roles/appengine.appAdmin
- members:
  - serviceAccount:qwiklabs-gcp-02-9960bd90e36a@qwiklabs
-gcp-02-9960bd90e36a.iam.gserviceaccount.com
.
.
.
- members:
  - serviceAccount:qwiklabs-gcp-02-9960bd90e36a@qwiklabs-gcp-02-9960bd90e36a.iam.gserviceaccount.com
  - user:student-02-2523be913322@qwiklabs.net
  role: roles/viewer
etag: BwXBj7nBxIk=
version: 1
  • 각각의 Role의 역할이 바뀐것을 확인했다면, 다음 Task를 진행하도록 한다.

Task 2. Create an instance of AI Platform Pipelines

  • Google Cloud Console의 탐색 메뉴에서 AI 플랫폼으로 스크롤하여 Pin 아이콘을 클릭합니다. 이렇게 하면 나중에 실습에서 쉽게 액세스할 수 있도록 메뉴 상단에 바로 가기가 만들어집니다.

GCP Kubernetes Engine을 통한 배포(2)

인프런 강의

1줄 요약

  • (GCP) GKE를 활용하여 nginx를 실행해보자.

Step 1. GCP Shell 활성화

  • You can list the active account name with this command:
(your_project_id)$ gcloud auth list
           Credentialed Accounts
ACTIVE  ACCOUNT
*       student-04-e46af1f1cd7b@qwiklabs.net

To set the active account, run:
    $ gcloud config set account `ACCOUNT`
  • You can list the project ID with this command:
(your_project_id)$ gcloud config list project
[core]
project = qwiklabs-gcp-04-79efc1e4ae0f

Your active configuration is: [cloudshell-24251]

Step 2. Create Deployment manifests

  • Task 1. Create deployment manifests and deploy to the cluster

(1) Connect to the lab GKE cluster

  • In Cloud Shell, type the following command to set the environment variable for the zone and cluster name.
(your_project_id)$ export my_zone=us-central1-a
(your_project_id)$ export my_cluster=standard-cluster-1
  • Configure kubectl tab completion in Cloud Shell.
(your_project_id)$ source <(kubectl completion bash)
  • In Cloud Shell, configure access to your cluster for the kubectl command-line tool, using the following command:
$ gcloud container clusters get-credentials $my_cluster --zone $my_zone
Fetching cluster endpoint and auth data.
kubeconfig entry generated for standard-cluster-1.
  • In Cloud Shell enter the following command to clone the repository to the lab Cloud Shell.
(your_project_id)$ git clone https://github.com/GoogleCloudPlatform/training-data-analyst
  • Create a soft link as a shortcut to the working directory.
(your_project_id)$ ln -s ~/training-data-analyst/courses/ak8s/v1.1 ~/ak8s
  • Change to the directory that contains the sample files for this lab.
(your_project_id)$ cd ~/ak8s/Deployments/
your_id@cloudshell:~/ak8s/Deployments (your_project_id)$

(2) Create a deployment manifest

  • You will create a deployment using a sample deployment manifest called nginx-deployment.yaml that has been provided for you. This deployment is configured to run three Pod replicas with a single nginx container in each Pod listening on TCP port 80.
    • Let’s create nginx-deployment.yaml
apiVersion: apps/v1
kind: Deployment
metadata:
  name: nginx-deployment
  labels:
    app: nginx
spec:
  replicas: 3
  selector:
    matchLabels:
      app: nginx
  template:
    metadata:
      labels:
        app: nginx
    spec:
      containers:
      - name: nginx
        image: nginx:1.7.9
        ports:
        - containerPort: 80
  • To deploy your manifest, execute the following command:
~/ak8s/Deployments (your_project_id)$ kubectl apply -f ./nginx-deployment.yaml
  • To view a list of deployments, execute the following command:
~/ak8s/Deployments (your_project_id)$ kubectl get deployments
NAME               READY   UP-TO-DATE   AVAILABLE   AGE
nginx-deployment   3/3     3            3           24s

Step 3.Manually scale up and down the number of Pods in deployments

Sometimes, you want to shut down a Pod instance. Other times, you want ten Pods running. In Kubernetes, you can scale a specific Pod to the desired number of instances. To shut them down, you scale to zero. In this task, you scale Pods up and down in the Google Cloud Console and Cloud Shell.

GCP Kubernetes Engine을 통한 배포(1)

인프런 강의

1줄 요약

  • (GCP) GKE를 활용하여 nginx를 실행해보자.

Step 1. GKE Cluster Setup

  • 네비게이션 메뉴에서 Kubernetes Engine > Clusters를 클릭합니다.

  • 위 화면에서 Create를 클릭합니다.

  • 그 이후에, Cluster 이름은 standard-cluster-1으로 바꾸고, Zone은 us-central1-a로 바꿉니다.

  • 나머지는 모두 Default로 그냥 놔둡니다.

Docker Started using Cloud Build

인프런 강의

1줄 요약

  • (GCP) Cloud Build를 활용하여 Docker를 활용해보자.

Step 1. API Enabled

  • 클라우드 네비게이션 메뉴에서 APIs & Services를 클릭한다.
  • Enable APIs and Services를 클릭한다.
  • Search for APIs & Services에서 Cloud Build를 입력한다.
  • Cloud Build API를 클릭한 후, Enable 버튼을 클릭한다.
  • 뒤로가기 버튼을 클릭한 후, Google Container Registry API 버튼을 클릭한다.

Step 2. Docker File 작성

  • 아래 그림처럼 Activate Cloud Shell를 클릭한다.

Introduction to MLOps

인프런 강의

1줄 요약

  • MLOps를 소개해본다.

What is MLOps?

  • 최근 기술 트렌드 중의 Hot한 주제는 DevOps이다.

    • DevDevelopment의 약어이며, OpsOperation의 약자이다.
    • 과거에는 개발팀과 운영팀 두개로 존재하는 것이 상식이었지만, 가장 큰 문제는 Communication 문제! 이러한 문제점을 해결하기 위해 나온 방법론이 DevOps이다.
  • 이러한 부분은 머신러닝과 딥러닝도 동일함. 즉, 개발자를 위한 배포와 운영이 DevOps라면, 머신러닝 엔지니어를 위해 나온 기술은 MLOps로 볼 수 있다. 자세한 것은 유투브 영상을 통해서 기본적인 개념을 배웠으면 한다.