WSL2

Streamlit와 BigQuery 활용한 배포 (API)

사전학습

실습 순서

  • 서울시 부동산 실거래가를 API 크롤링으로 가져온다.
  • JSON 형태의 데이터를 pandas 데이터프레임으로 변환한다.
  • 데이터프레임을 BigQuery에 전체 데이터를 저장한다.
  • 저장된 데이터프레임을 BigQuery에서 일부 컬럼만 불러온다.

실습 1 - API 크롤링에서 빅쿼리로 데이터 저장

  • .streamlit/secrets.toml 을 열고 아래와 같이 설정한다.
  • seoul_api_key는 서울 열린데이터 광장을 의미한다.
  • gcp_service_account 아래 내용은 api keyjson 파일로 열면 확인할 수 있다.
# .streamlit/secrets.toml
[public_data_api]
seoul_api_key = 'your_api_key'

[gcp_service_account]
type = "service_account"
project_id = "your_project_id"
private_key_id = "your_private_key_id"
private_key = "your_private_key"
client_email = "your_client_email"
client_id = "your_client_id"
auth_uri = "https://accounts.google.com/o/oauth2/auth"
token_uri = "https://oauth2.googleapis.com/token"
auth_provider_x509_cert_url = "https://www.googleapis.com/oauth2/v1/certs"
client_x509_cert_url = "your_client_x509_cert_url"
  • utils.py를 생성하고 아래와 같이 설정을 저장한다.
import streamlit as st
from google.oauth2 import service_account

SERVICE_KEY = st.secrets.public_data_api.seoul_api_key

# Create API client.
credentials = service_account.Credentials.from_service_account_info(
    # Very Important Point
    st.secrets["gcp_service_account"]
)
  • [aptCrawling.py](http://aptCrawling.py) 를 아래와 같이 작성한다.
# -*- coding:utf-8 -*-
import requests
import pandas as pd

# Google Cloud
from google.cloud import bigquery
import pandas_gbq

# API Key Settings
from utils import credentials, SERVICE_KEY
client = bigquery.Client(credentials=credentials)

def aptCrawling(SERVICE_KEY):
    data = None
    for j in range(1,2):
        url = f'http://openapi.seoul.go.kr:8088/{SERVICE_KEY}/json/tbLnOpendataRtmsV/{1+((j-1)*1000)}/{j*1000}'
        print(url)
        req = requests.get(url)
        content = req.json()
        con = content['tbLnOpendataRtmsV']['row']
        result = pd.DataFrame(con)
        data = pd.concat([data, result])
    data = data.reset_index(drop=True)
    data['DEAL_YMD'] = pd.to_datetime(data['DEAL_YMD'], format=("%Y%m%d"))

    return data

def save2BQ(data):
    table_name = "seoul.realestate"
    project_id = "streamlit-dashboard-369600"

    # Save the DataFrame to BigQuery
    pandas_gbq.to_gbq(data,
                      table_name,
                      project_id=project_id, if_exists='replace')

if __name__ == "__main__":
    data = aptCrawling(SERVICE_KEY)
    save2BQ(data)
  • 아래와 같이 실행해보자.
$ python aptCrawling.py
http://openapi.seoul.go.kr:8088/your_api_key/json/tbLnOpendataRtmsV/1/1000
100%|████████████████████████████████████████████████████████████| 1/1 [00:00<?, ?it/s]
  • 이번에는 BigQuery 콘솔에서 확인해본다.

Untitled

Google Clound & WSL2 Ubuntu 20.04 개발환경 설정

개요

  • GCP에서 개발환경을 설정하도록 한다.
  • Local PC에서 GCP로 접속을 하도록 한다.

사전준비

  • WSL2 Ubuntu 설치 과정은 여기에서 다루지 않는다.

Untitled

개발환경 설치

  • Python3 설치한다. (본인에게 맞는 언어를 선택한다)
sudo apt update
sudo apt install -y python3 python3-pip
python3

최신 버전(417.0.1) gcloud CLI 설치

$ sudo apt-get install apt-transport-https ca-certificates gnupg
  • 패키지 소스로 gcloud CLI 배포 URI를 추가합니다. 배포판에서 서명 옵션을 지원하는 경우 다음 명령어를 실행합니다.
$ echo "deb [signed-by=/usr/share/keyrings/cloud.google.gpg] https://packages.cloud.google.com/apt cloud-sdk main" | sudo tee -a /etc/apt/sources.list.d/google-cloud-sdk.list
  • Google Cloud 공개 키를 가져옵니다. 배포판의 apt-key 명령어가 --keyring 인수를 지원하는 경우 다음 명령어를 실행합니다.
$ curl https://packages.cloud.google.com/apt/doc/apt-key.gpg | sudo apt-key --keyring /usr/share/keyrings/cloud.google.gpg add -
  • gcloud CLI를 업데이트하고 설치합니다.
$ sudo apt-get update && sudo apt-get install google-cloud-cli

Shell 재시작 후 설치 확인

  • 다음 명령어를 통해 설치가 정상적으로 되었는지 확인한다.
$ exec -l $SHELL
$ gcloud version
Google Cloud SDK 419.0.0
alpha 2023.02.17
beta 2023.02.17
bq 2.0.85
bundled-python3-unix 3.9.16
core 2023.02.17
gcloud-crc32c 1.0.0
gsutil 5.20

시작하기

  • 시작하려면 [gcloud init](https://cloud.google.com/sdk/gcloud/reference/init?hl=ko)을 실행합니다.
$ gcloud init
Welcome! This command will take you through the configuration of gcloud.

Your current configuration has been set to: [default]

You can skip diagnostics next time by using the following flag:
  gcloud init --skip-diagnostics

Network diagnostic detects and fixes local network connection issues.
Checking network connection...done.                                                                      
Reachability Check passed.
Network diagnostic passed (1/1 checks passed).

You must log in to continue. Would you like to log in (Y/n)?  Y

Go to the following link in your browser:

    https://accounts.google.com/o/oauth2/auth?response_type=...

Enter authorization code: your_code
You are logged in as: [your_email@gmail.com].

Pick cloud project to use: 
 [1] Enter a project ID
 ...
 [2] Create a new project
Please enter numeric choice or text value (must exactly match list item):  

Your current project has been set to: [your_project_name].

...

Some things to try next:

* Run `gcloud --help` to see the Cloud Platform services you can interact with. And run `gcloud help COMMAND` to get help on any gcloud command.
* Run `gcloud topic --help` to learn about advanced features of the SDK like arg files and output formatting
* Run `gcloud cheat-sheet` to see a roster of go-to `gcloud` commands.

WM 설정

  • 아래 화면에서 VM을 선택한다.

Untitled

Docker Installation in Windows

사전 준비

도커 설치

Untitled

  • 관리자 권한으로 실행

Untitled

  • 설치가 완료가 되면 Close and Log Out 버튼이 나오면 클릭하면 윈도우 로그아웃이 진행되기 때문에, 다시 재 로그인을 하도록 한다.
  • 아래 그림 메뉴 우측 상단에 Sign In 버튼을 클릭해 로그인을 한다.

Untitled

  • 도커 Settings 창에 들어가서 아래 그림처럼 변경후 Apply & Restart 버튼을 클릭한다.

Untitled

테스트

  • PowerShell에서 도커 명령어가 실행되는지 확인한다.
PS C:\Users\h> docker ps
CONTAINER ID   IMAGE     COMMAND   CREATED   STATUS    PORTS     NAMES
PS C:\Users\h> docker --version
Docker version 20.10.20, build 9fdeb9c
PS C:\Users\h> wsl -l -v
  NAME                   STATE           VERSION
* Ubuntu                 Running         2
  docker-desktop         Running         2
  docker-desktop-data    Running         2

WSL2 설치 윈도우 10

Step 0. 설정을 통해 Hyper-V 역할 활성화

  • Windows 기능 사용/사용 안 함

Untitled

  • 재부팅을 해야 한다.

Step 1. WSL2 설치 과정

  • Windows PowerShell 관리자로 실행 후 다음 명령어 입력
$ dism.exe /online /enable-feature /featurename:Microsoft-Windows-Subsystem-Linux /all /norestart
$ dism.exe /online /enable-feature /featurename:VirtualMachinePlatform /all /norestart

Untitled

  • Windows Powershell 열고 아래 코드 실행
$ wsl --set-default-version 2
WSL 2와의 주요 차이점에 대한 자세한 내용은 https://aka.ms/wsl2를 참조하세요

마이크로소프트 스토어에서 리눅스 설치

  • 마이크로소프트 스토어(Microsoft Store) 앱을 열고 Ubuntu를 검색한다.

Untitled

AWS 개발환경 설정 - WSL2 & S3 & RDS

개요

  • 윈도우 WSL2에서 AWS 개발을 위한 기본 개발환경 설정을 진행한다.

WSL2 설치

Restart WSL2

  • WSL2 처음 작업할 때, 실행한다.
exec $SHELL

WSL2 주요 필수 패키지 설치

  • Python 3.8 버전을 설치한다.
sudo apt update
sudo apt install software-properties-common
sudo add-apt-repository ppa:deadsnakes/ppa
sudo apt install python3.7
  • Python 버전은 다음과 같다.
$ python3 --version
Python 3.8.10
  • 만약 Python 버전 변경이 안되면 전체 삭제하고 진행한다.

(옵션) Python 삭제

  • 현재 설치된 모든 파이썬 버전을 보여줌
ls /usr/bin/python* 
  • python3 버전과 관련된 모든 파일을 삭제함
sudo apt-get purge --auto-remove python3.8

awsebcli 설치 및 AWS CLI Configuration

  • awscli를 설치한다.
sudo apt install awscli
  • 버전은 다음과 같다.
$ aws --version
aws-cli/1.18.69 Python/3.8.10 Linux/5.10.16.3-microsoft-standard-WSL2 botocore/1.16.19

IAM 사용자 추가

  • AWS 회원가입은 완료된 상태에서 시작한다.

Spark Tutorial - Web UI on WSL

개요

  • 간단하게 Spark Tutorial을 활용하여 Web UI를 가동한다.
  • Spark Submit을 활용한다.

파이썬 가상환경

  • 파이썬 가상환경을 작성한다. (필자의 경로는 pyskt_tutorial)
$ pwd
/mnt/c/hadoop/pyskt_tutorial
  • 가상환경을 생성한다.
evan@evan:/mnt/c/hadoop/pyskt_tutorial$ virtualenv venv
  • 생성된 가상환경에 접속한다.
evan@evan:/mnt/c/hadoop/pyskt_tutorial$ source venv/bin/activate
(venv) evan@evan:/mnt/c/hadoop/pyskt_tutorial$

PySpark 설치

  • pyspark를 설치한다.
(venv) evan@evan:/mnt/c/hadoop/pyskt_tutorial$ pip install pyspark
Requirement already satisfied: pyspark in ./venv/lib/python3.8/site-packages (3.2.1)
Requirement already satisfied: py4j==0.10.9.3 in ./venv/lib/python3.8/site-packages (from pyspark) (0.10.9.3)

데이터 생성

  • 가상의 데이터를 생성한다.
  • 소스파일과 구분 위해 data 폴더를 만든 후, 마크다운 파일을 하나 만들 것이다.
(venv) evan@evan:/mnt/c/hadoop/pyskt_tutorial$ mkdir data && cd data
(venv) evan@evan:/mnt/c/hadoop/pyskt_tutorial/data$ vi README.md
  • README.md 파일에서 영어 텍스트 아무거나 추가한다.
    • 필자는 Spark 설명구문을 추가했다.
This program just counts the number of lines containing ‘a’ and the number containing ‘b’ in a text file. Note that you’ll need to replace YOUR_SPARK_HOME with the location where Spark is installed. As with the Scala and Java examples, we use a SparkSession to create Datasets. For applications that use custom classes or third-party libraries, we can also add code dependencies to spark-submit through its --py-files argument by packaging them into a .zip file (see spark-submit --help for details). SimpleApp is simple enough that we do not need to specify any code dependencies.

We can run this application using the bin/spark-submit script:

SimpleApp.py 작성

  • 다음과 같은 파일을 작성한다.
    • 구체적인 코드 설명은 생략한다.
    • 중요한 코드 중 하나는 input( ) 이다. 사용자가 입력을 하지 않으면 spark 세션은 계속 열린상태로 남게 된다. (일종의 Trick)
from pyspark.sql import SparkSession

logFile = "data/README.md"  # Should be some file on your system
spark = SparkSession.builder.appName("SimpleApp").getOrCreate()
logData = spark.read.text(logFile).cache()

numAs = logData.filter(logData.value.contains('a')).count()
numBs = logData.filter(logData.value.contains('b')).count()

print("Lines with a: %i, lines with b: %i" % (numAs, numBs))

input("Typing....")

spark.stop()

Spark-Submit 제출

(venv) evan@evan:/mnt/c/hadoop/pyskt_tutorial$ $SPARK_HOME/bin/spark-submit --master local[4] /mnt/c/hadoop/pyskt_tutorial/SimpleApp.py
  • 실행하면 아래와 같은 메시지가 뜰 것이다. 이 때, 주소를 복사한다.
    • Using 172.17.233.202 주소를 복사한다. (이는 각 컴퓨터마다 다를 것이다!)

Untitled

WSL2에서의 Spark 설치

개요

  • 간단하게 PySpark를 설치해보는 과정을 작성한다.
  • WSL2 설치 방법은 다루지 않는다.

필수 파일 설치

  • 자바 및 Spark 파일을 설치하도록 한다.
$ sudo apt-get install openjdk-8-jdk
$ sudo wget https://archive.apache.org/dist/spark/spark-3.2.0/spark-3.2.0-bin-hadoop3.2.tgz
$ sudo tar -xvzf spark-3.2.0-bin-hadoop3.2.tgz

.bashrc 파일 수정

  • 필자의 현재 경로는 다음과 같다.
evan@evan:/mnt/c/hadoop$ pwd
/mnt/c/hadoop
  • 설치한 파일은 다음과 같다.
evan@evan:/mnt/c/hadoop$ ls
spark-3.2.0-bin-hadoop3.2  spark-3.2.0-bin-hadoop3.2.tgz
  • vi ~/.bashrc 파일을 열고 다음과 같이 코드를 작성한다.
    • 다른 코드는 만지지 않는다.
    • 가장 맨 마지막으로 내려온다.
export JAVA_HOME=/usr/lib/jvm/java-8-openjdk-amd64
export SPARK_HOME=/mnt/c/hadoop/spark-3.2.0-bin-hadoop3.2
export PATH=$JAVA_HOME/bin:$PATH
export PATH=$SPARK_HOME/sbin:$PATH
export PYSPARK_PYTHON=/usr/bin/python3

테스트

  • pyspark를 실행한다. (경로에 주의한다)
evan@evan:/mnt/c/hadoop/spark-3.2.0-bin-hadoop3.2$ pwd
/mnt/c/hadoop/spark-3.2.0-bin-hadoop3.2
evan@evan:/mnt/c/hadoop/spark-3.2.0-bin-hadoop3.2$ pysaprk
Python 3.8.10 (default, Mar 15 2022, 12:22:08)
[GCC 9.4.0] on linux
Type "help", "copyright", "credits" or "license" for more information.
22/04/19 19:39:57 WARN Utils: Your hostname, evan resolves to a loopback address: 127.0.1.1; using 172.17.233.202 instead (on interface eth0)
22/04/19 19:39:57 WARN Utils: Set SPARK_LOCAL_IP if you need to bind to another address
Using Spark's default log4j profile: org/apache/spark/log4j-defaults.properties
Setting default log level to "WARN".
To adjust logging level use sc.setLogLevel(newLevel). For SparkR, use setLogLevel(newLevel).
22/04/19 19:39:59 WARN NativeCodeLoader: Unable to load native-hadoop library for your platform... using builtin-java classes where applicable
Welcome to
      ____              __
     / __/__  ___ _____/ /__
    _\ \/ _ \/ _ `/ __/  '_/
   /__ / .__/\_,_/_/ /_/\_\   version 3.2.0
      /_/

Using Python version 3.8.10 (default, Mar 15 2022 12:22:08)
Spark context Web UI available at http://172.17.233.202:4040
Spark context available as 'sc' (master = local[*], app id = local-1650364801421).
SparkSession available as 'spark'.
>>> rd = sc.textFile("README.md")
>>> rd.count()
109

참조

Apache NiFi 설치와 설정 in WSL2

설치

  1. wsl2에서 JAVA 설치 한다.
$ sudo apt-get update && sudo apt-get upgrade
$ sudo apt install openjdk-11-jre-headless
$ vi ~/.bash_profile
export JAVA_HOME=/usr/lib/jvm/java-11-openjdk-amd64
  1. curl을 이용해서 NiFi를 현재 경로에 내려받는다.
$ sudo wget https://downloads.apache.org/nifi/1.16.0/nifi-1.16.0-bin.tar.gz
  1. .tar.gz 파일의 압축을 푼다.
$ sudo tar xvzf nifi-1.16.0-bin.tar.gz
  1. 압축파일을 푼 다음에는 cd nifi-1.16.0 폴더에 접속을 한다.
$ cd nifi-1.16.0/bin
  1. ls를 실행해서 nifi-env.sh 파일이 있는지 확인하고 있다면, vi 에디터로 연다.
    1. .bash_profile에서 한 것처럼 동일하게 자바 환경변수를 잡아준다.
$ sudo vi nifi-env.sh
export JAVA_HOME="/usr/lib/jvm/java-11-openjdk-amd64"
  1. 그리고, nifi-env.sh 파일을 실행한다.
$ sudo ./nifi.sh start

Java home: /usr/lib/jvm/java-11-openjdk-amd64
NiFi home: /nifi-1.16.0

Bootstrap Config File: /nifi-1.16.0/conf/bootstrap.conf
  1. webserver 주소를 확인한다.
/nifi-1.16.0/conf$ cd .. 
/nifi-1.16.0/conf$ vi nifi.properties

Untitled

ElasticSearch & Kibana 설치 in WSL2

Step 1. 사전 필수 패키지 설치

  1. 우선 시스템 패키지를 업데이트 하고, HTTPS와 관련된 패키지를 설치한다.
$ sudo apt update
$ sudo apt install apt-transport-https
  1. 자바를 설치한다.
  • 이미 설치가 되어 있다면 버전만 확인한다.
$ sudo apt install openjdk-11-jdk
  • 설치한 버전을 확인한다.
$ java -version
openjdk version "11.0.14.1" 2022-02-08
OpenJDK Runtime Environment (build 11.0.14.1+1-Ubuntu-0ubuntu1.20.04)
OpenJDK 64-Bit Server VM (build 11.0.14.1+1-Ubuntu-0ubuntu1.20.04, mixed mode, sharing)
  1. 자바 환경 변수를 설정하기 위해 아래와 같이 에디터를 입력한다.
$ sudo vi /etc/environment
  • 그리고 아래와 같이 추가한다.
JAVA_HOME="/usr/lib/jvm/java-11-openjdk-amd64"
  • 환경변수를 업데이트 한다.
$ source /etc/environment
  • 실제 경로가 나오는지 확인한다.
$ echo $JAVA_HOME
/usr/lib/jvm/java-11-openjdk-amd64

Step 2. ElasticSearch 설치

  • GPG Keys를 확인하여 설치를 진행한다.
$ wget -qO - https://artifacts.elastic.co/GPG-KEY-elasticsearch | sudo apt-key add -
OK
  • 라이브러리를 아래와 같이 추가한다.
$ sudo sh -c 'echo "deb https://artifacts.elastic.co/packages/7.x/apt stable main" > /etc/apt/sources.list.d/elastic-7.x.list'
  • 이제 elasticsearch를 설치한다.
$ sudo apt-get update
Hit:1 https://artifacts.elastic.co/packages/7.x/apt stable InRelease
Hit:2 http://security.ubuntu.com/ubuntu focal-security InRelease
Hit:3 http://archive.ubuntu.com/ubuntu focal InRelease
Hit:4 http://archive.ubuntu.com/ubuntu focal-updates InRelease
Hit:5 http://archive.ubuntu.com/ubuntu focal-backports InRelease
Reading package lists... Done
$ sudo apt-get install elasticsearch
Reading package lists... Done
Building dependency tree
Reading state information... Done
The following NEW packages will be installed:
  elasticsearch
0 upgraded, 1 newly installed, 0 to remove and 0 not upgraded.
Need to get 312 MB of archives.
After this operation, 517 MB of additional disk space will be used.
Get:1 https://artifacts.elastic.co/packages/7.x/apt stable/main amd64 elasticsearch amd64 7.17.2 [312 MB]
Fetched 312 MB in 8s (40.9 MB/s)
Selecting previously unselected package elasticsearch.
(Reading database ... 32942 files and directories currently installed.)
Preparing to unpack .../elasticsearch_7.17.2_amd64.deb ...
Creating elasticsearch group... OK
Creating elasticsearch user... OK
Unpacking elasticsearch (7.17.2) ...
Setting up elasticsearch (7.17.2) ...
### NOT starting on installation, please execute the following statements to configure elasticsearch service to start automatically using systemd
 sudo systemctl daemon-reload
 sudo systemctl enable elasticsearch.service
### You can start elasticsearch service by executing
 sudo systemctl start elasticsearch.service
warning: usage of JAVA_HOME is deprecated, use ES_JAVA_HOME
Created elasticsearch keystore in /etc/elasticsearch/elasticsearch.keystore
Processing triggers for systemd (245.4-4ubuntu3.15) ...

Step 3. Elasticsearch 서비스 시작

  • 이번에는 elasticsearch 서비스를 시작한다.
$ sudo systemctl start elasticsearch
System has not been booted with systemd as init system (PID 1). 
Can't operate. Failed to connect to bus: Host is down
  • 다음 명령어를 추가한다.
$ sudo -b unshare --pid --fork --mount-proc /lib/systemd/systemd --system-unit=basic.target
$ sudo -E nsenter --all -t $(pgrep -xo systemd) runuser -P -l $USER -c "exec $SHELL"
  • 서비스가 가능하도록 한다.
$ sudo systemctl enable elasticsearch
Synchronizing state of elasticsearch.service with SysV service script with /lib/systemd/systemd-sysv-install.
Executing: /lib/systemd/systemd-sysv-install enable elasticsearch
Created symlink /etc/systemd/system/multi-user.target.wants/elasticsearch.service → /lib/systemd/system/elasticsearch.service.
  • 서비스를 시작한다.
$ sudo systemctl start elasticsearch
  • 실제 서비스가 작동하는지 확인한다.
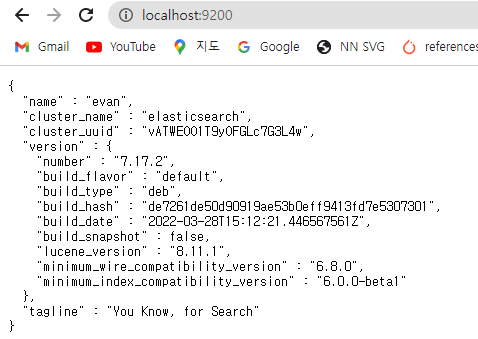
$ curl -X GET "localhost:9200/"
{
  "name" : "evan",
  "cluster_name" : "elasticsearch",
  "cluster_uuid" : "vATWEOO1T9yOFGLc7G3L4w",
  "version" : {
    "number" : "7.17.2",
    "build_flavor" : "default",
    "build_type" : "deb",
    "build_hash" : "de7261de50d90919ae53b0eff9413fd7e5307301",
    "build_date" : "2022-03-28T15:12:21.446567561Z",
    "build_snapshot" : false,
    "lucene_version" : "8.11.1",
    "minimum_wire_compatibility_version" : "6.8.0",
    "minimum_index_compatibility_version" : "6.0.0-beta1"
  },
  "tagline" : "You Know, for Search"
}
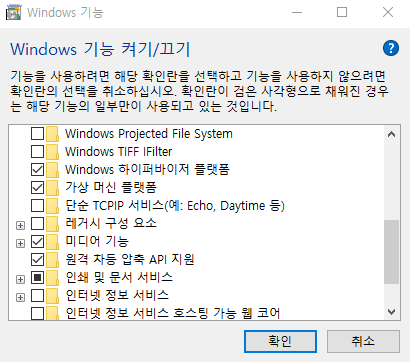
  • 만약 위와 같은 메시지가 뜨면, 윈도우 화면에서 재 확인해본다.

Untitled

PostgreSQL Installation on WSL2 and Windows

개요

  • WSL2에서 PostgreSQL을 설치한다.
  • pgAdmin은 Windows에 설치한다.

터미널 업그레이드

  • 먼저 WSL 터미널을 열고, Ubuntu 패키지를 모두 업데이트 및 업그레이드를 한다.
$ sudo apt update
[sudo] password for evan:
Hit:1 https://artifacts.elastic.co/packages/7.x/apt stable InRelease
Get:2 http://security.ubuntu.com/ubuntu focal-security InRelease [114 kB]
Hit:3 http://archive.ubuntu.com/ubuntu focal InRelease
Get:4 http://archive.ubuntu.com/ubuntu focal-updates InRelease [114 kB]
Get:5 http://archive.ubuntu.com/ubuntu focal-backports InRelease [108 kB]
Get:6 http://archive.ubuntu.com/ubuntu focal-updates/main amd64 Packages [1712 kB]
Get:7 http://archive.ubuntu.com/ubuntu focal-updates/universe amd64 Packages [916 kB]
Fetched 2963 kB in 5s (600 kB/s)
Reading package lists... Done
Building dependency tree
Reading state information... Done
All packages are up to date.
  • 이번에는 업그레이드를 해본다.
$ sudo apt-get upgrade
Reading package lists... Done
Building dependency tree
Reading state information... Done
Calculating upgrade... Done
0 upgraded, 0 newly installed, 0 to remove and 0 not upgraded.

PostgreSQL Installation in WSL2

  • 이번에는 WSL2에서 PostgreSQL을 설치한다. 설치가 종료되면, 반드시 버전을 확인한다.
$ sudo apt install postgresql postgresql-contrib
$ psql --version
psql (PostgreSQL) 12.9 (Ubuntu 12.9-0ubuntu0.20.04.1)
  • 설치 이후에는 Database를 접근가능하도록 활성화해야 한다.
    • 포트가 활성화 되어 있지 않다면 아래와 같은 메시지가 나타날 것이다.
$ sudo service postgresql status
12/main (port 5432): down
  • 이번에는 활성화를 해보도록 한다. 온라인이라는 메시지가 나타난다면 활성화가 되었다는 것을 의미한다.
$ sudo service postgresql start
 * Starting PostgreSQL 12 database server
$ sudo service postgresql status
12/main (port 5432): online
  • 이번에는 활성화된 데이터베이스를 종료시킨다.
$ sudo service postgresql stop
 * Stopping PostgreSQL 12 database server                                                                        [ OK ]
$ sudo service postgresql status
12/main (port 5432): down

사용자 계정 Password 설정

  • 기본적으로 admin 사용자로 등록이 되어 있다. 보통 DB 초기 세팅 시에는 패스워드를 입력받아야 한다. (예: evan)
$ sudo passwd postgres
New password:
Retype new password:
passwd: password updated successfully
  • 여기까지 했다면, WSL2에서 추가로 설정할 것은 더 없다.

pgAdmin Installation on Windows

Untitled