Connecting Jupyter Notebook to VS Code
I. 개요
VS Code에 Jupyter Notebook을 연동해본다. 강사는 R & Python을 연동해서 작업할 일이 많다. 특히 블로그를 쓰다보면 더욱 그러한 일이 많은데, IDE가 많으면 많을수록 무언가 복잡스러워 보일 때가 많다. 이 때 좀 더 효율적으로 일하고자 하는 마음에 VS Code에 Jupyter Notebook을 추가 및 연동하는 작업을 진행해본다.
II. Installation
내용의 간결화를 위해, VS Code 및 Jupyter Notebook 설치 방법은 본 포스트에서는 생략한다.
VS Code설치방법: https://code.visualstudio.com/downloadJupyter Notebook설치 방법: https://jupyter.org/install
III. VS Code에서 Jupyter Notebook 접속
Python이 VS Code Extension에서 설치가 완료된 것을 전제로 한다. 이 부분 역시, 아래 참고자료를 활용한다.
- Python Extension for Visual Studio Code: https://marketplace.visualstudio.com/items?itemName=ms-python.python
(1) Jupyter URL 복사하기
터미널에서 아래와 같은 명령어를 입력하여 Jupyter Notebook을 실행하여 URL을 복사한다.
$ jupyter notebook
[I 00:36:59.316 NotebookApp] Serving notebooks from local directory: /Users/jihoonjung
[I 00:36:59.316 NotebookApp] The Jupyter Notebook is running at:
[I 00:36:59.316 NotebookApp] http://localhost:8888/?token=e68982d0305b30d52228ef811c3bd08c1c6b8ed0a8a351e0
[I 00:36:59.316 NotebookApp]  or http://127.0.0.1:8888/?token=e68982d0305b30d52228ef811c3bd08c1c6b8ed0a8a351e0
[I 00:36:59.316 NotebookApp] Use Control-C to stop this server and shut down all kernels (twice to skip confirmation).
[C 00:36:59.323 NotebookApp]

    To access the notebook, open this file in a browser:
        file:///Users/jihoonjung/Library/Jupyter/runtime/nbserver-22060-open.html
    Or copy and paste one of these URLs:
        http://localhost:8888/?token=e68982d0305b30d52228ef811c3bd08c1c6b8ed0a8a351e0
     or http://127.0.0.1:8888/?token=e68982d0305b30d52228ef811c3bd08c1c6b8ed0a8a351e0
위와 같은 소스코드가 나오는 것을 확인할 수 있다. 여기에서 http://127.0.0.1:8888/?token=e68982d0305b30d52228ef811c3bd08c1c6b8ed0a8a351e0 URL을 복사한다.
(2) VSCode에서 Token 입력
복사한 URL을 붙여넣기 위해 아래 메뉴 순서대로 클릭한다.
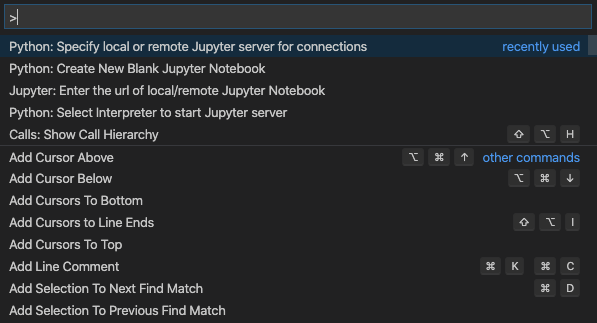
[View] - [Command Palette] 클릭하면 아래와 같은 이미지가 나올 것이다.

위 화면 활성화를 위한 단축키는 아래와 같다.
- Windows: Ctrl + Shift + P
- MacOS: Command + Shift + P
다양한 메뉴 중에서 (MacOS 기준) Python: Specify local or remote Jupyter server for connections를 클릭하면 아래와 같은 이미지가 나타날 것이다.

여기에서 Existing(Specify the URI of an existing server를 클릭한 후, 복사한 URL을 붙여넣기 하면 VS Code에서도 이제 정상적으로 Jupyter Notebook을 사용할 수 있다.
V. Reference
- Working with Jupyter Notebooks in Visual Studio Code: https://code.visualstudio.com/docs/python/jupyter-support 에서
Connect to a remote Jupyter Server참조.
