Colab + Drive + Github Workflow
공지
제 수업을 듣는 사람들이 계속적으로 실습할 수 있도록 강의 파일을 만들었습니다. 늘 도움이 되기를 바라며. 참고했던 교재 및 Reference는 꼭 확인하셔서 교재 구매 또는 관련 Reference를 확인하시기를 바랍니다.
I. 동기 부여 및 개요
-
Google Colab을 알게 된 이후에, 모든 파일을 가급적 여기에서 작성을 한다. -
Why?
- 첫째,
GPU를 무료로 사용할 수 있다. - 둘째, 맥북에어의 저용량을 쓰는 나에게 있어, 시스템 파일 등을
Local로 내려받는데 버거움이 있다. - 셋째, 온라인 강의 및 책을 협업해서 써야 하는데, 각
Local환경을 구축하는 번거로움을 없애고 싶었다. - 마지막으로, 파일 공유가 가능하다.
- 첫째,
-
문제는
Google Colab+Drive+Github로 연동하여 소스파일을 관리해야 하는 시점이 도래했다. -
주 목적은
Google Colab을 향후에 팀 프로젝트로 연결하고자 하는 준비 차원에서 작성을 해본다.

II. 기존 방식 - Google Colab with Github
- 기존에는 [파일]-[Github에 사본저장]을 클릭하여 조금은 수동으로 파일을 저장하고 있었다.

- 그런데, 가끔 파일을 다른
repo에 저장하는 등의 실수(mistake)를 저지르기도 하여, 불필요한 작업을 수행하였다. 삭제하는 것이 어려운 것은 아니나, 가끔 있어야 하는 파일이 없을 때, 조금 황당하기도 했다. - 이제, 본격적으로
프로젝트 폴더단위로github와 연동하는 작업을 수행하고,Drive에 이를 반영하도록 하자.
III. 업무 개선 - Colab with Drive
- 각종 경진대회에 나가는
repo를 하나 만들었다. - 그
repo는 그대로Drive로 내려받는데,colab을 이용한다.
(1) Mount Google Drive to Google Colab
구글 드라이브(Drive)를구글 코랩(Colab)에mount하기 위해 아래 코드를 작성한다.- 이 때
authorization code가 활성화 되는데, 인증을 진행한다.
# Mount Google Drive
from google.colab import drive # import drive from google colab

ROOT = "/content/drive"     # default location for the drive
print(ROOT)                 # print content of ROOT (Optional)
drive.mount(ROOT)           # we mount the google drive at /content/drive
/content/drive
Go to this URL in a browser: https://accounts.google.com/o/oauth2/auth?client_id=947318989803-6bn6qk8qdgf4n4g3pfee6491hc0brc4i.apps.googleusercontent.com&redirect_uri=urn%3aietf%3awg%3aoauth%3a2.0%3aoob&response_type=code&scope=email%20https%3a%2f%2fwww.googleapis.com%2fauth%2fdocs.test%20https%3a%2f%2fwww.googleapis.com%2fauth%2fdrive%20https%3a%2f%2fwww.googleapis.com%2fauth%2fdrive.photos.readonly%20https%3a%2f%2fwww.googleapis.com%2fauth%2fpeopleapi.readonly

Enter your authorization code:
··········
Mounted at /content/drive
Mounted at /content/drive결과값이 나오면 성공적으로Google Drive가mount가 되었다는 뜻이다.- 간단하게
CLI(=Command-Line Interface)을 활용하여 현재 경로를 확인한다.
%pwd
'/content'
%ls
[0m[01;34mdrive[0m/ [01;34msample_data[0m/
%cd drive/'My Drive'/'Colab Notebooks'
/content/drive/My Drive/Colab Notebooks
%ls
'Colaboratory에 오신 것을 환영합니다의 사본' [0m[01;34mpython_edu[0m/
'colab_package_settings.ipynb의 사본' tempMelonData.ipynb
[01;34mcompetition_temp[0m/ Untitled0.ipynb
[01;34mdeeplearningAI[0m/ Untitled1.ipynb
[01;34mgcp_tutorial[0m/ Untitled2.ipynb
[01;34mimg[0m/ Untitled3.ipynb
melonData.ipynb [01;34m'카카오X멜론 공모전'[0m[K/
[01;34mpkg_folders[0m/
IV. 업무 개선 - Clone Github Repo to Google Drive
- 우선 깃허브에서
competition이라는Repo를 사전에 만들었다. (이 부분은 안다는 것으로 전제한다!)- 만약, 처음
Github를 접한다면, 댓글을 남겨주실 것을 권한다.
- 만약, 처음
- 필자는
Colab Notebooks폴더 안에competiton라는repo를 다운로드 받을 것이다. - 이 때, 아래 4개의 변수를
script에 저장할 필요가 있다.- GIT_TOKEN (GitHub Access Token)
- MY_GOOGLE_DRIVE_PATH
- GIT_USERNAME
- GIT_REPOSITORY
(1) 깃허브 Access Token
-
[Profile]-[Settings]-[Developer settings]-[Personal Access tokens] 순서대로 클릭한다.
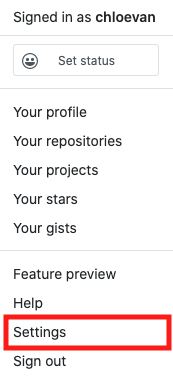
-
이 때, 꼭 아래 그림처럼
repo를 클릭한다.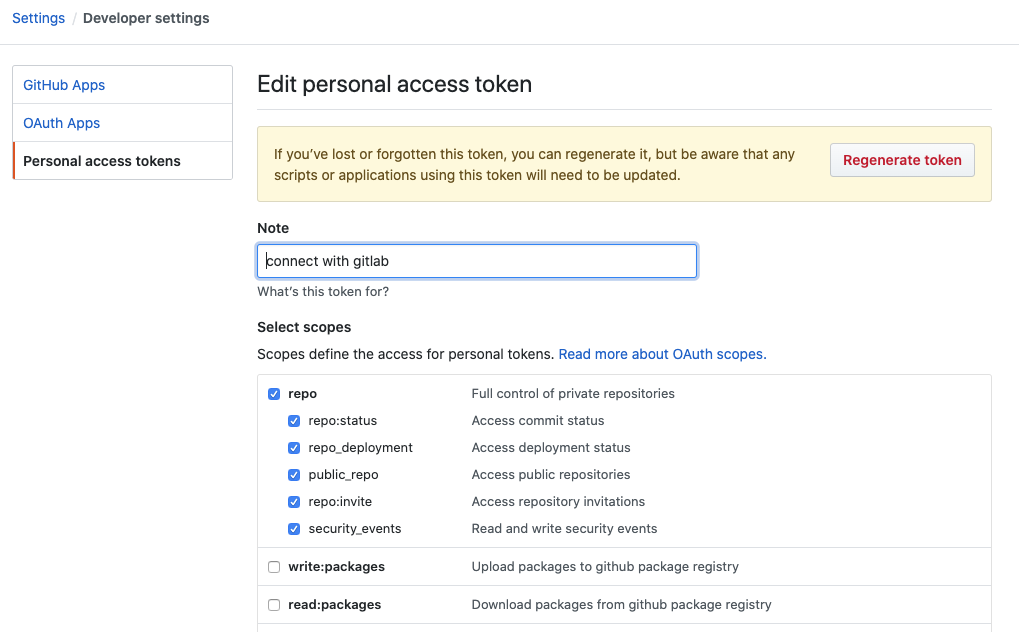
(2) 4가지 변수 할당
- 소스 코드 작성 전, 몇가지 주의사항이 있다.
- 첫째, 구글 드라이브와 경로에 해당하는 폴더 명과 깃허브의
repo명을 통일시킨다 (필자는competition으로 통일함). - 이 때 한가지 주의점은
Access Token은 외부로 유출시키지 않는다.
- 첫째, 구글 드라이브와 경로에 해당하는 폴더 명과 깃허브의
%pwd
'/content/drive/My Drive/Colab Notebooks'
# Clone github repository setup
# import join used to join ROOT path and MY_GOOGLE_DRIVE_PATH
from os.path import join

# path to your project on Google Drive
MY_GOOGLE_DRIVE_PATH = 'My Drive/Colab Notebooks/'

# replace with your github username
GIT_USERNAME = "chloevan"

# definitely replace with your
GIT_TOKEN = "your_token"

# Replace with your github repository in this case we want
# to clone deep-learning-v2-pytorch repository
GIT_REPOSITORY = "competition"

PROJECT_PATH = join(ROOT, MY_GOOGLE_DRIVE_PATH)

# It's good to print out the value if you are not sure
print("PROJECT_PATH: ", PROJECT_PATH)

# In case we haven't created the folder already; we will create a folder in the project path
# !mkdir "{PROJECT_PATH}"

#GIT_PATH = "https://{GIT_TOKEN}@github.com/{GIT_USERNAME}/{GIT_REPOSITORY}.git" this return 400 Bad Request for me
GIT_PATH = "https://" + GIT_TOKEN + "@github.com/" + GIT_USERNAME + "/" + GIT_REPOSITORY + ".git"
print("GIT_PATH: ", GIT_PATH)
PROJECT_PATH:  /content/drive/My Drive/Colab Notebooks/
GIT_PATH:  https://your_token@github.com/chloevan/competition.git
(2) 깃허브 연동 두가지 옵션
- 여기에서 고려해야 할 사항은 구글 드라이브내 이미 존재하는 파일과 합치는 부분이 있다.
- 아래 코드를 확인해보자.
!git clone "{GIT_PATH}" ./temp      # clone github repository to temp folder
!mv ./temp/* "{PROJECT_PATH}"       # move all files/folders in temp folder to folder defined in project path
!rm -rf ./temp                      # remove all the files/folders in temp folder
!rsync -aP --exclude=data/ "{PROJECT_PATH}"/*  ./   # use remote sync to copy from google drive to local runtime google colab
                                                    # but exclude data folder
                                                    # https://www.computerhope.com/unix/rsync.htm
-
첫번째라인의 코드는 깃허브
repo를 드라이브 내temp폴더에 저장한다. -
두번째라인의 코드는
temp폴더의 모든 파일을{PROJECT_PATH}에 잘라넣기 한다. -
세번째라인의 코드는 기존
temp를 삭제 한다. -
네번째라인의 코드는 큰 용량을 차지하는
data와 같은 부분은 제외한다는 뜻이다. (이 부분은 별도의 에러를 경험해야 필요성을 알 수 있을 것 같다!) -
여기에서는 간단하게
!git clone을 실행한다.
%cd "{PROJECT_PATH}"
!git clone "{GIT_PATH}"
/content/drive/My Drive/Colab Notebooks
Cloning into 'competition'...
remote: Enumerating objects: 7, done.[K
remote: Counting objects: 100% (7/7), done.[K
remote: Compressing objects: 100% (4/4), done.[K
remote: Total 7 (delta 0), reused 0 (delta 0), pack-reused 0[K
Unpacking objects: 100% (7/7), done.
- 에러가 없다면, 정상적으로
git clone이 수행된 것이다. - 이 때, 구글 드라이브 내
competition폴더에서.git폴더가 생성되었는지 확인한다.
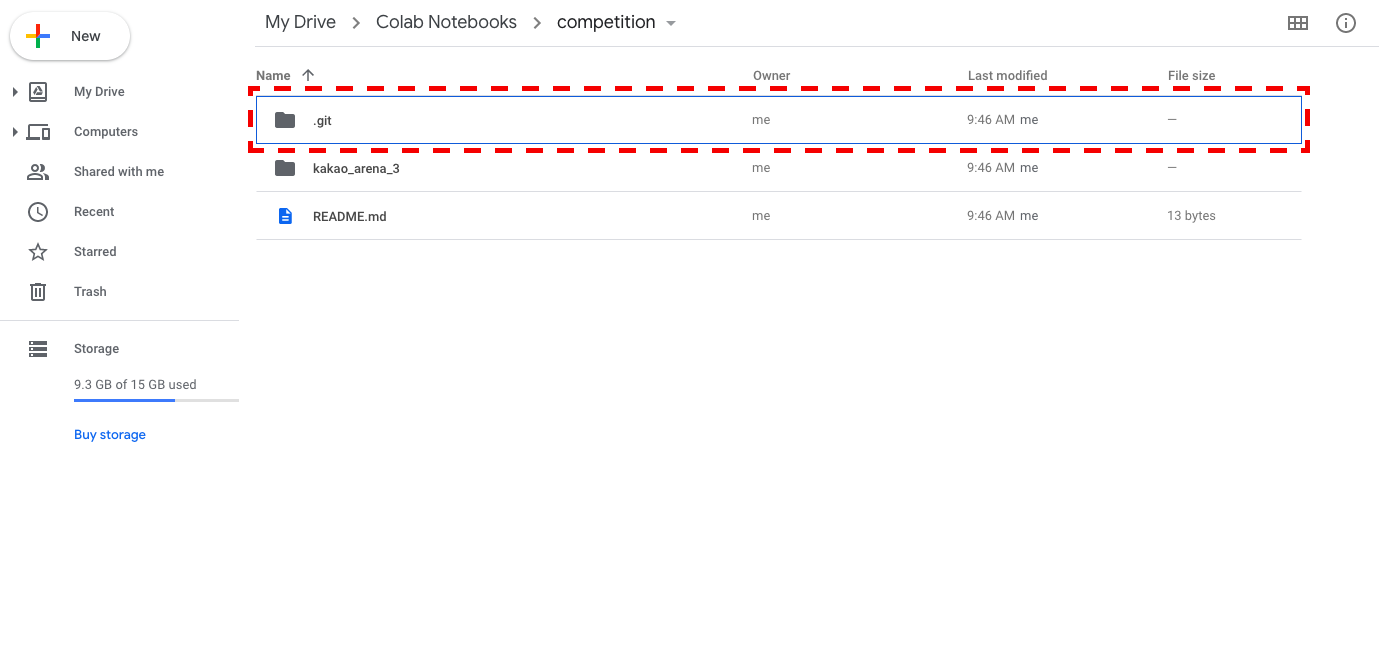
(3) 폴더 정보 확인
git clone을 통해서 파일을 내려받았다면, 간단한 명령어로 폴더를 탐색한다.- 이 때
git branch를 실행하면master folder외에 어떤branch들이 있는지 확인이 가능하다.
%pwd
'/content/drive/My Drive/Colab Notebooks'
%cd competition/
/content/drive/My Drive/Colab Notebooks/competition
!git branch
* [32mmaster[m
!git checkout master
Already on 'master'
Your branch is up to date with 'origin/master'.
!git status
On branch master
Your branch is up to date with 'origin/master'.

nothing to commit, working tree clean
V. 파일 추가 및 업데이트
- 이제 위
competition에 참가하기 위한 기본 파일들을kakao_arena_3에 저장한다.- 위 부분은 터미널 명령어가 약하다면 구글 드라이브에서 직접 실행해도 상관없다.
(1) 파일 추가 및 깃허브 업데이트
- 간단한게 현재 경로의 파일을 확인하고 소스코드를 작성한다.
!apt-get install tree
!tree
Reading package lists... Done
Building dependency tree
Reading state information... Done
The following NEW packages will be installed:
  tree
0 upgraded, 1 newly installed, 0 to remove and 31 not upgraded.
Need to get 40.7 kB of archives.
After this operation, 105 kB of additional disk space will be used.
Get:1 http://archive.ubuntu.com/ubuntu bionic/universe amd64 tree amd64 1.7.0-5 [40.7 kB]
Fetched 40.7 kB in 0s (117 kB/s)
Selecting previously unselected package tree.
(Reading database ... 144433 files and directories currently installed.)
Preparing to unpack .../tree_1.7.0-5_amd64.deb ...
Unpacking tree (1.7.0-5) ...
Setting up tree (1.7.0-5) ...
Processing triggers for man-db (2.8.3-2ubuntu0.1) ...
.
├── kakao_arena_3
│   └── README.md
└── README.md

1 directory, 2 files
!tree가 실행되지 않는다면, 다음 해당 패키지를 다음 코드 셀에서 다음 명령어를 입력 후 실행한다.
!apt-get install tree
source폴더에 아무것도 없기 때문에,temp.ipynb파일 생성 후 저장한다.
!tree
.
├── kakao_arena_3
│   ├── README.md
│   └── source
│       └── temp.ipynb
└── README.md

2 directories, 3 files
- 추가된 파일을 확인 후 깃허브에 파일을 저장해보자.
# Add / track changed files
!git add .
# Linked to account
!git config --global user.email "your_email_address"
!git config --global user.name "your_name"

# commit the changes
!git commit -m "create temp file"
[master dc8af91] create temp file
 1 file changed, 1 insertion(+)
 create mode 100644 kakao_arena_3/source/temp.ipynb
# push the changes to github repo
!git push
Counting objects: 5, done.
Delta compression using up to 2 threads.
Compressing objects: 100% (4/4), done.
Writing objects: 100% (5/5), 653 bytes | 163.00 KiB/s, done.
Total 5 (delta 0), reused 0 (delta 0)
To https://github.com/chloevan/competition.git
   04ca27a..dc8af91  master -> master
- 생성된 파일이 깃허브에 잘 올라갔는지 학인해보자.
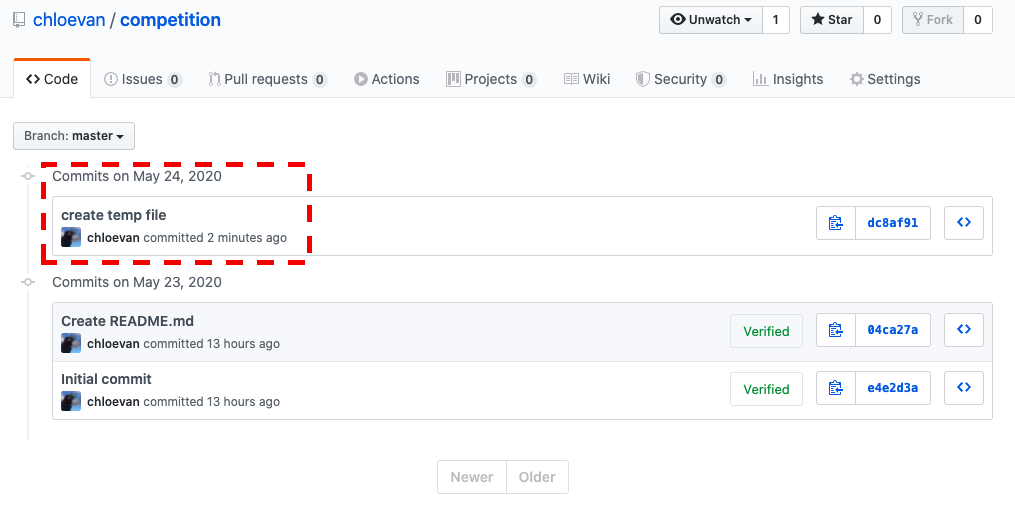
(2) .gitignore 파일 작성
-
Project에 원하지 않는백업 File이나로그 File, 혹은 컴파일 된 파일들을 Git에서 제외시킬수 있는 설정 File이다. -
여기에서는
.json을 모두 제외할 예정이다.- 첫째, 100MB 이상의 데이터를 굳이
github에 올릴 필요는 없다. - 둘째, 구글 드라이브에 데이터를 올려놓고 그대로 불러와서 사용하는 방법을 택하고 있다.
- 첫째, 100MB 이상의 데이터를 굳이
-
.gitignore파일은 구글 드라이브에서 만드는 것 보다는 직접 깃허브에서 만들도록 하자. -
이 때,
.gitignore의 파일 위치는 프로젝트의 최상위 경로에 위치해야 한다.
# exclude json file
*.json
- 이제
git pull로 다시 드라이브 내 파일을 업데이트 한다.
!git pull
(3) 데이터 파일 및 폰트 파일 업데이트
- 다운로드 받은 데이터와 폰트 파일을 프로젝트 폴더에 업데이트 한다.
!tree
.
├── kakao_arena_3
│   ├── data
│   │   ├── genre_gn_all.json
│   │   ├── song_meta.json
│   │   ├── test.json
│   │   ├── train.json
│   │   └── val.json
│   ├── README.md
│   ├── settings
│   │   └── NanumGothic.ttf
│   └── source
│       ├── temp2.ipynb
│       └── temp.ipynb
└── README.md

4 directories, 10 files
- 이제
json파일은 업데이트 되지 않지만,NanumGothic.ttf파일은 업데이트 될 것이다.
!git add .
!git commit -m "font updated excluded data"
!git push origin master
[master 7d45fd3] font updated excluded data
2 files changed, 0 insertions(+), 0 deletions(-)
create mode 100644 kakao_arena_3/settings/NanumGothic.ttf
rename kakao_arena_3/source/{Copy of temp.ipynb => temp2.ipynb} (100%)
Counting objects: 6, done.
Delta compression using up to 2 threads.
Compressing objects: 100% (5/5), done.
Writing objects: 100% (6/6), 2.28 MiB | 4.40 MiB/s, done.
Total 6 (delta 1), reused 0 (delta 0)
remote: Resolving deltas: 100% (1/1), completed with 1 local object.
To https://github.com/chloevan/competition.git
  b6c954c..7d45fd3  master -> master
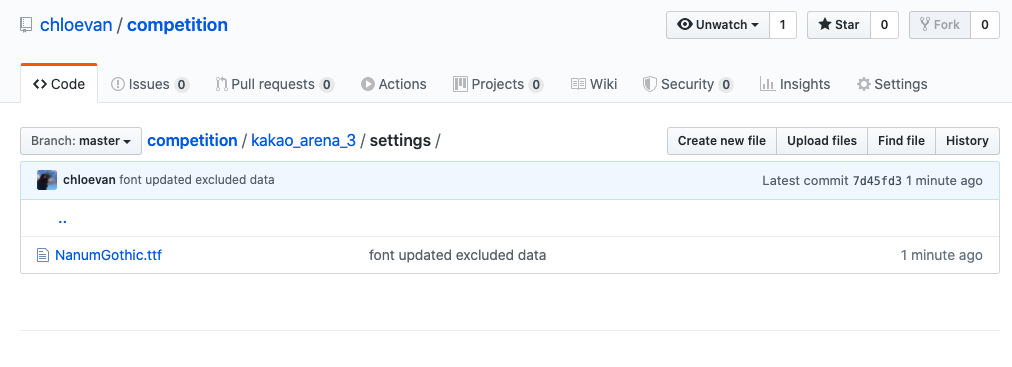
json파일을 제외한 폰트 파일은 업데이트 되었는지github에서 확인해본다.
VI. Final Test
- 새로운 노트북을 열고 이제 마지막 테스트를 진행해본다.
- 파일명은
kakao_arena_3_eda이라고 지정했다. - 결과 파일은 다음 게시글에서 확인한다.
Reference
Say, V. (2020, January 01). Google Drive + Google Colab + GitHub; Don’t Just Read, Do It! Retrieved May 24, 2020, from https://towardsdatascience.com/google-drive-google-colab-github-dont-just-read-do-it-5554d5824228
Żero, O. (2019, October 30). Colaboratory + Drive + Github - the workflow made simpler. Retrieved May 24, 2020, from https://towardsdatascience.com/colaboratory-drive-github-the-workflow-made-simpler-bde89fba8a39
