M1 tensorflow Test Preview
Page content
개요
- M1에서
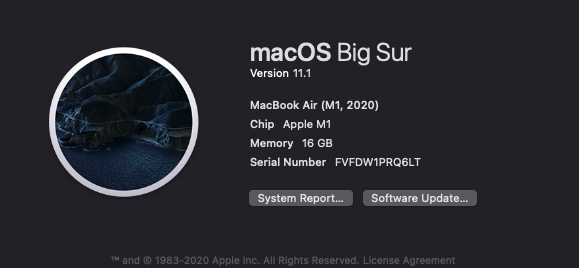
Tensorflow테스트를 진행해본다.- 현재 M1 시스템 환경은 아래와 같다. (2021-01-16)

- 현재 M1 시스템 환경은 아래와 같다. (2021-01-16)
주의: 텐서플로 공식 버전은 아님
라이브러리 설치
- 다음 코드를 설치해본다.
- Apple 공식 Repo: https://github.com/apple/tensorflow_macos
- 실행 전, 필수 체크 사항
- macOS 11.0+
- Python 3.8, available from the Xcode Command Line Tools
$ /bin/bash -c "$(curl -fsSL https://raw.githubusercontent.com/apple/tensorflow_macos/master/scripts/download_and_install.sh)"
Installation script for pre-release tensorflow_macos 0.1alpha1.  Please visit https://github.com/apple/tensorflow_macos
for instructions and license information.

This script will download tensorflow_macos 0.1alpha1 and needed binary dependencies, then install them into a new
or existing Python 3.8 virtual enviornoment.
Continue [y/N]?
-
위 질문이 나오면 y 입력한다.

-
설치가 완료가 된 뒤에는 가상환경 설정을 물어본다.
Path to new or existing virtual environment [default: /Users/your_id/tensorflow_macos_venv/]:
- 일단, Test를 진행하는 것이니
Default로 설정한다.- 경로에 유의하면서, Enter를 누른다.
./install_venv.sh will perform the following operations:
-> Create new python 3.8 virtual environment at /Users/evan/tensorflow_macos_venv.
-> Install tensorflow_macos 0.1a1 into created virtual environment /Users/evan/tensorflow_macos_venv.
-> Install bundled binary wheels for numpy-1.18.5, grpcio-1.33.2, h5py-2.10.0, scipy-1.5.4, tensorflow_addons-0.11.2+mlcompute into /Users/evan/tensorflow_macos_venv.

Confirm[y/N]?
- 위 질문이 나오면
y를 누른다.- 정상적으로 설치가 완료가 된다면, 아래와 같은 문구가 나올 것이다.
TensorFlow and TensorFlow Addons with ML Compute for macOS 11.0 successfully installed.
To begin, activate the virtual environment:
   . "/Users/your_id/tensorflow_macos_venv/bin/activate"
- (Option) 패키지 설치를 진행하면, 중간에 WARNING 메시지가 나온다.
.
.
.
Successfully installed tensorflow-macos-0.1a1
WARNING: You are using pip version 20.2.4; however, version 20.3.3 is available.
You should consider upgrading via the '/Users/your_id/tensorflow_macos_venv/bin/python3 -m pip install --upgrade pip' command.
.
.
.
- 위 메시지를 찾아서 복사 한 후, 터미널에 붙여서 실행한다.
$ /Users/your_id/tensorflow_macos_venv/bin/python3 -m pip install --upgrade pip
- 이제, 가상환경을 활성화 한다.
$ . /Users/your_id/tensorflow_macos_venv/bin/activate
(tensorflow_macos_venv) your_name-MacBook-Air-2:blog your_id$
- 위와 같이 (tensorflow_macos_venv)가 활성화되었다면 설정은 끝이 난 것이다.
간단한 텐서플로 테스트
- 이제 텐서플로가 제대로 실행되는지 확인하는 코드를 짜보도록 한다.
- 필자는 PyCharm에서
.py형태로 구현한 뒤, 터미널에서 실행하였다.- 필자의 파일은
m1_tensorflow.py에서 구동하였다. - 소스코드 출처: https://github.com/apple/tensorflow_macos/issues/7
- 필자의 파일은
import tensorflow as tf
print(tf.__version__)

from tensorflow.python.framework.ops import disable_eager_execution
disable_eager_execution()

from tensorflow.python.compiler.mlcompute import mlcompute
mlcompute.set_mlc_device(device_name='gpu')

import time

import tensorflow.compat.v2 as tf
import tensorflow_datasets as tfds

tf.enable_v2_behavior()

from tensorflow.python.framework.ops import disable_eager_execution
disable_eager_execution()

from tensorflow.python.compiler.mlcompute import mlcompute
mlcompute.set_mlc_device(device_name='gpu')

(ds_train, ds_test), ds_info = tfds.load(
    'mnist',
    split=['train', 'test'],
    shuffle_files=True,
    as_supervised=True,
    with_info=True,
)

def normalize_img(image, label):
  """Normalizes images: `uint8` -> `float32`."""
  return tf.cast(image, tf.float32) / 255., label

batch_size = 128

ds_train = ds_train.map(
    normalize_img, num_parallel_calls=tf.data.experimental.AUTOTUNE)
ds_train = ds_train.cache()
ds_train = ds_train.shuffle(ds_info.splits['train'].num_examples)
ds_train = ds_train.batch(batch_size)
ds_train = ds_train.prefetch(tf.data.experimental.AUTOTUNE)


ds_test = ds_test.map(
    normalize_img, num_parallel_calls=tf.data.experimental.AUTOTUNE)
ds_test = ds_test.batch(batch_size)
ds_test = ds_test.cache()
ds_test = ds_test.prefetch(tf.data.experimental.AUTOTUNE)


model = tf.keras.models.Sequential([
  tf.keras.layers.Conv2D(32, kernel_size=(3, 3),
                 activation='relu'),
  tf.keras.layers.Conv2D(64, kernel_size=(3, 3),
                 activation='relu'),
  tf.keras.layers.MaxPooling2D(pool_size=(2, 2)),
#   tf.keras.layers.Dropout(0.25),
  tf.keras.layers.Flatten(),
  tf.keras.layers.Dense(128, activation='relu'),
#   tf.keras.layers.Dropout(0.5),
  tf.keras.layers.Dense(10, activation='softmax')
])
model.compile(
    loss='sparse_categorical_crossentropy',
    optimizer=tf.keras.optimizers.Adam(0.001),
    metrics=['accuracy'],
)

start_time = time.time()

model.fit(
    ds_train,
    epochs=12,
    validation_data=ds_test,
)

elapsed_time = time.time() - start_time

print(f"Model Training Time: {elapsed_time}")
- 자세한 소스코드 설명은 생략한다.
- 다만, m1에서는 다음 코드를 추가로 설정해야 한다.
# Import mlcompute module to use the optional set_mlc_device API for device selection with ML Compute.
from tensorflow.python.compiler.mlcompute import mlcompute

# Select CPU device.
mlcompute.set_mlc_device(device_name=‘gpu’) # Available options are 'cpu', 'gpu', and ‘any'.
- 이제 터미널에서
m1_tensorflow.py를 실행한다.
$ python3 m1_tensorflow.py

- Model Training Time: 252.47167301177979
구글 코랩 GPU로 구동 시, 조금 더 빨랐다.
테스트 결과 요약
- 아직 정식 버전이 아니기 때문에, 개발용도로 사용하는 것은 아직 권장은 못하겠다.
- 텐서플로에서 추후 정식버전으로 배포가 되면 그 때 사용하는 것을 권한다.
- Preview 형태로 제공이 된 것이고, m1 칩에서 다른 패키지들과의 호환성을 고려할 때, 아직 얼리어댑터의 기능이 강하다.
- 위 코드가 깔끔하게 되었을 거라고 생각이 될 수도 있지만, 현실은 그렇지 못하다.
- 이 부분은 다음 포스트에서 설명하도록 하겠다.
