Tensorflow 2.0 Tutorial ch8.3.2 - 컨볼루션 신경망을 사용한 신경 스타일 전이
공지
-
본 Tutorial은 교재
시작하세요 텐서플로 2.0 프로그래밍의 강사에게 국비교육 강의를 듣는 사람들에게 자료 제공을 목적으로 제작하였습니다. -
강사의 주관적인 판단으로 압축해서 자료를 정리하였기 때문에, 자세하게 공부를 하고 싶으신 분은 반드시 교재를 구매하실 것을 권해드립니다.

- 본 교재 외에 강사가 추가한 내용에 대한 Reference를 확인하셔서, 추가적으로 학습하시는 것을 권유드립니다.
Tutorial
이전 강의가 궁금하신 분들은 아래에서 선택하여 추가 학습 하시기를 바랍니다.
- Google Colab Tensorflow 2.0 Installation
- Tensorflow 2.0 Tutorial ch3.3.1 - 난수 생성 및 시그모이드 함수
- Tensorflow 2.0 Tutorial ch3.3.2 - 난수 생성 및 시그모이드 함수 편향성
- Tensorflow 2.0 Tutorial ch3.3.3 - 첫번째 신경망 네트워크 - AND
- Tensorflow 2.0 Tutorial ch3.3.4 - 두번째 신경망 네트워크 - OR
- Tensorflow 2.0 Tutorial ch3.3.5 - 세번째 신경망 네트워크 - XOR
- Tensorflow 2.0 Tutorial ch4.1 - 선형회귀
- Tensorflow 2.0 Tutorial ch4.2 - 다항회귀
- Tensorflow 2.0 Tutorial ch4.3 - 딥러닝 네트워크를 이용한 회귀
- Tensorflow 2.0 Tutorial ch4.4 - 보스턴 주택 가격 데이터세트
- Tensorflow 2.0 Tutorial ch5.1 - 분류
- Tensorflow 2.0 Tutorial ch5.2 - 다항분류
- Tensorflow 2.0 Tutorial ch5.3 - Fashion MNIST
- Tensorflow 2.0 Tutorial ch6.1-2 - CNN 이론
- Tensorflow 2.0 Tutorial ch6.3 - Fashion MNIST with CNN 실습
- Tensorflow 2.0 Tutorial ch6.4 - 모형의 성능 높이기
- Tensorflow 2.0 Tutorial ch7.1 - RNN 이론 (1)
- Tensorflow 2.0 Tutorial ch7.1 - RNN 이론 (2)
- Tensorflow 2.0 Tutorial ch7.3 - 긍정, 부정 감성 분석
- Tensorflow 2.0 Tutorial ch7.4 - (1) 단어 단위 생성
- Tensorflow 2.0 Tutorial ch7.4 - (2) 단어 단위 생성
- Tensorflow 2.0 Tutorial ch8.1 - 텐서플로 허브
- Tensorflow 2.0 Tutorial ch8.2 - 전이 학습과 & Kaggle 대회
- Tensorflow 2.0 Tutorial ch8.3.1 - 컨볼루션 신경망을 사용한 텍스처 합성
I. 개요
2015년, 딥러닝과 예술의 만남으로 큰 화제가 되었던 신경 스타일 전이 논문1은 반 고흐의 (별이 빛나는 밤에)라는 그림과 풍경 사진을 합성해서 반 고흐가 그린 것 같은 스타일의 풍경 이미지를 만들었고, 프리즈마등의 앱은 이 알고리즘을 빠르게 탑재해서 인기를 끌었습니다.
본 포스트에서는 텍스처 합성에 대해 알아본 뒤 2장의 이미지에서 각각 스타일과 내용을 가져와서 합성하는 신경 스타일 전이에 대해 다루도록 합니다.
II. 컨볼루션 신경망을 사용한 신경 스타일 전이
신경 스타일 전이는 지난 시간에 배운 Gram Matrix를 이용해서 텍스처 합성에 한가지를 추가한 것입니다. 바로 content 텍스처입니다.1
- 먼저, 타깃 텍스처를 만들기 위해서
style텍스처와Gram Matrix의MSE를 구합니다. Content텍스처와는 픽셀 값의 차이인MSE를 구합니다.- 여기서 사용하는 특징 추출값을 위한 레이어는 서로 다르게 설정할 수 있습니다.
그 외의 이론적인 내용은 319-320 페이지를 참조하시기를 바랍니다.
(1) 원본 텍스처 불러오기
먼저 content 원본 텍스처를 불러옵니다.
# 텐서플로 2 버전 선택
try:
    # %tensorflow_version only exists in Colab.
    %tensorflow_version 2.x
except Exception:
    pass
import tensorflow as tf
import numpy as np
import pandas as pd
import tensorflow_hub as hub
import matplotlib.pyplot as plt
import cv2
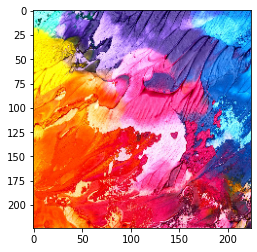
(2) 첫번째 이미지 타깃 텍스쳐 함수 정의 및 실행
이전 시간에 배웠던 내용의 전체코드가 필요합니다. 복습을 하면서 다시한번 실습하기를 바랍니다.
style_path = tf.keras.utils.get_file('style.jpg', 'http://bit.ly/2mGfZIq')

style_image = plt.imread(style_path)
style_image = cv2.resize(style_image, dsize=(224, 224))
style_image = style_image / 255.0
plt.imshow(style_image)
<matplotlib.image.AxesImage at 0x7fe1d74332e8>

합성 하려고 하는 첫번째 사진입니다.
(3) 함수 정의
아래와 같이 함수를 정의합니다.
# Gram Matrix 함수 정의
def gram_matrix(input_tensor):
    channels = int(input_tensor.shape[-1])
    a = tf.reshape(input_tensor, [-1, channels])
    n = tf.shape(a)[0]
    gram = tf.matmul(a, a, transpose_a=True)
    return gram / tf.cast(n, tf.float32)

# 타깃 텍스처 gram matrix 함수 정의
def get_outputs(image):
    image_batch = tf.expand_dims(image, axis=0)
    output = model(preprocess_input(image_batch * 255.0))
    outputs = [gram_matrix(out) for out in output]
    return outputs

# MSE 구하는 함수 (원본 텍스처 gram matrix - 타깃 텍스처 gram matrix)
def get_loss(outputs, style_outputs):
    return tf.reduce_sum([tf.reduce_mean((o-s)**2) for o,s in zip(outputs, style_outputs)])

# 0.0~1.0 사이의 컬러값 정의 함수
def clip_0_1(image):
    return tf.clip_by_value(image, clip_value_min=0.0, clip_value_max=1.0)

# variation loss 함수 정의
def high_pass_x_y(image):
  x_var = image[:, 1:, :] - image[:, :-1, :]
  y_var = image[1:, :, :] - image[:-1, :, :]
  return x_var, y_var

def total_variation_loss(image):
  x_deltas, y_deltas = high_pass_x_y(image)
  return tf.reduce_mean(x_deltas**2) + tf.reduce_mean(y_deltas**2)
(4) 원본 텍스처에 대한 Gram Matrix 계산
자세한 설명은 이전 포스트를 참조합니다.
from tensorflow.keras.applications import VGG19
from tensorflow.keras.applications.vgg19 import preprocess_input# 특징 추출 모델 만들기

vgg = VGG19(include_top=False, weights='imagenet')
style_layers = ['block1_conv1',
                'block2_conv1',
                'block3_conv1',
                'block4_conv1',
                'block5_conv1']
vgg.trainable = False
outputs = [vgg.get_layer(name).output for name in style_layers]
model = tf.keras.Model([vgg.input], outputs)

# 원본 텍스처에서 Gram Matrix 계산
style_image = plt.imread(style_path)
style_image = cv2.resize(style_image, dsize=(224, 224))
style_image = style_image / 255.0

style_batch = style_image.astype('float32')
style_batch = tf.expand_dims(style_batch, axis=0)
style_output = model(preprocess_input(style_batch * 255.0))

style_outputs = [gram_matrix(out) for out in style_output]
(5) Content 이미지 확인
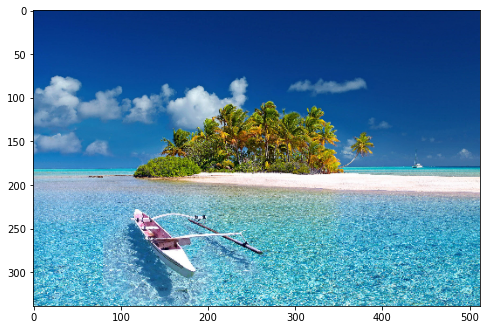
합성할 Content 이미지를 다운로드 받습니다.
content_path = tf.keras.utils.get_file('content.jpg', 'http://bit.ly/2mAfUX1')

content_image = plt.imread(content_path)
max_dim = 512
long_dim = max(content_image.shape[:-1])
scale = max_dim / long_dim
new_height = int(content_image.shape[0] * scale)
new_width = int(content_image.shape[1] * scale)

content_image = cv2.resize(content_image, dsize=(new_width, new_height))
content_image = content_image / 255.0
plt.figure(figsize=(8,8))
plt.imshow(content_image)
<matplotlib.image.AxesImage at 0x7fe3aa115ef0>

여기에서 가로와 세로 중 가장 긴 축을 512 픽셀에 맞춰서 리사이즈 합니다. VGG-19 네트워크는 32보다 큰 이미지는 모두 받을 수 있기 때문에 적절한 퍼포먼스를 유지하기 위해 적당히 크게 설정합니다.
여기서 주의해야 할 점은 content 텍스처와 타깃 텍스처의 크기가 같아야 한다는 점입니다. 이 둘은 서로 특징 추출값의 픽셀을 MSE로 비교하기 때문에 크기가 다르면 안됩니다. 반면 style 텍스처는 타깃 텍스처와 크기가 달라도 상관없습니다.
Gram Matrix 계산값은 각 레이어의 [채널 수]X[채널 수]만큼의 값을 서로 비교하기 때문입니다.
(6) content 특징 추출 모델 만들기
이제 content의 특징을 추출하기 위한 모델을 만들어야 하는데, 모델을 정의하는 방식은 다음과 같습니다.
content_batch = content_image.astype('float32')
content_batch = tf.expand_dims(content_batch, axis=0)

content_layers=['block5_conv2']

vgg.trainable = False
outputs = [vgg.get_layer(name).output for name in content_layers]
model_content = tf.keras.Model([vgg.input], outputs)
content_output = model_content(preprocess_input(content_batch * 255.0))
content특징 추출을 위해 선택한 레이어는 block5_conv1 바로 뒤에 있는 block5_conv2 레이어입니다. 위에서 style 특징을 추출하는 모델과 별도의 모델을 만들어서 model_content에 저장하고, 이 모델을 사용해 content 텍스처에서 미리 특징을 추출해서 content_output 변수에 저장합니다. style_outputs처럼 이 값도 여기서 한 번만 계산해놓으면 바뀌지 않고 계속 사용됩니다.
(7) 타깃 텍스처 업데이트 함수 정의
-
먼저, 타깃 텍스처에서
gram matrix을 구하는 함수가 필요합니다. -
MSE를 구하는 함수가 필요한데, 원본 텍스처의Gram Matrix값과, 타깃 텍스처의Gram Matrix사이의 MSE 함수가 필요합니다. -
이 때,
MSE값이 0.0에서 1.0사이의 컬러 값이어야 하기 때문에 그 이하나 이상으로 값이 넘어가지 않도록 해주는 함수가 필요합니다.
# 타깃 텍스처 gram matrix 함수 정의
def gram_matrix(input_tensor):
    channels = int(input_tensor.shape[-1])
    a = tf.reshape(input_tensor, [-1, channels])
    n = tf.shape(a)[0]
    gram = tf.matmul(a, a, transpose_a=True)
    return gram / tf.cast(n, tf.float32)

def get_outputs(image):
    image_batch = tf.expand_dims(image, axis=0)
    output = model(preprocess_input(image_batch * 255.0))
    outputs = [gram_matrix(out) for out in output]
    return outputs

# MSE 구하는 함수 (원본 텍스처 gram matrix - 타깃 텍스처 gram matrix)
def get_loss(outputs, style_outputs):
    return tf.reduce_sum([tf.reduce_mean((o-s)**2) for o,s in zip(outputs, style_outputs)])

# 0.0~1.0 사이의 컬러값 정의 함수
def clip_0_1(image):
    return tf.clip_by_value(image, clip_value_min=0.0, clip_value_max=1.0)
(8) content output, loss 함수 정의
이제 style에서 했던 것처럼 content 전용의 output과 loss 함수를 정의합니다.
def get_content_output(image):
  image_batch = tf.expand_dims(image, axis=0)
  output = model_content(preprocess_input(image_batch * 255.0))
  return output

def get_content_loss(image, content_output):
  return tf.reduce_sum(tf.reduce_mean(image-content_output)**2)

# 0.0~1.0 사이의 컬러값 정의 함수
def clip_0_1(image):
    return tf.clip_by_value(image, clip_value_min=0.0, clip_value_max=1.0)
get_content_loss함수에서는 타깃 텍스처와content텍스처의MSE를 구합니다.
(9) Content loss 손실 계산식에 추가
이제, content loss를 계산식에 추가하고, 모델의 하이퍼파라미터인 Adam Optimizer의 학습률과 각 loss의 가중치들을 신경 스타일 전이 과제에 맞게 조정합니다.
opt = tf.optimizers.Adam(learning_rate=0.001, beta_1=0.99, epsilon=1e-1)

total_variation_weight = 1e9
style_weight = 1e-2
content_weight = 1e4

@tf.function()
def train_step(image):
    with tf.GradientTape() as tape:
        outputs = get_outputs(image)
        output2 = get_content_output(image)
        loss = style_weight * get_loss(outputs, style_outputs)
        loss += content_weight * get_content_loss(output2, content_output)
        loss += total_variation_weight * total_variation_loss(image)

    grad = tape.gradient(loss, image)
    opt.apply_gradients([(grad, image)])
    image.assign(clip_0_1(image))
(10) 신경 스타일 전이 알고리즘 직접 실행
이제 신경 스타일 전이 알고리즘을 직접 실행해보겠습니다.
import IPython.display as display
import time
import imageio

start = time.time()

# target_image = tf.random.uniform(content_image.shape)
image = tf.Variable(content_image.astype('float32'))

epochs = 20
steps_per_epoch = 100

step = 0
for n in range(epochs):
    for m in range(steps_per_epoch):
        step += 1
        train_step(image)
        print(".", end='')
    if n % 5 == 0 or n == epochs - 1:
        imageio.imwrite('style_{0}_content_{1}_transfer_epoch_{2}.png'.format(style_weight, content_weight, n), image.read_value().numpy())
    display.clear_output(wait=True)
    plt.figure(figsize=(8,8))
    plt.imshow(image.read_value())
    plt.title("Train step: {}".format(step))
    plt.show()

end = time.time()
print("Total time: {:.1f}".format(end-start))

Total time: 123.6
Option, 그림 8.24 원본 소스코드
그림 8.24(교재 299p)에서는 첫 번째 레이어에서 활성화되는 64개 뉴런의 특징 추출값을 모두 표시했습니다.
style_image = plt.imread(style_path)
style_image = cv2.resize(style_image, dsize=(224, 224))
style_image = style_image / 255.0

style_batch = style_image.astype('float32')
style_batch = tf.expand_dims(style_batch, axis=0)
style_output = model(preprocess_input(style_batch * 255.0))

plt.figure(figsize=(16,16))

for c in range(style_output[0].shape[-1]):
    plt.subplot(8,8,c+1)
    plt.axis('off')
    plt.imshow(tf.squeeze(style_output[0][:,:,:,c], 0), cmap='gray')

III. 연습 파일
VI. Reference
김환희. (2020). 시작하세요! 텐서플로 2.0 프로그래밍: 기초 이론부터 실전 예제까지 한번에 끝내는 머신러닝, 딥러닝 핵심 가이드. 서울: 위키북스.
-
Tensorflow 2.0 Tutorial ch8.3.1 - 컨볼루션 신경망을 사용한 텍스처 합성 에서
Gram Matrix에 대해 다뤘다. ↩︎ ↩︎
