matplotlib 06 Table Chart
강의 홍보
- 취준생을 위한 강의를 제작하였습니다.
- 본 블로그를 통해서 강의를 수강하신 분은 게시글 제목과 링크를 수강하여 인프런 메시지를 통해 보내주시기를 바랍니다.
스타벅스 아이스 아메리카노를 선물로 보내드리겠습니다.
- [비전공자 대환영] 제로베이스도 쉽게 입문하는 파이썬 데이터 분석 - 캐글입문기

공지
제 수업을 듣는 사람들이 계속적으로 실습할 수 있도록 강의 파일을 만들었습니다. 늘 도움이 되기를 바라며. 참고했던 교재 및 Reference는 꼭 확인하셔서 교재 구매 또는 관련 Reference를 확인하시기를 바랍니다.
도움이 되었다면 Github에 Star를 눌러주세요.
I. Matplotlib & Seaborn
(1) 기본 개요
Matplotlib는 파이썬 표준 시각화 도구라고 불리워지며 파이썬 그래프의 기본 토대가 된다고 해도 무방하다. 객체지향 프로그래밍을 지원하므로 세세하게 꾸밀 수 있다.
Seaborn 그래는 파이썬 시각화 도구의 고급 버전이다. Matplotlib에 비해 비교적 단순한 인터페이스를 제공하기 때문에 초보자도 어렵지 않게 배울 수 있다.
(2) matplotlib & Seabon 설치
설치방법은 윈도우 명령 프롬프트, MacOS, Linux 터미널에서 pip install matplotlib입력하면 되지만, 간혹 여러 환경에 따라 달라질 수 있으니 관련 싸이트에서 확인하기를 바란다.
- matplotlib 설치 방법: https://matplotlib.org/users/installing.html
- seaborn 설치 방법: https://seaborn.pydata.org/installing.html
II. Table Chart
Table Chart는 막대 그래프와 테이블을 섞어서 쓰는 형태가 되겠다. 우선 가상의 Sample 데이터를 만들어보자.
(1) 데이터 생성
import pandas as pd
from tabulate import tabulate

# Years under consideration
years = ["2010", "2011", "2012", "2013", "2014"]

# Available Watt
columns = ["4.5W", "6.0W", "7.0W", "8.5W", "9.5W", "13.5W", "15W"]

# UnitsSold
unitsSold = [
              [65, 141, 88, 111, 104, 71, 99],
              [85, 142, 89, 112, 103, 73, 98],
              [75, 143, 90, 113, 89, 75, 93],
              [65, 144, 91, 114, 90, 77, 92],
              [55, 145, 92, 115, 88, 79, 93]
            ]

print(years)
print(columns)
print(unitsSold)
['2010', '2011', '2012', '2013', '2014']
['4.5W', '6.0W', '7.0W', '8.5W', '9.5W', '13.5W', '15W']
[[65, 141, 88, 111, 104, 71, 99], [85, 142, 89, 112, 103, 73, 98], [75, 143, 90, 113, 89, 75, 93], [65, 144, 91, 114, 90, 77, 92], [55, 145, 92, 115, 88, 79, 93]]
이번에는 시각화를 하기 위해 y축을 작성해본다.
import numpy as np
values = np.arange(0, 600, 100)
(2) 색상조합
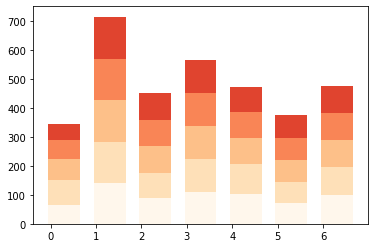
전체적인 테이블 차트를 작성하기 전, 먼저 bar 차트를 작성해본다.
import matplotlib.pyplot as plt
colors = plt.cm.OrRd(np.linspace(0, 0.7, len(years)))
index = np.arange(len(columns)) + 0.3
bar_width = 0.7
y_offset = np.zeros(len(columns))
print(colors)
print()
print(index)
print()
print(y_offset)
[[1.         0.96862745 0.9254902  1.        ]
 [0.9945867  0.87996924 0.7216609  1.        ]
 [0.99215686 0.75371011 0.53883891 1.        ]
 [0.97783929 0.52095348 0.33542484 1.        ]
 [0.87930796 0.26811226 0.18336025 1.        ]]

[0.3 1.3 2.3 3.3 4.3 5.3 6.3]

[0. 0. 0. 0. 0. 0. 0.]
- colors는 연도를 의미하고, 연도별로 다르게 색상을 줘서 차별점을 둔다는 뜻이다.
- 우선,
cm은matplotlib.pyplot색상을 의미하고,OrRd는 일종의 색상의 종류이다.1 - np.linspace는 일종의 gradation을 주는 것으로 생각하면 된다.
len(years)만큼의 gradation을 주겠다고 선언하는 것과 같다.
- 우선,
- index는 columns는 의미하며, X축으로 활용될 것이다.
- bar_width는 X축에서 각 값끼리의 간격을 의미한다.
- y_offset은
unitsSold값을 담아서 실제 bar chart의 y축 및 table 셀의 값에 해당된다.
fig, ax = plt.subplots()

일종의 그래프를 선언한다는 뜻이다.
cell_text = []
n_rows = len(unitsSold)

for row in range(n_rows):
  plot = plt.bar(index, unitsSold[row], bar_width, bottom=y_offset, color=colors[row])
  y_offset = y_offset + unitsSold[row]
  cell_text.append(['%1.1f' % (x) for x in y_offset])
  i=0

  print(cell_text)
[['65.0', '141.0', '88.0', '111.0', '104.0', '71.0', '99.0']]
[['65.0', '141.0', '88.0', '111.0', '104.0', '71.0', '99.0'], ['150.0', '283.0', '177.0', '223.0', '207.0', '144.0', '197.0']]
[['65.0', '141.0', '88.0', '111.0', '104.0', '71.0', '99.0'], ['150.0', '283.0', '177.0', '223.0', '207.0', '144.0', '197.0'], ['225.0', '426.0', '267.0', '336.0', '296.0', '219.0', '290.0']]
[['65.0', '141.0', '88.0', '111.0', '104.0', '71.0', '99.0'], ['150.0', '283.0', '177.0', '223.0', '207.0', '144.0', '197.0'], ['225.0', '426.0', '267.0', '336.0', '296.0', '219.0', '290.0'], ['290.0', '570.0', '358.0', '450.0', '386.0', '296.0', '382.0']]
[['65.0', '141.0', '88.0', '111.0', '104.0', '71.0', '99.0'], ['150.0', '283.0', '177.0', '223.0', '207.0', '144.0', '197.0'], ['225.0', '426.0', '267.0', '336.0', '296.0', '219.0', '290.0'], ['290.0', '570.0', '358.0', '450.0', '386.0', '296.0', '382.0'], ['345.0', '715.0', '450.0', '565.0', '474.0', '375.0', '475.0']]

- X축과 y축에 따라 대응하도록 하는데, lopp를 활용하여 그래프를 작성하겠다는 뜻이고, 이는
matplotlib.pyplot에서는 자주 쓰이는 문법이다. - y_offset은 각 리스트에 저장될
unitsSold이고, loop가 돌 때마다 점점 확장하는 것을 볼 수 있다.
colors = plt.cm.OrRd(np.linspace(0, 0.7, len(years)))
index = np.arange(len(columns)) + 0.3
bar_width = 0.7

y_offset = np.zeros(len(columns))
fig, ax = plt.subplots()

cell_text=[]
n_rows = len(unitsSold)
for row in range(n_rows):
  plot = plt.bar(index, unitsSold[row], bar_width, bottom=y_offset, color=colors[row])
  print(plot)
  y_offset = y_offset + unitsSold[row]
  cell_text.append(['%1.1f' % (x) for x in y_offset])
  i=0

  for rect in plot:
    height = rect.get_height()
    print(height)
    ax.text(rect.get_x() + rect.get_width()/2,
            y_offset[i], "%d"
            % int(y_offset[i]),
            ha='center',
            va='bottom')
    i = i+1
<BarContainer object of 7 artists>
65.0
141.0
88.0
111.0
104.0
71.0
99.0
<BarContainer object of 7 artists>
85.0
142.0
89.0
112.0
103.0
73.0
98.0
<BarContainer object of 7 artists>
75.0
143.0
90.0
113.0
89.0
75.0
93.0
<BarContainer object of 7 artists>
65.0
144.0
91.0
114.0
90.0
77.0
92.0
<BarContainer object of 7 artists>
55.0
145.0
92.0
115.0
88.0
79.0
93.0

- 각각의
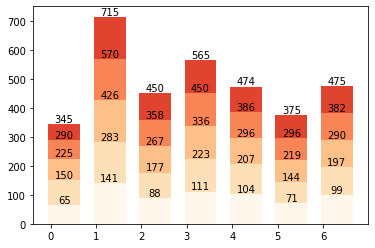
plot container들이 담고있는 값들은rect.get_height()을 통해서 리스트 형태로 출력할 수 있다. - 이를 받아서, text로 시각화하는 과정이
for rect in plot:이하 구문이다. i를 통해서, loop를 통해0~6까지 하나씩 이동하면서 그래프와 함께 텍스트가 출력된다.
colors = plt.cm.OrRd(np.linspace(0, 0.7, len(years)))
index = np.arange(len(columns)) + 0.3
bar_width = 0.7

y_offset = np.zeros(len(columns))
fig, ax = plt.subplots()

cell_text=[]
n_rows = len(unitsSold)
for row in range(n_rows):
  plot = plt.bar(index, unitsSold[row], bar_width, bottom=y_offset, color=colors[row])
  y_offset = y_offset + unitsSold[row]
  cell_text.append(['%1.1f' % (x) for x in y_offset])
  i=0

  for rect in plot:
    height = rect.get_height()
    ax.text(rect.get_x() + rect.get_width()/2,
            y_offset[i], "%d"
            % int(y_offset[i]),
            ha='center',
            va='bottom')
    i = i+1

plt.table(cellText=cell_text, rowLabels=years,
          rowColours=colors, colLabels=columns, loc='bottom')
plt.ylabel("Units Sold")
plt.xticks([])
plt.title('Number of LED Bulb Sold/Year')
plt.show()

이렇게 해서 그래프가 완성이 되었다. 해석은 비교적 용이하다. 짙은 빨간색은 2014년 그래프를 가리키고, 4.5W를 기준으로 상하로 그래프가 작성된 것을 확인할 수 있다.
- 이제 plt.table 이하 구문을 적용하면 된다.
III. 실습파일
- 구글코랩에서 빠르게 실습도 할 수 있습니다. 실습
IV. Reference
Mukhiya, Uuresh Kumar. Ahmed Usman. Hands-on Exploratory Data Analysis With Python: Perform EDA Techniques to understand, Summarize, and Investigate Your Data. Packt publishing limited, 2020.
-
Choosing Colormaps in Matplotlib에 가면 다양한 색상을 확인할 수 있다. ↩︎
