matplotlib 03 Scatter Plot
강의 홍보
- 취준생을 위한 강의를 제작하였습니다.
- 본 블로그를 통해서 강의를 수강하신 분은 게시글 제목과 링크를 수강하여 인프런 메시지를 통해 보내주시기를 바랍니다.
스타벅스 아이스 아메리카노를 선물로 보내드리겠습니다.
- [비전공자 대환영] 제로베이스도 쉽게 입문하는 파이썬 데이터 분석 - 캐글입문기

공지
제 수업을 듣는 사람들이 계속적으로 실습할 수 있도록 강의 파일을 만들었습니다. 늘 도움이 되기를 바라며. 참고했던 교재 및 Reference는 꼭 확인하셔서 교재 구매 또는 관련 Reference를 확인하시기를 바랍니다.
도움이 되었다면 Github에 Star를 눌러주세요.
I. Matplotlib 기본 그래프
Matplotlib는 파이썬 표준 시각화 도구라고 불리워지며 파이썬 그래프의 기본 토대가 된다고 해도 무방하다. 객체지향 프로그래밍을 지원하므로 세세하게 꾸밀 수 있다.
II. matplotlib 설치
설치방법은 윈도우 명령 프롬프트, MacOS, Linux 터미널에서 pip install matplotlib입력하면 되지만, 간혹 여러 환경에 따라 달라질 수 있으니 관련 싸이트에서 확인하기를 바란다.
III. 산점도(Scatter Plot)
산점도는 서로 다른 두 변수 사이의 관계를 나타날 때 사용한다. 이 때 두 변수는 continous, 수량형 변수여야 하고, 서로 독립적이어야 한다. 두 연속 변수의 관계를 보여준다는 점에서 선 그래프와 비슷하다. 선 그래프를 그릴 때 plot() 함수에 o 옵션을 사용하면 선 없이 점으로만 표현되는데, 산점도라고 할 수 있다.
또한 산점도 그래프를 작성하면 상관관계도 그릴 수 있다. 상관관계에 대한 내용은 여기에서는 자세하게 서술하지는 않는다.
IV. 그래프 작성
-
Goa1 1. 수면시간과 나이에 관한 데이터를 활용하여 실제 나이에 따라 수면시간이 달라지는지 확인해보자.
-
Goal 2. 고등교육 연수에 따른 성인의 평균 임금과 관련된 그래프를 작성해보자.
(1) 데이터 수집
먼저 데이터를 가져옵니다.
import pandas as pd
from tabulate import tabulate

url = 'https://raw.githubusercontent.com/chloevan/python_visualisation/master/data/sleep_vs_age.csv'
headers_cols = ['age','min_recommended', 'max_recommended', 'may_be_appropriate_min', 'may_be_appropriate_max', 'min_not_recommended', 'max_not_recommended']

sleep = pd.read_csv(url).iloc[:, 1:] # 첫번째 열 제거

print(tabulate(sleep.head(10), tablefmt="pipe", headers="keys"))
|    |   age |   min_recommended |   max_recommended |   may_be_appropriate_min |   may_be_appropriate_max |   min_not_recommended |   max_not_recommended |
|---:|------:|------------------:|------------------:|-------------------------:|-------------------------:|----------------------:|----------------------:|
|  0 |     0 |                14 |                17 |                       11 |                       13 |                    11 |                    19 |
|  1 |     1 |                14 |                17 |                       11 |                       13 |                    11 |                    19 |
|  2 |     2 |                14 |                17 |                       11 |                       13 |                    11 |                    19 |
|  3 |     3 |                14 |                17 |                       11 |                       13 |                    11 |                    19 |
|  4 |     4 |                12 |                15 |                       10 |                       11 |                    10 |                    18 |
|  5 |     5 |                12 |                15 |                       10 |                       11 |                    10 |                    18 |
|  6 |     6 |                12 |                15 |                       10 |                       11 |                    10 |                    18 |
|  7 |     7 |                12 |                15 |                       10 |                       11 |                    10 |                    18 |
|  8 |     8 |                12 |                15 |                       10 |                       11 |                    10 |                    18 |
|  9 |     9 |                12 |                15 |                       10 |                       11 |                    10 |                    18 |
(2) matplotlib 방식
수집된 데이터를 토대로 산점도를 작성해본다. 이 때에는 seaborn 라이브러리를 활용하여 iris 데이터를 가져온다.
import seaborn as sns
import matplotlib.pyplot as plt

sns.set()

# 일반적인 산점도
plt.scatter(x=sleep['age']/12.,
            y=sleep['min_recommended'])

plt.scatter(x=sleep['age']/12.,
            y=sleep['max_recommended'])

plt.xlabel('Age of person in Years')
plt.ylabel('Total hours of sleep required')
plt.show()

그래프를 작성하는 것은 어렵지 않다. 다만 해석이 조금 난해할 뿐이다. 문제는 산점도로 그리니, 무언가 딱딱 끊기는 느낌이다. 이번에는 선 그래프로 전환해보자. 사실 전체적인 코드는 비슷하고, g--, r-- 명령어만 추가했다.
import seaborn as sns
import matplotlib.pyplot as plt

sns.set()

plt.plot(sleep['age']/12.,
         sleep['min_recommended'], 'g--')

plt.plot(sleep['age']/12.,
         sleep['max_recommended'],
         'r--')

plt.xlabel('Age of person in Years')
plt.ylabel('Total hours of sleep required')
plt.show()

위 두 그래프 모두 시간이 지남에 따라 필요한 수면시간이 감소하다가 약 18세 되는 시점부터는 일정한 것을 알 수 있다.
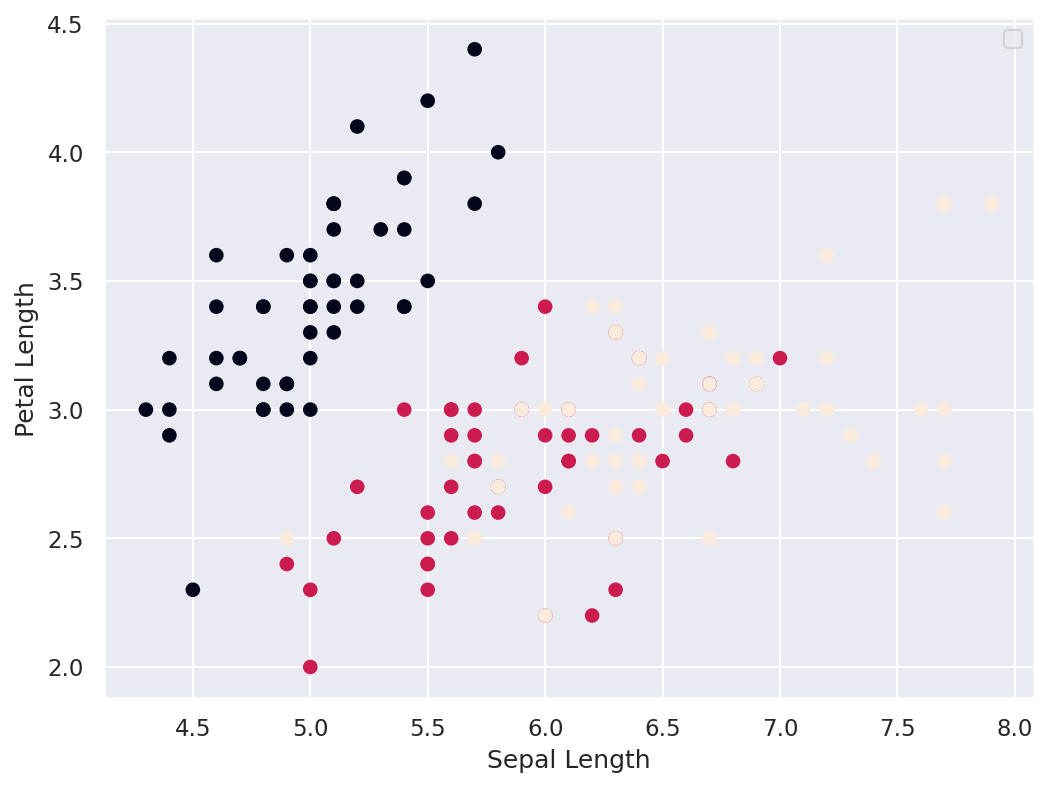
이번에는 iris데이터를 활용하는데, matplotlib 스타일로 그래프를 작성한다.
import seaborn as sns
import matplotlib.pyplot as plt

plt.rcParams['figure.figsize'] = (8, 6)
plt.rcParams['figure.dpi'] = 150
sns.set()

iris = sns.load_dataset('iris')
iris['species'] = iris['species'].map({'setosa': 0, 'versicolor':1, 'virginica':2})

plt.scatter(x=iris['sepal_length'],
            y=iris['sepal_width'], c=iris.species)

plt.xlabel('Sepal Length')
plt.ylabel('Petal Length')

plt.show()
No handles with labels found to put in legend.

그런데, 여기에 한가지 문제점이 있다. 범례(legend)가 없어서 어떤 종인지 색상의 구별이 잘 가지 않는다. 이럴 때 어떻게 해야할까?
이 때에는 사실 matplotlib만 활용하면 조금 코드가 복잡해진다. 아래 코드를 보자.
# Scatter plot with a different color by groups
groups = iris.groupby('species')

fig, ax = plt.subplots()
for name, group in groups:
    ax.plot(group.sepal_length,
            group.sepal_width,
            marker='o',
            linestyle='',
            label=name)

ax.legend(fontsize=12, loc='upper left') # legend position
plt.title('Scatter Plot of iris by matplotlib', fontsize=20)
plt.xlabel('Petal Length', fontsize=14)
plt.ylabel('Petal Width', fontsize=14)
plt.show()

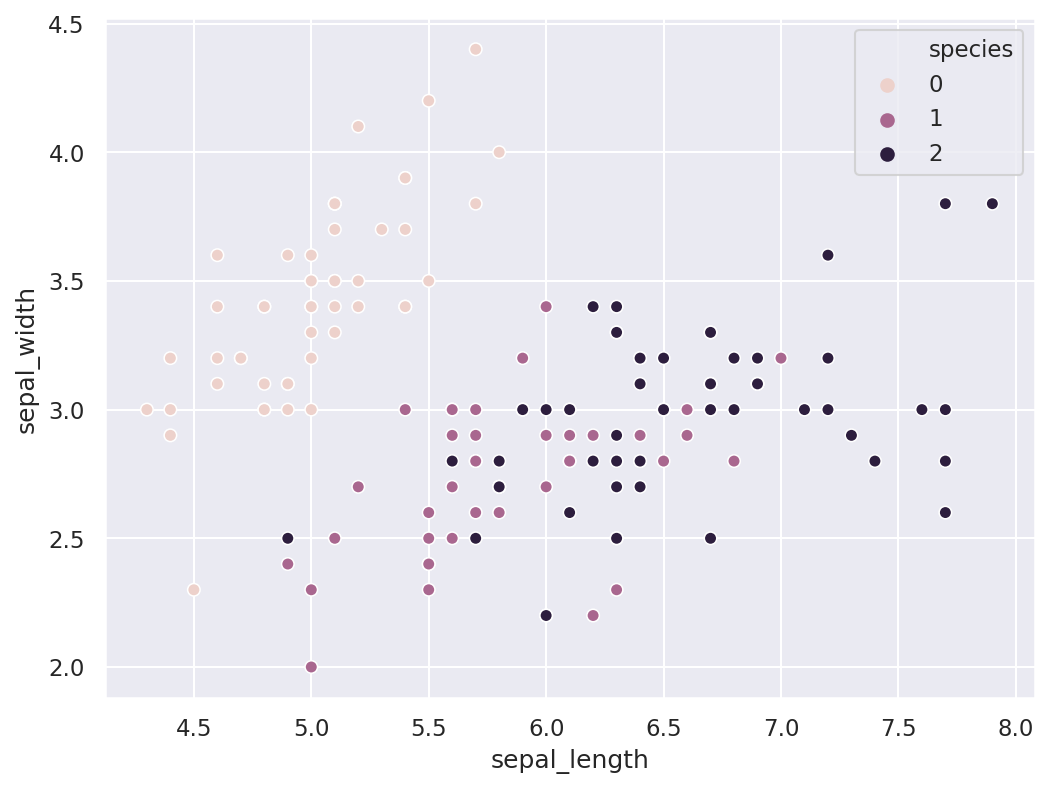
즉 For-loop를 활용해서 각각의 label을 해줘야 하는 매우 큰 번거로움이 있다. 이 때에는 seaborn 패키지를 활용하면 매우 쉽게 그래프를 작성할 수 있다.
(3) seaborn 방식
iris = sns.load_dataset('iris')
iris['species'] = iris['species'].map({'setosa':0, 'versicolor':1, 'virginica':2})
sns.scatterplot(x=iris['sepal_length'],
                y=iris['sepal_width'], hue=iris.species, data=iris)
<matplotlib.axes._subplots.AxesSubplot at 0x7fc3cd092048>

위와 같이 코드가 매우 간결해진 것을 볼 수 있다.
V. 실습파일
- 구글코랩에서 빠르게 실습도 할 수 있습니다. 실습
VI. Reference
Mukhiya, Uuresh Kumar. Ahmed Usman. Hands-on Exploratory Data Analysis With Python: Perform EDA Techniques to understand, Summarize, and Investigate Your Data. Packt publishing limited, 2020.
