네이버 뉴스 댓글 크롤링 대시보드 만들기 with Heroku
Page content
강의 홍보
- 취준생을 위한 강의를 제작하였습니다.
- 본 블로그를 통해서 강의를 수강하신 분은 게시글 제목과 링크를 수강하여 인프런 메시지를 통해 보내주시기를 바랍니다.
스타벅스 아이스 아메리카노를 선물로 보내드리겠습니다.
- [비전공자 대환영] 제로베이스도 쉽게 입문하는 파이썬 데이터 분석 - 캐글입문기
1. 개요
- 기존 웹크롤링은 주로 코드에 기반한 소개가 주를 이루었음
- 본 장에서는 가급적 사용자 기준에 맞춰서 뉴스 URL만 입력하면 댓글 수집할 수 있는 기능 소개함
2. 라이브러리
- 크롤링 및 대시보드 작업을 위한 필수 라이브러리는 다음과 같음 (requirements.txt)
colorama==0.4.4
dash==1.21.0
gunicorn==20.1.0
numpy==1.19.4
pandas==1.2.0
beautifulsoup4==4.9.3
openpyxl==3.0.7
requests==2.26.0
- 위 파일을 프로젝트의 가장 최상단에 위치시켜 놓는다.
- 설치 진행 시에는
pip install -r requirements.txt해도 좋고, 아니면 개별적으로 설치를 해도 좋다.
3. 코드 설명
- 본장에서는 디테일한 코드 설명은 넘어가도록 한다.
(1) 크롤링 코드
- 먼저 크롤링 코드는 다음과 같다.
# 크롤링 라이브러리
from bs4 import BeautifulSoup
import requests
import re

# 데이터프레임
import pandas as pd

# 샘플 URL을 적용한다.
url = "https://news.naver.com/main/read.naver?mode=LSD&mid=shm&sid1=100&oid=022&aid=0003609357"

def get_df(url):
    # 댓글을 달 빈 리스트를 생성합니다.
    List = []
    url = url
    oid = url.split("oid=")[1].split("&")[0]
    aid = url.split("aid=")[1]
    page = 1
    header = {
        "User-agent": "Mozilla/5.0 (Windows NT 10.0; Win64; x64) AppleWebKit/537.36 (KHTML, like Gecko) Chrome/65.0.3325.181 Safari/537.36",
        "referer": url,

    }
    while True:
        c_url = "https://apis.naver.com/commentBox/cbox/web_neo_list_jsonp.json?ticket=news&templateId=default_society&pool=cbox5&_callback=jQuery1707138182064460843_1523512042464&lang=ko&country=&objectId=news" + oid + "%2C" + aid + "&categoryId=&pageSize=20&indexSize=10&groupId=&listType=OBJECT&pageType=more&page=" + str(
            page) + "&refresh=false&sort=FAVORITE"
    # 파싱하는 단계입니다.
        r = requests.get(c_url, headers=header)
        cont = BeautifulSoup(r.content, "html.parser")
        total_comm = str(cont).split('comment":')[1].split(",")[0]

        match = re.findall('"contents":([^\*]*),"userIdNo"', str(cont))
        # 댓글을 리스트에 중첩합니다.
        List.append(match)

        # 한번에 댓글이 20개씩 보이기 때문에 한 페이지씩 몽땅 댓글을 긁어 옵니다.
        if int(total_comm) <= ((page) * 20):
            break
        else:
            page += 1

		#
    def flatten(l):
        flatList = []
        for elem in l:
        # if an element of a list is a list
        # iterate over this list and add elements to flatList
            if type(elem) == list:
                for e in elem:
                    flatList.append(e)
            else:
               flatList.append(elem)
        return flatList

    # 리스트 결과입니다.
    # print(flatten(List))

    # convert dataframe
    data = pd.DataFrame(flatten(List), columns=["기사댓글"])
    data = data.rename_axis("index").reset_index()

    # write_excel
    # data.to_excel("news_comments.xlsx", sheet_name="Sheet1")
    return data

# data = get_df(url) # URL 테스트 시, 실행
data = pd.DataFrame({"index": [0], "기사댓글": ["댓글"]}) # 앱 배포시 실행
# print(data.head())
- 중간에 주석처리 한 것을 풀면 된다.
- 해당 코드는 app.py 또는 일반적인 주피터 노트북, 구글 코랩에서 실행해도 된다.
- 수집된 댓글을 확인해보니, 중간에 삭제된 글은 댓글 수집 시, 제외되는 것을 확인할 수 있다.
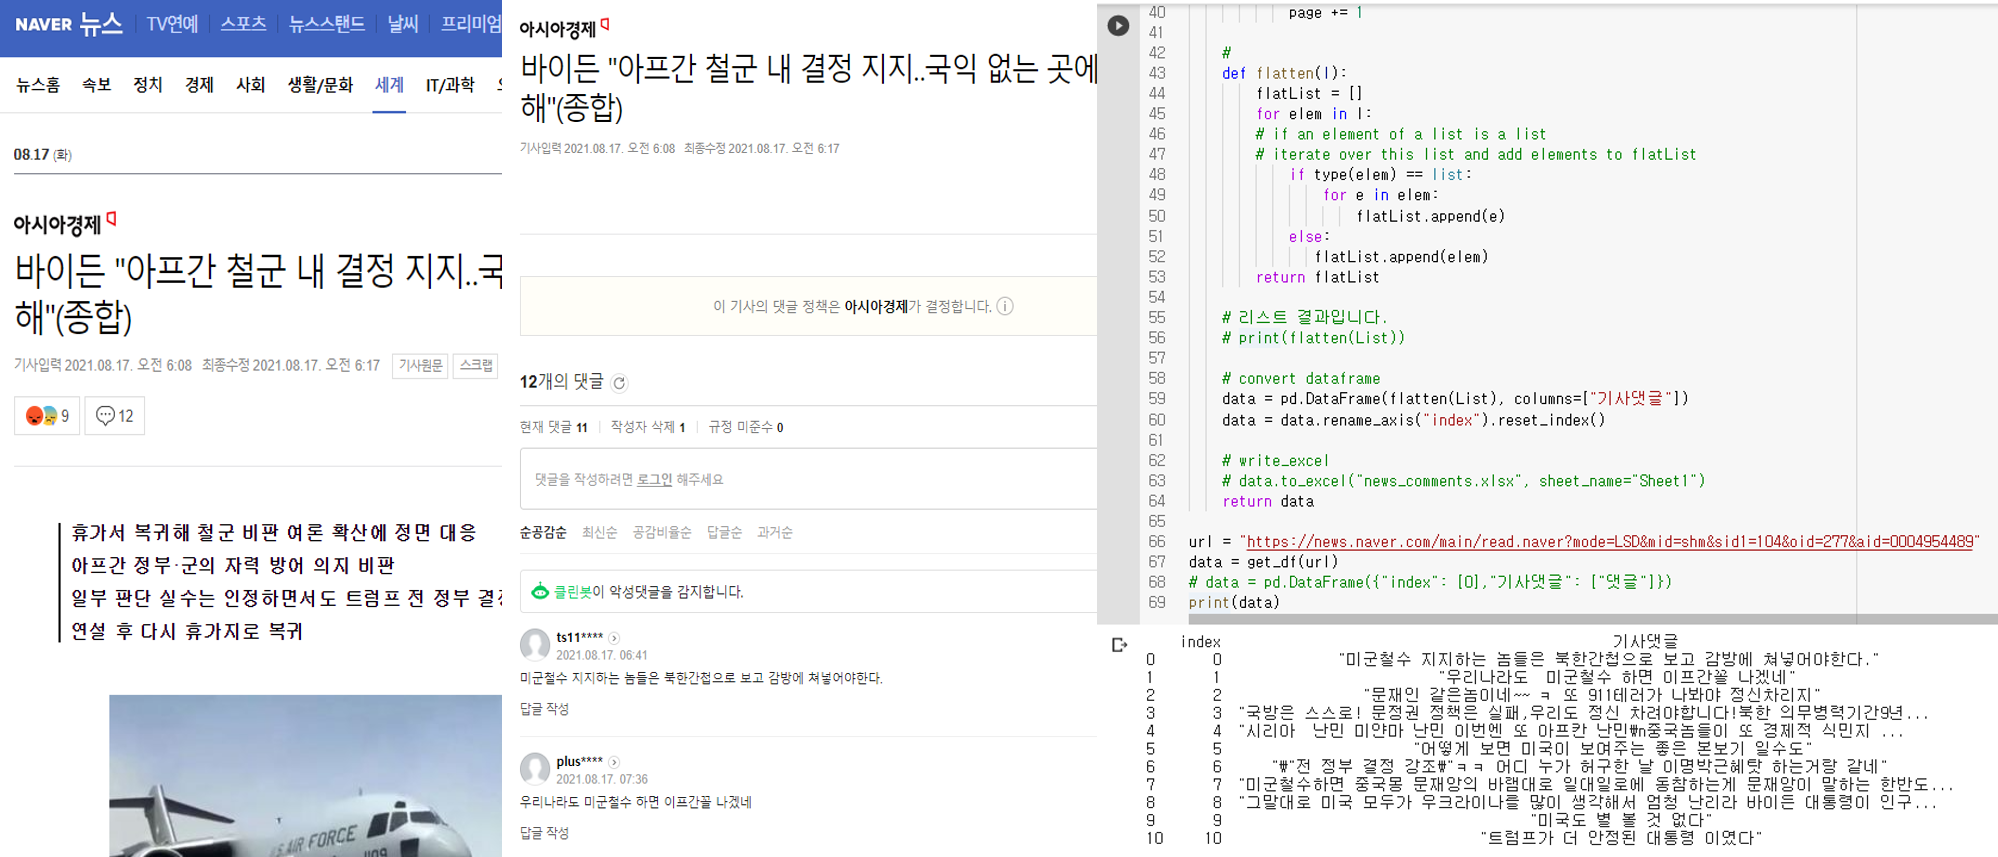
- 이제 저 코드를 Dash에 포함시키도록 한다.
(2) 대시 코드
- 이번에는 대시 코드를 적용해본다.
- 기존 코드에 이어서 작성을 해본다. (app.py)
# 크롤링 라이브러리
from bs4 import BeautifulSoup
import requests
import re
import pandas as pd

# dash 라이브러리
import dash
import dash_core_components as dcc
import dash_html_components as html
import dash_table
from dash.dependencies import Input, Output, State

# 댓글을 달 빈 리스트를 생성합니다.
url = "https://news.naver.com/main/read.naver?mode=LSD&mid=shm&sid1=100&oid=022&aid=0003609357"

def get_df(url):
    # 댓글을 달 빈 리스트를 생성한다.
    List = []
    url = url
    oid = url.split("oid=")[1].split("&")[0]
    aid = url.split("aid=")[1]
    page = 1
    header = {
        "User-agent": "Mozilla/5.0 (Windows NT 10.0; Win64; x64) AppleWebKit/537.36 (KHTML, like Gecko) Chrome/65.0.3325.181 Safari/537.36",
        "referer": url,

    }
    while True:
        c_url = "https://apis.naver.com/commentBox/cbox/web_neo_list_jsonp.json?ticket=news&templateId=default_society&pool=cbox5&_callback=jQuery1707138182064460843_1523512042464&lang=ko&country=&objectId=news" + oid + "%2C" + aid + "&categoryId=&pageSize=20&indexSize=10&groupId=&listType=OBJECT&pageType=more&page=" + str(
            page) + "&refresh=false&sort=FAVORITE"
    # 파싱하는 단계입니다.
        r = requests.get(c_url, headers=header)
        cont = BeautifulSoup(r.content, "html.parser")
        total_comm = str(cont).split('comment":')[1].split(",")[0]

        match = re.findall('"contents":([^\*]*),"userIdNo"', str(cont))
        # 댓글을 리스트에 중첩합니다.
        List.append(match)

        # 한번에 댓글이 20개씩 보이기 때문에 한 페이지씩 몽땅 댓글을 긁어 옵니다.
        if int(total_comm) <= ((page) * 20):
            break
        else:
            page += 1

    def flatten(l):
        flatList = []
        for elem in l:
        # if an element of a list is a list
        # iterate over this list and add elements to flatList
            if type(elem) == list:
                for e in elem:
                    flatList.append(e)
            else:
               flatList.append(elem)
        return flatList

    # 리스트 결과입니다.
    # print(flatten(List))

    # convert dataframe
    data = pd.DataFrame(flatten(List), columns=["기사댓글"])
    data = data.rename_axis("index").reset_index()

    # write_excel
    # data.to_excel("news_comments.xlsx", sheet_name="Sheet1")
    return data

# data = get_df(url)
data = pd.DataFrame({"index": [0],
                     "기사댓글": ["댓글"]})
# print(data.head())

external_stylesheets = [
    {
        "href": "https://fonts.googleapis.com/css2?"
                "family=Lato:wght@400;700&display=swap",
        "rel": "stylesheet",
    },
]
app = dash.Dash(__name__, external_stylesheets=external_stylesheets,
                suppress_callback_exceptions=True,
                prevent_initial_callbacks=True)

app.title = "네이버 크롤링"
server = app.server # 해당 코드를 새롭게 추가한다.

app.layout = html.Div(
    children = [
        html.Div(
            children = [
                html.H1(children="네이버 뉴스 댓글 크롤링 싸이트", className="header_title", ),
                html.P(children="temp ~~~ ", className="header_description", ),
            ],
            className='header',
        ),
        # URL html.Div
        html.Div(
            children=[
                html.Div(
                    children=[
                        html.Div(children="네이버 뉴스 주소를 입력하여 주세요", className="menu-title"),
                        dcc.Input(id="naver_news_url",
                                  placeholder="URL을 입력하여 주세요",
                                  className="naver_news_url"),
                        html.P("예: https://news.naver.com/main/read.naver?mode=LSD&mid=shm&sid1=100&oid=586&aid=0000027892",
                               className="url_sample"),
                        html.Button('크롤링 시작', id='submit-val', n_clicks=0),
                    ]
                ), # html.Div
            ], # children
            className="menu"
        ), # URL html.Div
        html.Div(
            children=[
                html.Div(
                    children=dash_table.DataTable(
                        id = "data_id",
                        columns=[{"id":c, "name":c} for c in data.columns],
                        data = [],
                        style_cell={'textAlign': 'left',
                                    'whiteSpace': 'normal',
                                    'fontWeight': 'normal',
                                    'height': 'auto'
                                    },
                        style_header={
                            'backgroundColor': 'black',
                            'fontWeight': 'bold',
                            'color': 'white'
                        },
                        export_format="xlsx",
                    ) # children
                ) # Table
            ],
            className="wrapper",
        ), # html.Div
    ]
)

# URL 텍스트
@app.callback(
    Output(component_id="data_id", component_property="data"),
    [Input(component_id="submit-val", component_property="n_clicks")],
    [State(component_id="naver_news_url", component_property='value')]

)

def update_output_url(n_clicks, input_url):
    global data
    if n_clicks > 0:
        data = get_df(input_url)
    else:
        print("None")
    return data.to_dict('records')

if __name__ == "__main__":
	app.run_server(debug=True)
- 본 코드에서의 핵심은
@app.callback과update_output_url함수 영역이다. - 또한,
global data는 기 저장된 data 객체를 함수 내에서 쓰기 위함이다.- 코드 용어로는
global은data를 전역변수로 쓰겠다는 것을 의미한다.
- 코드 용어로는
(3) CSS 소스 적용
- CSS 적용 파일은 아래와 같이 적용했다.
body {
    font-family: "Lato", sans-serif;
    margin: 0;
    background-color: #F7F7F7;
}

.header {
    background-color: #222222;
    height: 288px;
    padding: 16px 0 0 0;
}

.header_title {
    color: #FFFFFF;
    font-size: 48px;
    font-weight: bold;
    text-align: center;
    margin: 0 auto;
}

.header_description {
    color: #CFCFCF;
    margin: 4px auto;
    text-align: center;
    max-width: 384px;
}

.menu {
    height: 130px;
    width: 912px;
    display: flex;
    justify-content: space-evenly;
    padding-top: 24px;
    margin: -80px auto 0 auto;
    background-color: #FFFFFF;
    box-shadow: 0 4px 6px 0 rgba(0, 0, 0, 0.18);
}

.naver_news_url {
    width: 100%;
}

.menu-title {
    margin-bottom: 6px;
    font-weight: normal;
    font-style: bold;
}

.url_sample {
    font-weight: normal;
    font-style: italic;
    font-size: 80%;
    color: #079A82;
}

.card {
    margin-bottom: 24px;
    box-shadow: 0 4px 6px 0 rgba(0, 0, 0, 0.18);
}

.wrapper {
    margin-right: auto;
    margin-left: auto;
    max-width: 1024px;
    padding-right: 10px;
    padding-left: 10px;
    margin-top: 32px;
}
(4) 로컬호스트 앱 실행
- 이제 파일의 구조를 확인해본다.
C:.
│  app.py
│  requirements.txt
│
├─assets
│      favicon.ico
│      style.css
- 이제 app.py를 실행한다.
$python app.py
Dash is running on http://127.0.0.1:8050/

 * Serving Flask app "app" (lazy loading)
 * Environment: production
   WARNING: This is a development server. Do not use it in a production deployment.
   Use a production WSGI server instead.
 * Debug mode: on
None
- 기존에 입력한 URL과 동일하게 나타나는 것을 확인할 수 있다.
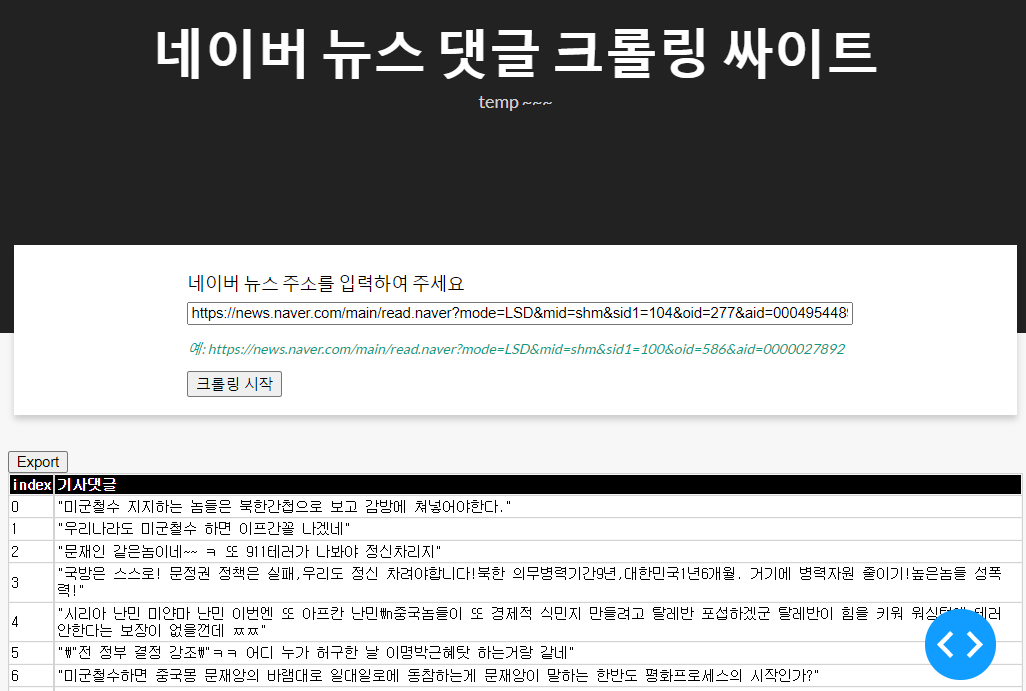
- 그리고, Export 버튼을 누르면, excel 파일이 출력될 것이다.
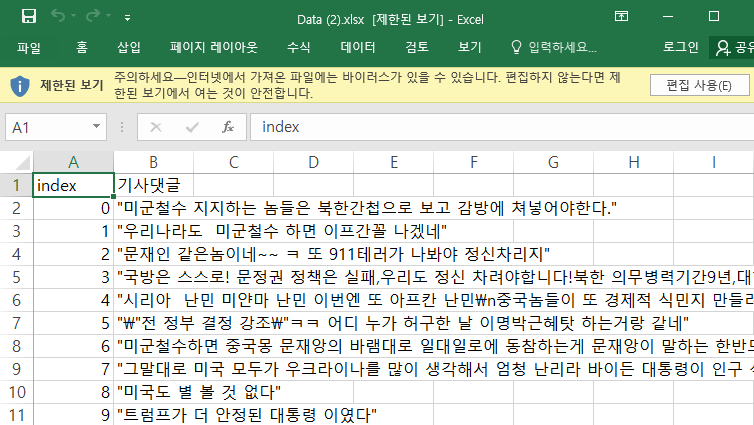
- 이 때, 처음 댓글의 개수가 1개 정도 차이가 나는 것을 확인할 수 있었는데, 이 글을 작성하는 중간에 누군가가 또 삭제 하였기 때문에 차이가 발생했을 뿐이다.
- 즉 로컬호스트에서는 이제 정상적으로 배포가 되었고, 마지막으로 Heroku를 통해서 배포를 진행하도록 한다.
4. 웹 배포하기 with Heroku & Git
- 웹 배포를 위해서는 Heroku & Git 설치를 해야 한다.
- 각 버전에 맞는 것을 설치 진행한다.
Heroku&git정상적으로 설치 후 버전 확인을 화면 다음과 같이 확인이 가능하다.
(venv) $ echo 'export PATH="/usr/local/homebrew/opt/heroku-node/bin:$PATH"' >> /Users/evan/.bash_profile
(venv) $ git --version
git version 2.30.0
(venv) $ heroku --version
 ›   Warning: Our terms of service have changed: https://dashboard.heroku.com/terms-of-service
heroku/7.56.1 darwin-x64 node-v12.21.0
- 이번에는
runtime.txt파일을 프로젝트 폴더 내 상단 위치에 생성한 후, 다음과 같이 입력한다.- 해당 버전은 독자의 버전과 다를 수 있으니 확인 후 입력한다.
python-3.8.7
- 이번에는
Procfile을 생성한 후, 아래 텍스트를 추가한다.- Heroku app에서 gunicorn 서버로 대시보드를 운영한다는 뜻이다.
web: gunicorn app:server
- 이번에는
.gitignore파일을 생성하여 불필요한 파일들을 추적하지 않도록 한다.- 해당 파일만
git commit을 진행한다.
- 해당 파일만
venv
*.pyc
.DS_Store # 맥 사용자만 추가
- 전체적인 프로젝트의 파일 구조는 아래와 같다.
C:.
│  app.py
│  Procfile
│  README.md
│  requirements.txt
│  runtime.txt
│
├─.idea
│  │  .gitignore
│  │  dash-crawling.iml
│  │  dbnavigator.xml
│  │  misc.xml
│  │  modules.xml
│  │  vcs.xml
│  │  workspace.xml
│  │
│  └─inspectionProfiles
│          profiles_settings.xml
│
├─assets
       favicon.ico
       style.css
- 이제 마지막으로
heroku에 앱 배포를 시작한다.- 사전에 회원가입 등 진행이 되어 있어야 한다.
- 이 때, 중요한 것은 프로젝트 폴더명과 Heroku App 이름이 동일해야 한다.
your-project
$ heroku create your-project # 각자의 이름을 추가한다.
- 이제
heroku login을 진행한다.
$ (venv) heroku login
heroku: Press any key to open up the browser to login or q to exit:
Opening browser to https://cli-auth.heroku.com/auth/cli/browser/9320abcd-b8c6-406d-9198-ca14d1e59a26?requestor=SFMyNTY.g2gDbQAAAA4yMjEuMTU3LjM3LjIxNm4GAGgtTBB7AWIAAVGA.GlyVc8jbyiW6NG0MVzCS0bOjtzBWvYRfjB9-gnkQaoQ
Logging in... done
Logged in as your_email_address
- 웹 화면에 로그인 한 후, 본인의 프로젝트를 확인한다.
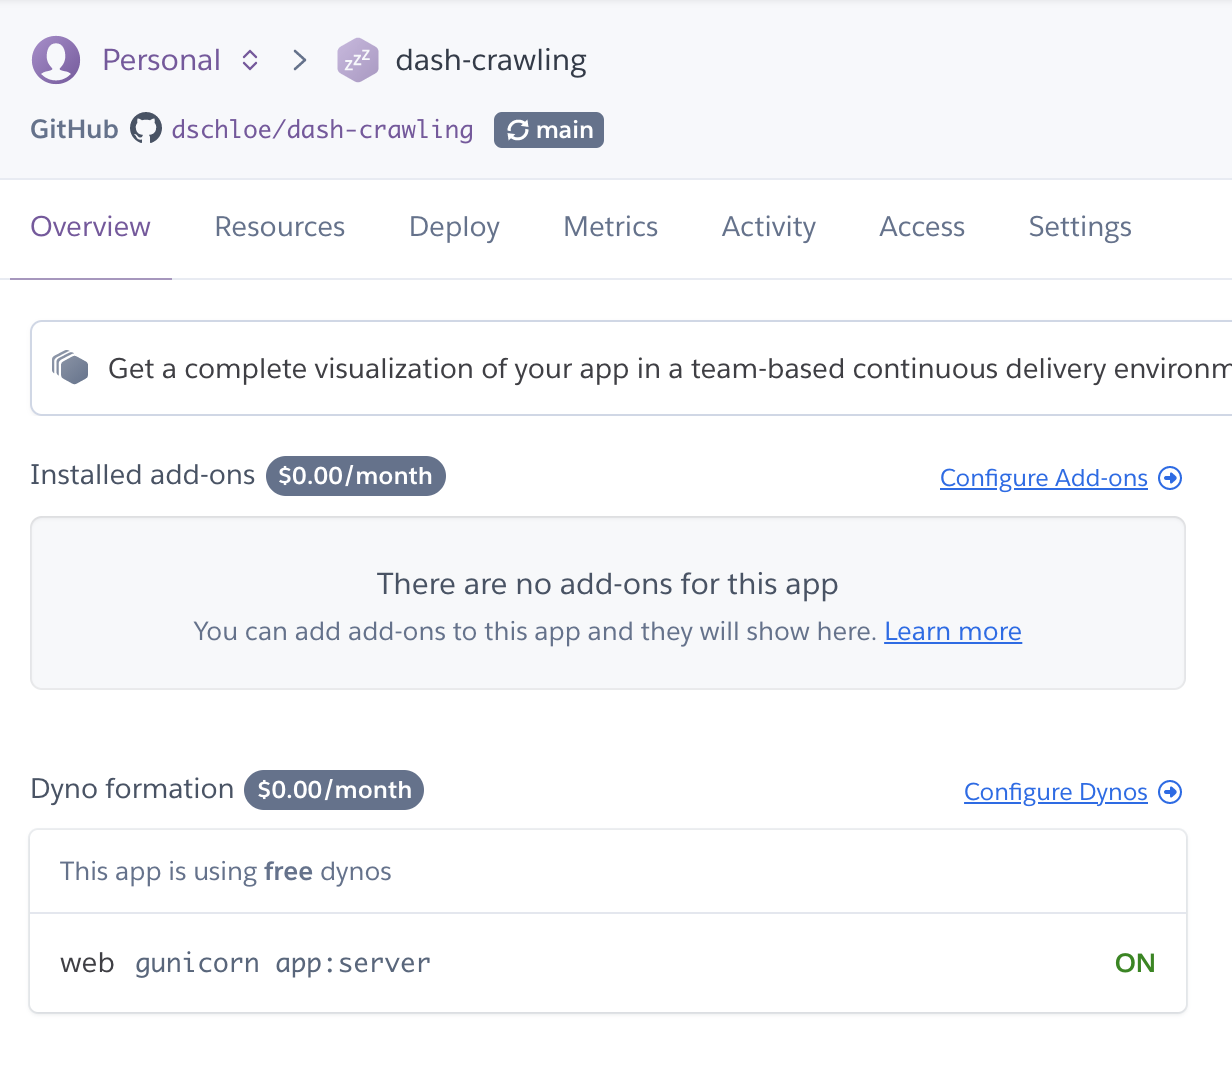
- 이제 배포를 진행한다. 소스코드는 Deploy 메뉴를 클릭하면 확인할 수 있다.
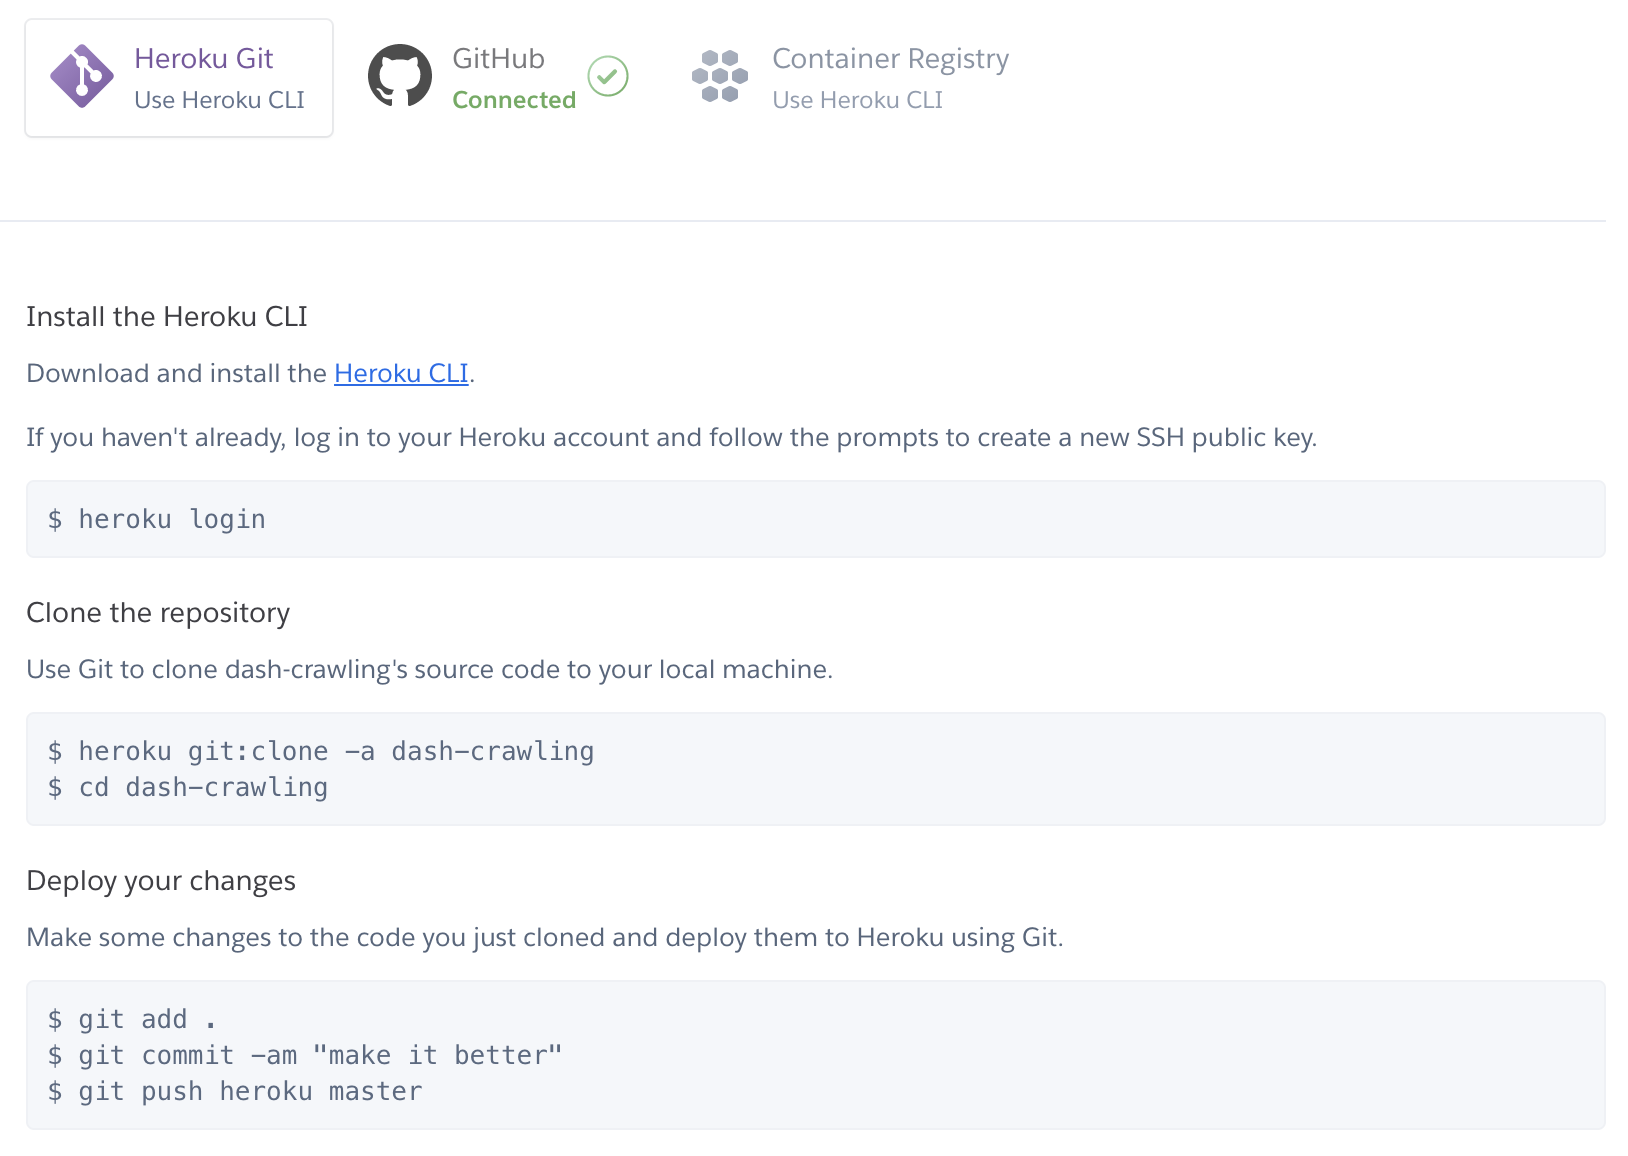
- 다만 필자는 아래와 같이 명령어를 살짝 바꿔서 진행하고 있다.
$ git add .
$ git commit -am "make it better"
$ git push
$ git push heroku main
- 이제 완성된 heroku-app을 확인한다.
- URL: https://dash-crawling.herokuapp.com/
- 현재는 닫은 상태입니다.
- 웹 크롤링은 완전한 합법은 아닙니다. 따라서, 샘플용으로 제작했을 뿐입니다.
- [Settings]-[Maintenance Mode] 에서 쉽게 온오프를 할 수 있다.

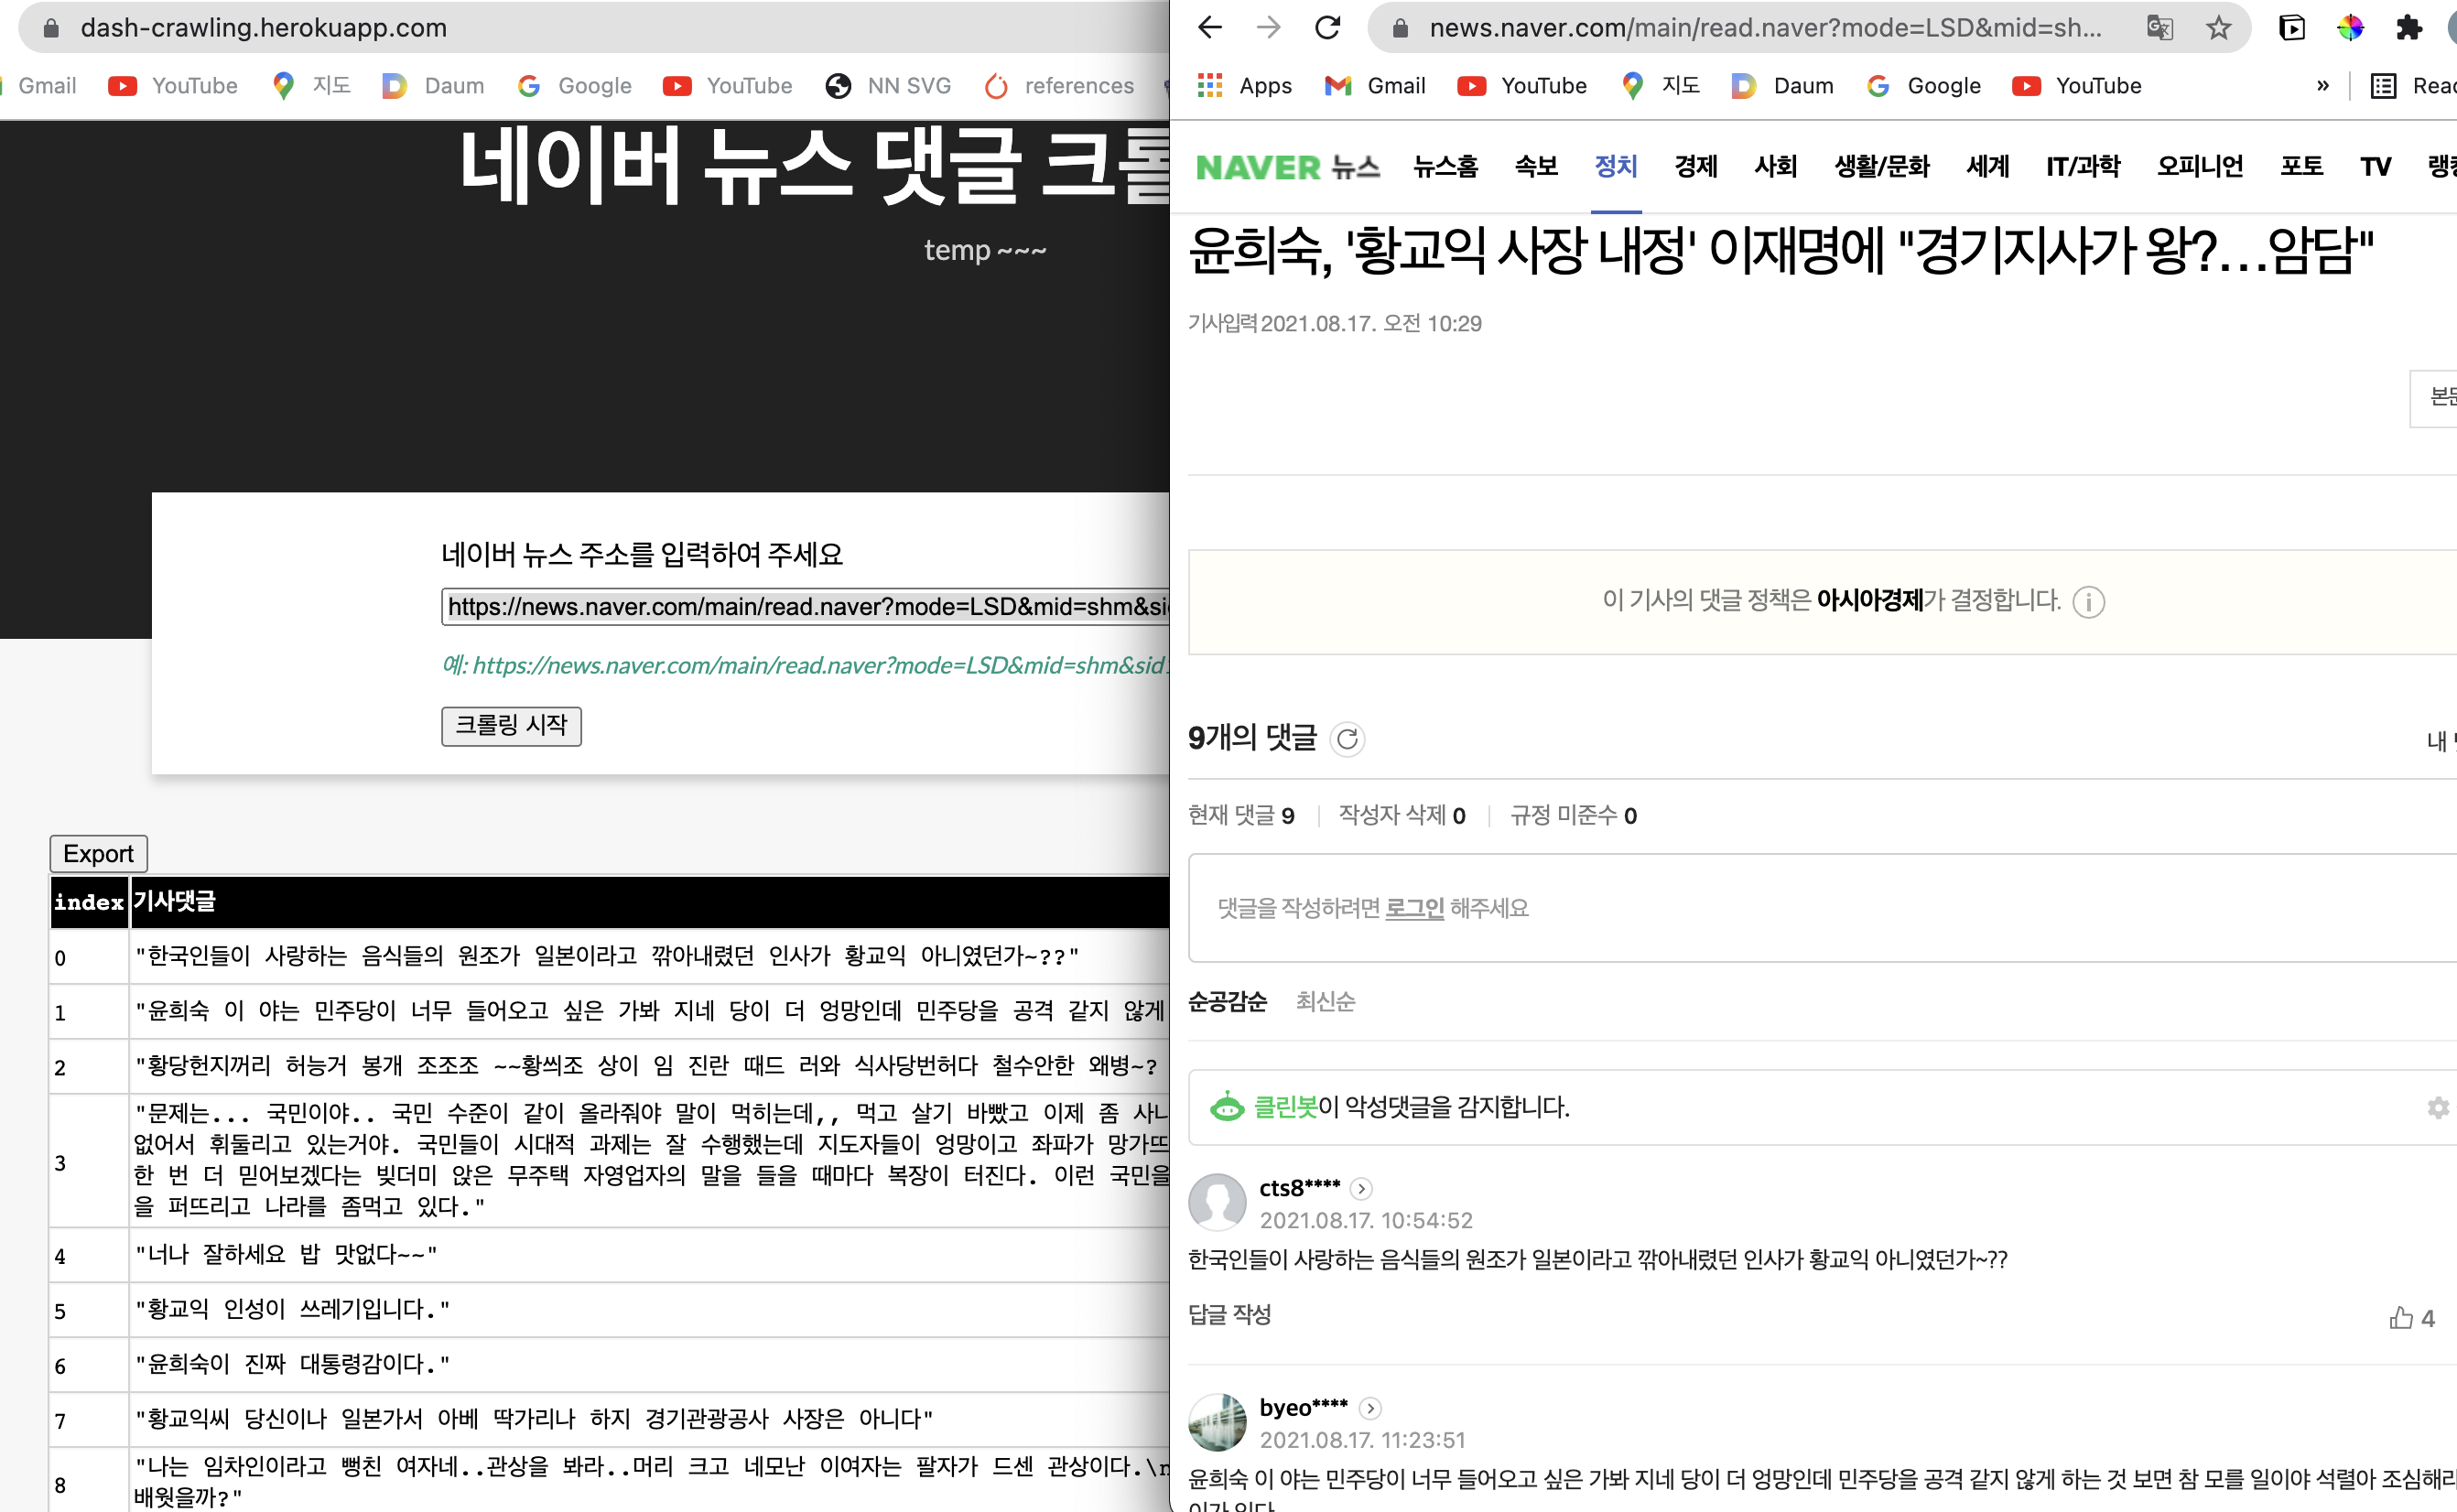
- 아래는 서버를 오픈한 뒤 메인 화면이다. 테스트도 하였다.
- URL: https://news.naver.com/main/read.naver?mode=LSD&mid=shm&sid1=100&oid=277&aid=0004954690
- 기사 선택은 무작위이기 때문에 아무런 의미가 없습니다. 댓글이 잘 수집되는지만 확인 바랍니다.
5. Reference
- 네이버 크롤링 댓글 수집 소스 코드, https://blog.naver.com/seodaeho91/221273565367
