Kaggle Countplot with Text using Seaborn
Page content
강의 홍보
- 취준생을 위한 강의를 제작하였습니다.
- 본 블로그를 통해서 강의를 수강하신 분은 게시글 제목과 링크를 수강하여 인프런 메시지를 통해 보내주시기를 바랍니다.
스타벅스 아이스 아메리카노를 선물로 보내드리겠습니다.
- [비전공자 대환영] 제로베이스도 쉽게 입문하는 파이썬 데이터 분석 - 캐글입문기

개요
- 수강생 중 1명이 캐글 경진대회에 참여하고 있는데, 시각화의 어려움을 같이 해결하면서 팁을 공유한다.
- 도구: Python + Seaborn + Matplotlib
- 캐글 데이터: https://www.kaggle.com/c/kaggle-survey-2020/notebooks?competitionId=23724&sortBy=voteCount
캐글 데이터 연동
- 캐글 데이터를 구글 드라이브에 업로드 한 뒤 구글 코랩과 연동한다.
- Kaggle API를 통해 데이터를 불러올 수도 있지만, 수동으로 다운로드 받은 뒤 드라이브에 업로드 하였다.
# Mount Google Drive
from google.colab import drive # import drive from google colab

ROOT = "/content/drive"     # default location for the drive
print(ROOT)                 # print content of ROOT (Optional)
drive.mount(ROOT)           # we mount the google drive at /content/drive
/content/drive
Mounted at /content/drive
# import join used to join ROOT path and MY_GOOGLE_DRIVE_PATH
from os.path import join

# path to your project on Google Drive
MY_GOOGLE_DRIVE_PATH = 'My Drive/Colab Notebooks/competition/kaggle/2020 Kaggle Machine Learning'

PROJECT_PATH = join(ROOT, MY_GOOGLE_DRIVE_PATH)
print(PROJECT_PATH)
/content/drive/My Drive/Colab Notebooks/competition/kaggle/2020 Kaggle Machine Learning
%cd "{PROJECT_PATH}"
/content/drive/My Drive/Colab Notebooks/competition/kaggle/2020 Kaggle Machine Learning
라이브러리 & 데이터 불러오기
import numpy as np
import pandas as pd
import matplotlib.pyplot as plt
import seaborn as sns

pd.set_option('mode.chained_assignment', None)
survey = pd.read_csv('./data/kaggle_survey_2020_responses.csv')
question = survey.iloc[0,:].T
full_df = survey.iloc[1:,:]
full_df.shape
/usr/local/lib/python3.6/dist-packages/IPython/core/interactiveshell.py:2718: DtypeWarning: Columns (0) have mixed types.Specify dtype option on import or set low_memory=False.
  interactivity=interactivity, compiler=compiler, result=result)


(20036, 355)
데이터 전처리
- 우선
India와USA를 제외한 나라는 삭제하도록 한다. - 출력된 결과를 확인해보면 알겠지만, 행이 대폭 감소한 것을 확인할 수 있다.
full_df['Q3'].replace({'United States of America':'USA'}, inplace=True)
df1 = full_df[(full_df['Q3']=='India')|(full_df['Q3']=='USA')]
df1.reset_index(drop=True, inplace=True)
print(df1['Q3'].unique())
df1.shape
['USA' 'India']


(8088, 355)
1차 데이터 시각화
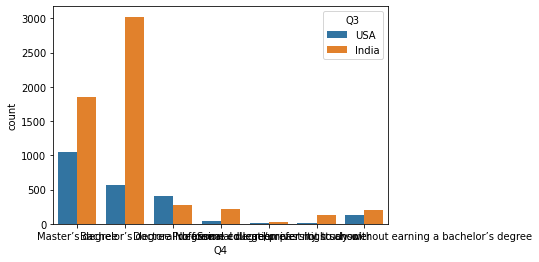
- 이제 countplot()을 활용하여 시각화를 진행한다.
sns.countplot(x = 'Q4', hue = 'Q3', data = df1)
<matplotlib.axes._subplots.AxesSubplot at 0x7f3bbad50ac8>

- x축 라벨이 섞여 있어서, 알아보기 어렵다.
2차 데이터 시각화
- x축 라벨의 경우 rotation을 통해 수정할 수 있다.
sns.countplot(x = 'Q4', hue = 'Q3', data = df1)
plt.xticks(rotation=90)
plt.show()

- 위 시각화의 문제점은 무엇일까? 무언가 특별한 순서가 없다는 점이다.
3차 데이터 시각화
- 순서를 정해서 진행해본다.
- 이 부분은 Order를 통해서 순서를 정할 수 있다.
- 또한, 텍스트가 긴 내용은 전처리를 통하여 수정하도록 한다.
[^A-Za-z0-9-\s]+는 정규표현식의 일종으로 문자와 숫자를 제외한 특수문자들을 찾는다.- 그 이후에는 replace 함수를 적용하여 특수 문자를 제거하도록 한다.
q4_order에 원하는대로 리스트 객체를 만들어서 countplot() 인수에 q4_order를 대입한다.
df1['Q4'] = df1['Q4'].str.replace("[^A-Za-z0-9-\s]+", "")
df1['Q4'].replace({'No formal education past high school':'~ High school',
                   'I prefer not to answer':'Not answer',
                   'Some collegeuniversity study without earning a bachelors degree':'Study without a BD',
                   'Masters degree':"Master's degree",
                   'Bachelors degree':"Bachelor's degree",
                   ' High school':'~ High school'}, inplace=True)

q4_order = ['~ High school', 'Professional degree', 'Study without a BD', "Bachelor's degree","Master's degree",'Doctoral degree', 'Not answer']

sns.countplot(x = 'Q4', hue = 'Q3', order = q4_order, data = df1)
plt.xticks(rotation=90)
plt.show()

4차 데이터 시각화
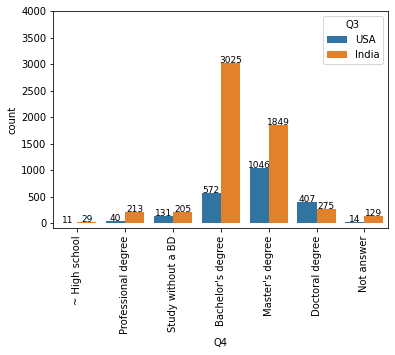
- 이제 마지막 남은 미션이 있다. 텍스트를 올리는 작업이다.
- ax.patches의 뜻은 14개의 그래프가 있다는 뜻을 의미한다.
- 즉, 각각의 그래프에
텍스트를 올리는 의미를 가진다.
- 즉, 각각의 그래프에
df1['Q4'] = df1['Q4'].str.replace("[^A-Za-z0-9-\s]+", "")
df1['Q4'].replace({'No formal education past high school':'~ High school',
                   'I prefer not to answer':'Not answer',
                   'Some collegeuniversity study without earning a bachelors degree':'Study without a BD',
                   'Masters degree':"Master's degree",
                   'Bachelors degree':"Bachelor's degree",
                   ' High school':'~ High school'}, inplace=True)

q4_order = ['~ High school', 'Professional degree', 'Study without a BD', "Bachelor's degree","Master's degree",'Doctoral degree', 'Not answer']

ax = sns.countplot(x = 'Q4', hue = 'Q3', order = q4_order, data = df1)
print(len(ax.patches))
for p in ax.patches:
  height = p.get_height()
  ax.text(p.get_x() + p.get_width()/2., height+3, height, ha = 'center', size=9)
ax.set_ylim([-100, 4000])
plt.xticks(rotation=90)
plt.show()
14

5차 데이터 시각화
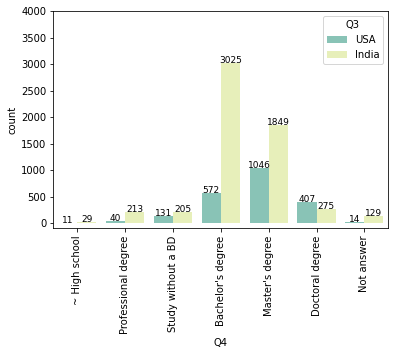
- 이번에는 그래프의 색깔을 조금 바꿔보도록 하자.
df1['Q4'] = df1['Q4'].str.replace("[^A-Za-z0-9-\s]+", "")
df1['Q4'].replace({'No formal education past high school':'~ High school',
                   'I prefer not to answer':'Not answer',
                   'Some collegeuniversity study without earning a bachelors degree':'Study without a BD',
                   'Masters degree':"Master's degree",
                   'Bachelors degree':"Bachelor's degree",
                   ' High school':'~ High school'}, inplace=True)

q4_order = ['~ High school', 'Professional degree', 'Study without a BD', "Bachelor's degree","Master's degree",'Doctoral degree', 'Not answer']

ax = sns.countplot(x = 'Q4', hue = 'Q3', order = q4_order, palette = ["#7fcdbb", "#edf8b1"], data = df1)
print(len(ax.patches))
for p in ax.patches:
  height = p.get_height()
  ax.text(p.get_x() + p.get_width()/2., height+3, height, ha = 'center', size=9)
ax.set_ylim([-100, 4000])
plt.xticks(rotation=90)
plt.show()
14

결론
- 데이터 시각화를 잘할려면,
RAW데이터를 그대로 시각화를 하는 것이 아니다. - 즉, 데이터 전처리가 필요하며, 또한 필요에 따라서 조작하는 것이 중요하다.
