Flask Web Resume Using Templates
Page content
개요
- Flask 웹개발을 통해 간단한 Resume를 작성해본다.
가상환경
- 프로젝트 폴더에 가상환경을 설치한다.
virtualenv venv
created virtual environment CPython3.9.12.final.0-64 in 5343ms
  creator CPython3Windows(dest=C:\Users\human\Desktop\flask-resume-evan-examples\venv, clear=False, no_vcs_ignore=False, global=False)
  seeder FromAppData(download=False, pip=bundle, setuptools=bundle, wheel=bundle, via=copy,
app_data_dir=C:\Users\human\AppData\Local\pypa\virtualenv)
    added seed packages: pip==22.2.2, setuptools==63.2.0, wheel==0.37.1
  activators BashActivator,BatchActivator,FishActivator,NushellActivator,PowerShellActivator,PythonActivator
라이브러리 설치
- 가상환경에 접속 후,
Flask라이브러리를 설치한다.
pip install Flask
[app.py](http://app.py)에 다음과 같이 작성한다.
from flask import Flask, render_template

app = Flask(__name__)

@app.route('/')
def index():
    first_name = 'Evan'
    return render_template('index.html', f_name = first_name)
-
templates에서index.html파일을 만든다.- 이 때, jinja2를 적용하여 html 태그를 작성한다.
<br />

<center>
  <h1>Hello {{ f_name }}</h1>
</center>
Jinja2 Logic
index.html파일에Jinja2 logic을 적용해본다. (IF-Else)
<br />

<center>
  <h1> Hello
    {% if f_name == "Evan" %}
        {{ f_name }}!!
    {% else %}
        There!!
    {% endif %}
  </h1>
</center>
- 이번에는
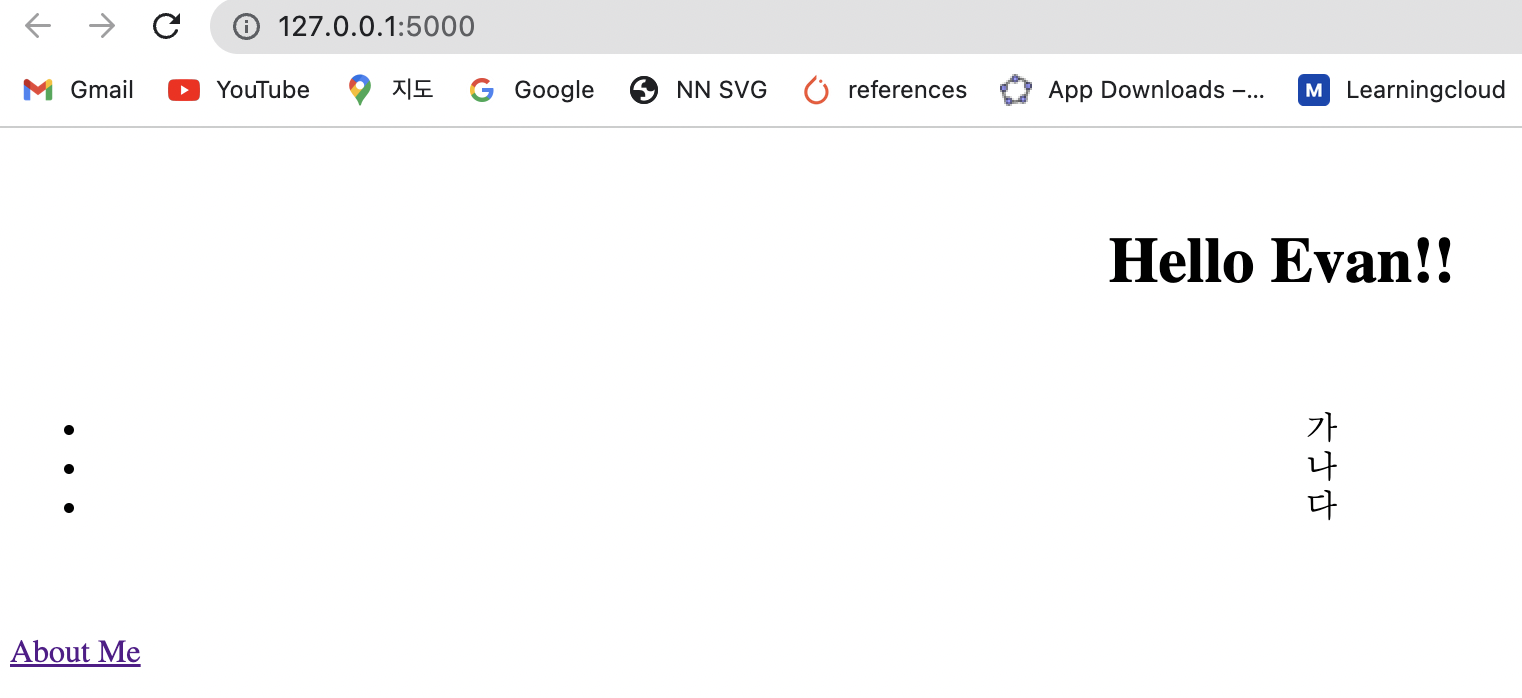
For Loops를 적용한다. 우선,html파일을 아래와 같이 수정을 한다.
<br />

<center>
  <h1>
    Hello {% if f_name == "Evan" %} {{ f_name }}!! {% else %} There!! {% endif
    %}
  </h1>

  <br />
  <ul>
    {% for hangul in hanguls %}
    <li>{{ hangul }}</li>
    {% endfor %}
  </ul>
</center>
- 이번에는
app.py를 수정한다.
from flask import Flask, render_template

app = Flask(__name__)

@app.route('/')
def index():
    first_name = 'Evan'
    hanguls = ["가", "나", "다"]
    return render_template('index.html',
    f_name = first_name,
    hanguls = hanguls)

Factory Application with Blueprint
- 이제 Factory Application Pattern에 맞추어서 전체적인 구조를 변경할 예정이다.
wsgi.py
- 우선, 프로젝트 경로에
[wsgi.py](http://wsgi.py)를 생성 후, 아래와 같이 작성한다.
from app import create_app

app = create_app()

if __name__ == "__main__":
    app.run(host='0.0.0.0', debug=True)
app 폴더 내부
- 우선, app 폴더를 생성한다.
- app 폴더 내에서,
__init__.py를 작성한다.- 여기에서 가장 중요한 코드는
app.register_blueprint(about_bp)이다.
- 여기에서 가장 중요한 코드는
import os

from flask import Flask, render_template

def create_app(test_config=None):
    app = Flask(__name__, instance_relative_config=True)
    app.config.from_mapping(
        SECRET_KEY = 'development'
    )

    if test_config is None:
        app.config.from_pyfile('config.py', silent=True)
    else:
        app.config.from_mapping(test_config)

    try:
        os.makedirs(app.instance_path)
    except OSError:
        pass

    @app.route('/')
    def index():
        first_name = 'Evan'
        hanguls = ["가", "나", "다"]
        return render_template('index.html', template_folder = "templates",
        f_name = first_name,
        hanguls = hanguls)

    from .about.about import about_bp
    app.register_blueprint(about_bp)

    return app
templates폴더를 생성하고,index.html파일을 추가한다.
<br />

<center>
  <h1>
    Hello {% if f_name == "Evan" %} {{ f_name }}!! {% else %} There!! {% endif
    %}
  </h1>

  <br />
  <ul>
    {% for hangul in hanguls %}
    <li>{{ hangul }}</li>
    {% endfor %}
  </ul>

  <a href="/about">about</a>
</center>
about 폴더
- app 폴더 내, about 폴더를 생성한다.
- 기존과 동일하게 파일 작성을 한다.
- 우선,
__init__.py는 파일 생성만 하고 아무것도 작성하지는 않는다.
- 우선,
- 이번에는
[about.py](http://about.py)를 생성하고, 아래와 같이 작성한다.
from flask import Blueprint, render_template

about_bp = Blueprint('about', __name__, template_folder = "templates", url_prefix='/about')

@about_bp.route('/')
def about():
    first_name = 'Evan'
    hanguls = ["가", "나", "다"]
    return render_template('about.html',
    f_name = first_name,
    hanguls = hanguls)
templates폴더를 생성하고,about.html파일을 작성한다.
<h1>about</h1>
테스트
- 이제 localhost에서 확인한다.
flask run
 * Debug mode: off
WARNING: This is a development server. Do not use it in a production deployment. Use a production WSGI server instead.
 * Running on http://127.0.0.1:5000

페이지 이동
index페이지와about페이지를 서로 이동할 수 있도록a태그를 추가하는 코드를 작성해본다.- 먼저,
index.html파일에 아래와 같은 코드를 추가한다.- url_for(): 여기안에 flask 함수명을 넣어주면 된다.
.
.
.
<br/><br/>
<a href="{{ url_for('about.about')}}">About Me</a>
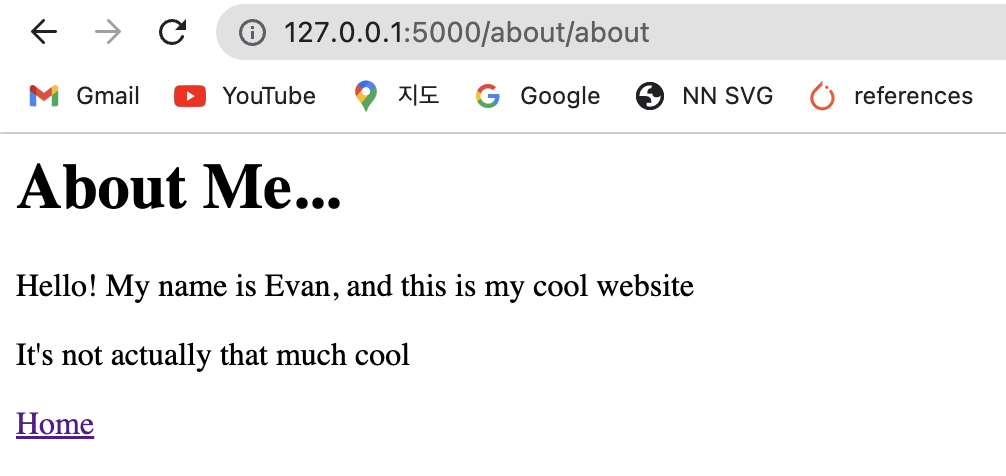
- about은 함수명이고, .about은 추가된 route 명이다. 필자의 about 함수는 아래와 같이 구성했다.
# app/about/about.py
from flask import Blueprint, render_template

about_bp = Blueprint('about', __name__, template_folder = "templates", url_prefix='/about')

@about_bp.route('/about')
def about():
    return render_template('about.html')
- 이번에는
about.html파일에 아래와 같은 코드를 추가한다.
<h1>About Me...</h1>

<p>Hello! My name is Evan, and this is my cool website</p>

<p>It's not actually that much cool</p>

<a href="{{ url_for('index')}}">Home</a>
- 터미널에
flask run을 실행하고 결괏값을 확인한다.


Resume Templates Download
- 파일을 다운로드 받는다.
- 아래와 같이 경로에 다운로드 파일을 추가한다.
static폴더를 만들고 그 안에assets,css,js폴더를 추가한다.- 그리고
templates폴더 안에index.html파일을 추가한다.
app evan$ tree
.
├── __init__.py
├── about
│   ├── __init__.py
│   ├── about.py
│   └── templates
│       └── about.html
├── static
│   ├── assets
│   │   └── img
│   │       ├── favicon.ico
│   │       └── profile.jpg
│   ├── css
│   │   └── styles.css
│   └── js
│       └── scripts.js
└── templates
    └── index.html

8 directories, 9 files
- 이제
index.html에 아래와 같이 코드를 추가한다.
.
.
										<div class="subheading mb-5">
                        3542 Berry Street · Cheyenne Wells, CO 80810 · (317) 585-8468 ·
                        <a href="mailto:name@email.com">name@email.com</a>
                    </div>
										<!-- Will be added -->
                    <div>
                      {% block content %} {% endblock %}

                      This is the footer
                    </div>
										<p class="lead mb-5">I am experienced ...</p>
.
.
- 이번에는
about.html파일을 변경한다.- about.html 파일의 목적은 jinja2 extends 태그를 사용하는데 목적이 있다.
{% extends 'index.html' %}

{% block content %}
<h1>About Me...</h1>

<p>Hello! My name is Evan, and this is my cool website</p>

<p>It's not actually that much cool</p>

<a href="{{ url_for('index')}}">Home</a>

{% endblock %}
FLASK 테스트
- 이제 Flask App을 테스트 한다.
- 왼쪽 프로필 사진 아래의
ABOUT를 클릭한다.
- 왼쪽 프로필 사진 아래의

about 페이지를 살펴보면 아래와 같이 기존 페이지에 추가가 되는 것을 확인할 수 있다.- 텍스트 중간의 Home을 클릭하면 홈페이지로 돌아가는 것을 확인할 수 있다.

