파이썬과 PostgreSQL DB 연동 예제
Page content
강의 홍보
- 취준생을 위한 강의를 제작하였습니다.
- 본 블로그를 통해서 강의를 수강하신 분은 게시글 제목과 링크를 수강하여 인프런 메시지를 통해 보내주시기를 바랍니다.
스타벅스 아이스 아메리카노를 선물로 보내드리겠습니다.
- [비전공자 대환영] 제로베이스도 쉽게 입문하는 파이썬 데이터 분석 - 캐글입문기

개요
- MacOS에서의 기본 설치 과정은 생략하도록 한다.
- 새로운 DB를 생성하도록 한다.
- 먼저 환경변수를 설정한다.
- 해당 경로를 가져오는 방법은 Postgre SQL Installation on MacOS M1에서 확인한다.
(venv) $ export PATH=/opt/homebrew/bin:$PATH:/Applications/Postgres.app/Contents/Versions/13/bin
- 먼저 기본 데이터베이스에 연결한다.
(venv) $ psql postgres
psql (13.4)
Type "help" for help.

postgres=#
- 위 상태에서 패스워드를 설정한다.
- 필자는
evan을 패스워드로 입력하였다.
postgres=# ALTER USER postgres with PASSWORD 'evan';
ALTER ROLE
- 그 후, 다시 Shell로 돌아온 뒤
python_dataengineering데이터베이스를 생성한다.- 아래 코드는 Mac환경설정이 끝난 상황에서의 명령어이기 때문에 다를 수 있다. 또한, 다른 OS에서도 다를 수 있음을 유의한다.
- 참고자료: 1.3. Creating Database
postgres=# \q
(venv) $ createdb python_dataengineering
(venv) $
- 이번에는 pgAdmin에 접속한다.
- 설치 과정은 pgAdmin4 GUI installation on MacOS M1 에서 참고한다.
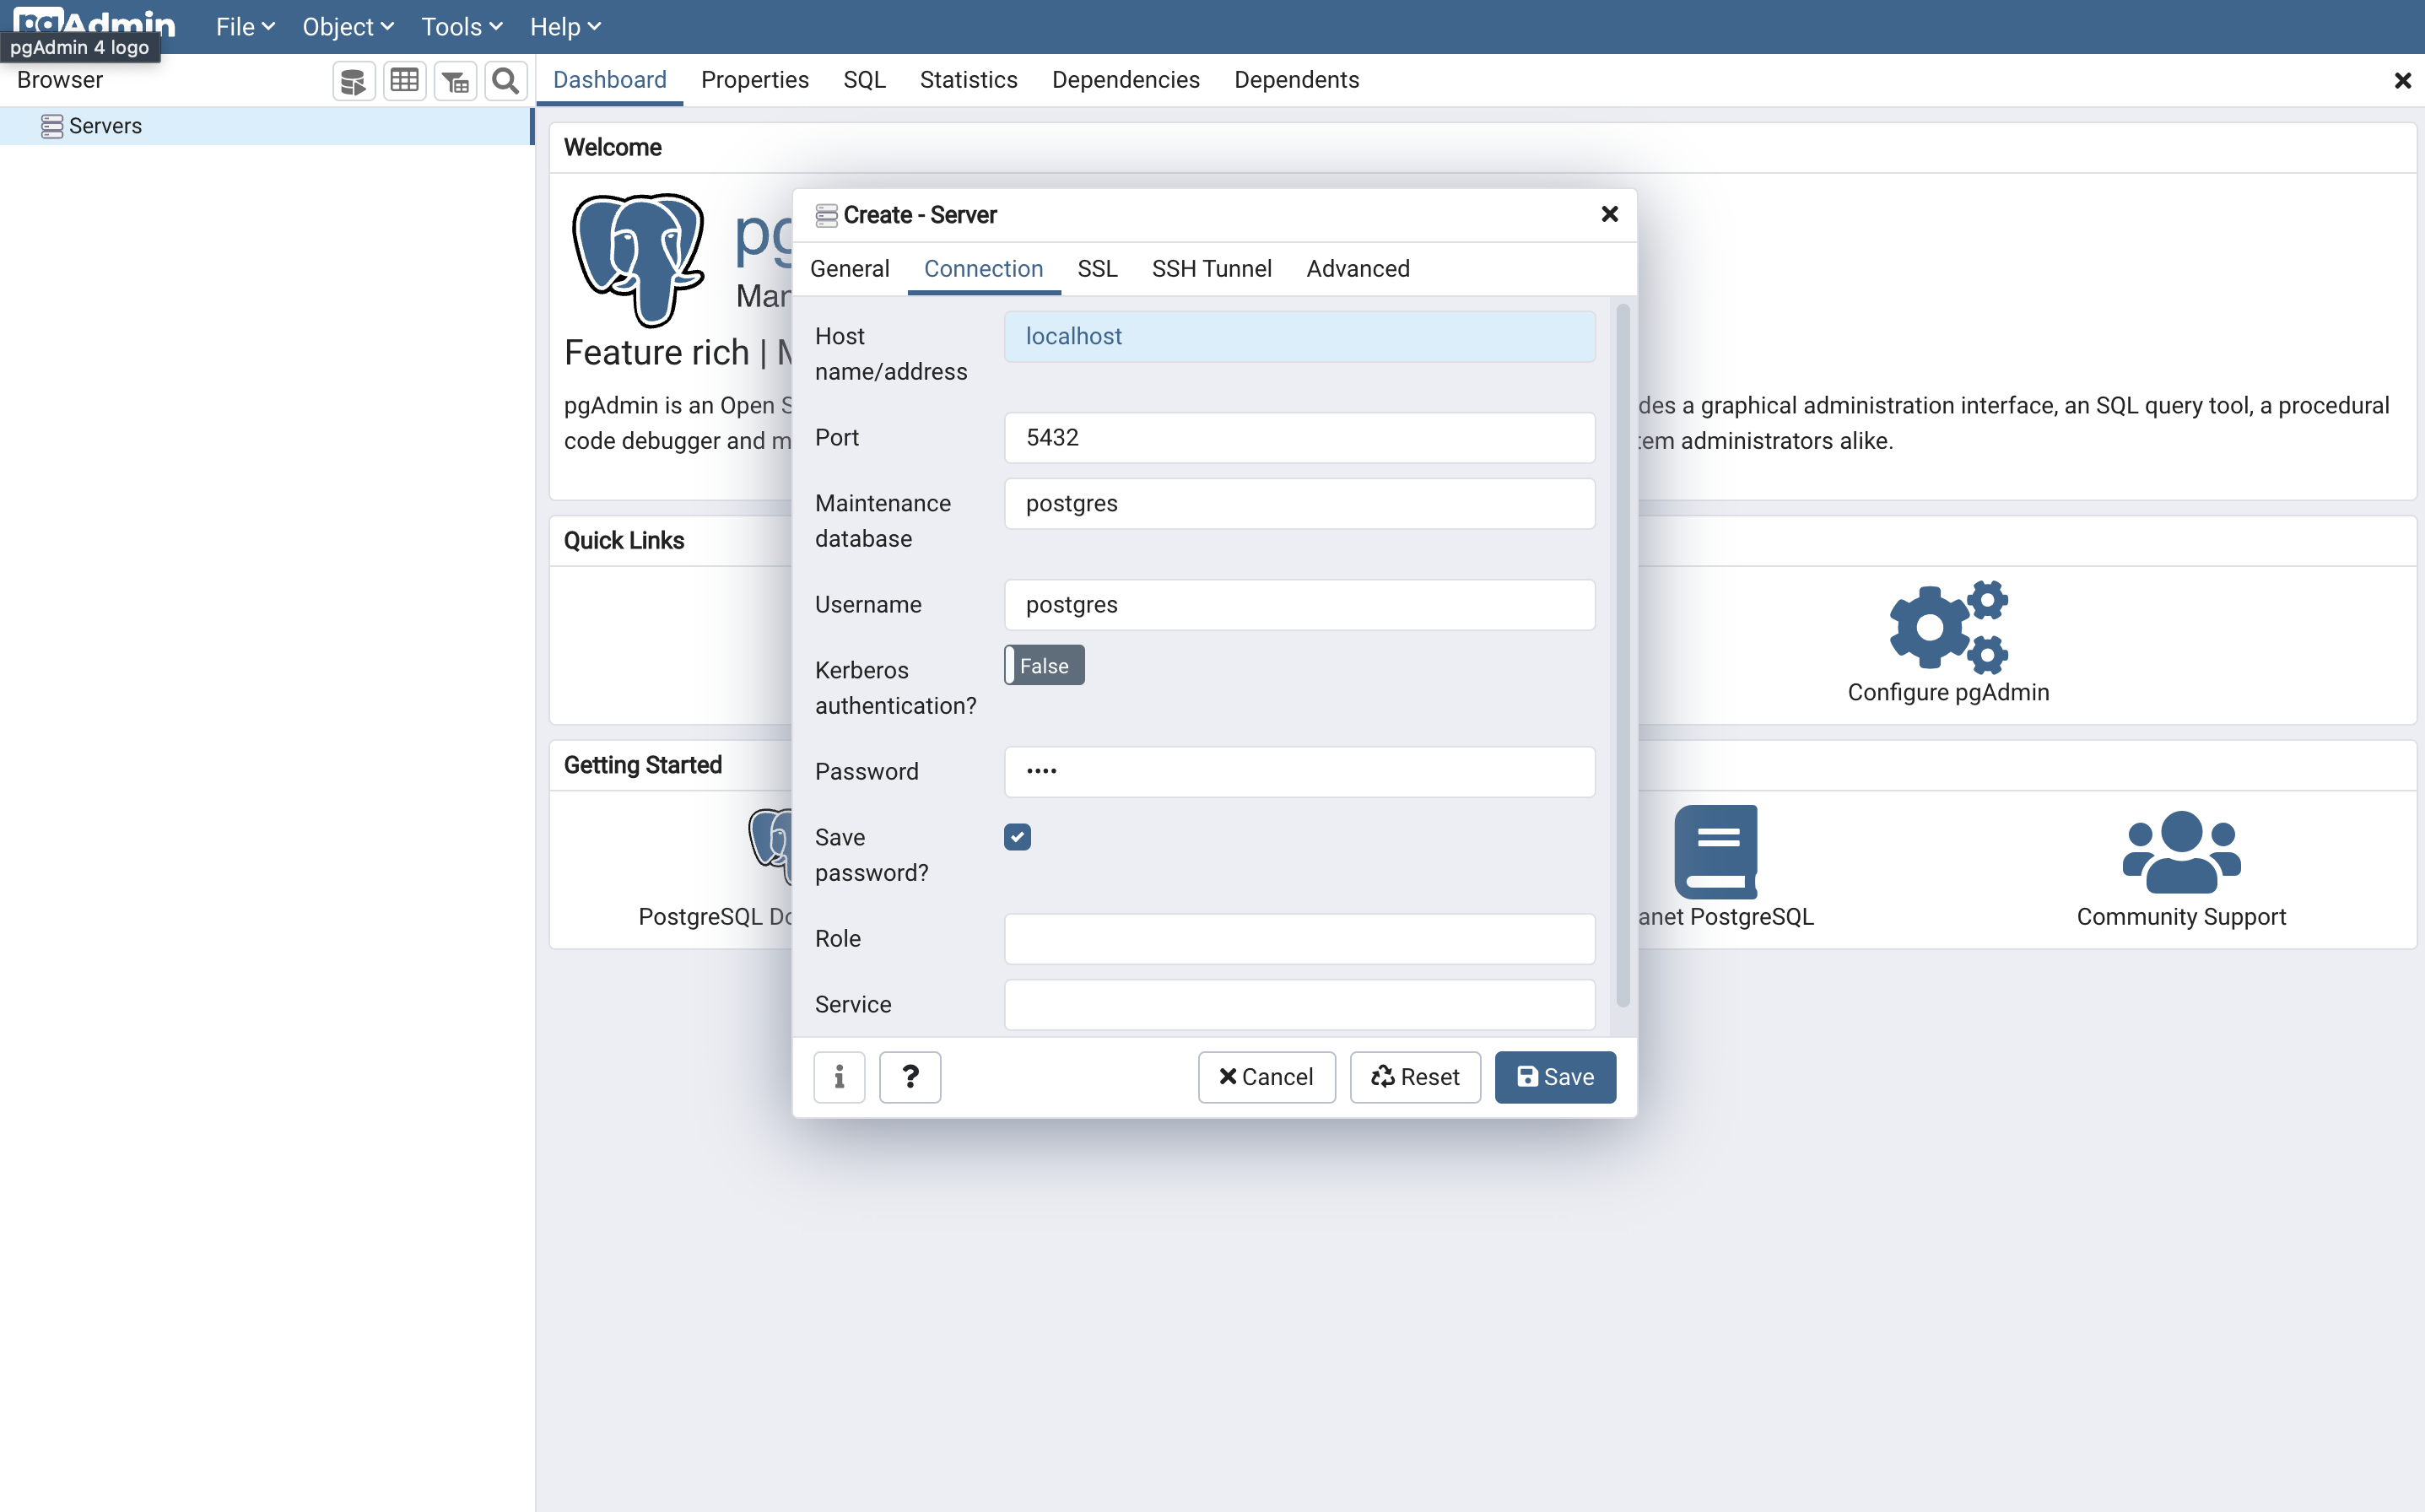
- 최초 접속 후, 아래와 같은 화면에서 PostgreSQL 서버를 추가하도록 한다.
- 상단
대시보드- 화면 중간Add New Server를 차례대로 클릭하면 입력해야 할 상자가 나타난다. - General 메뉴에서는 식별자 이름을 추가하고,
Connection에서는 아래와 같이 입력을 한다.
/img/python/data_engineering/ch04_working_databases/python_postgresql
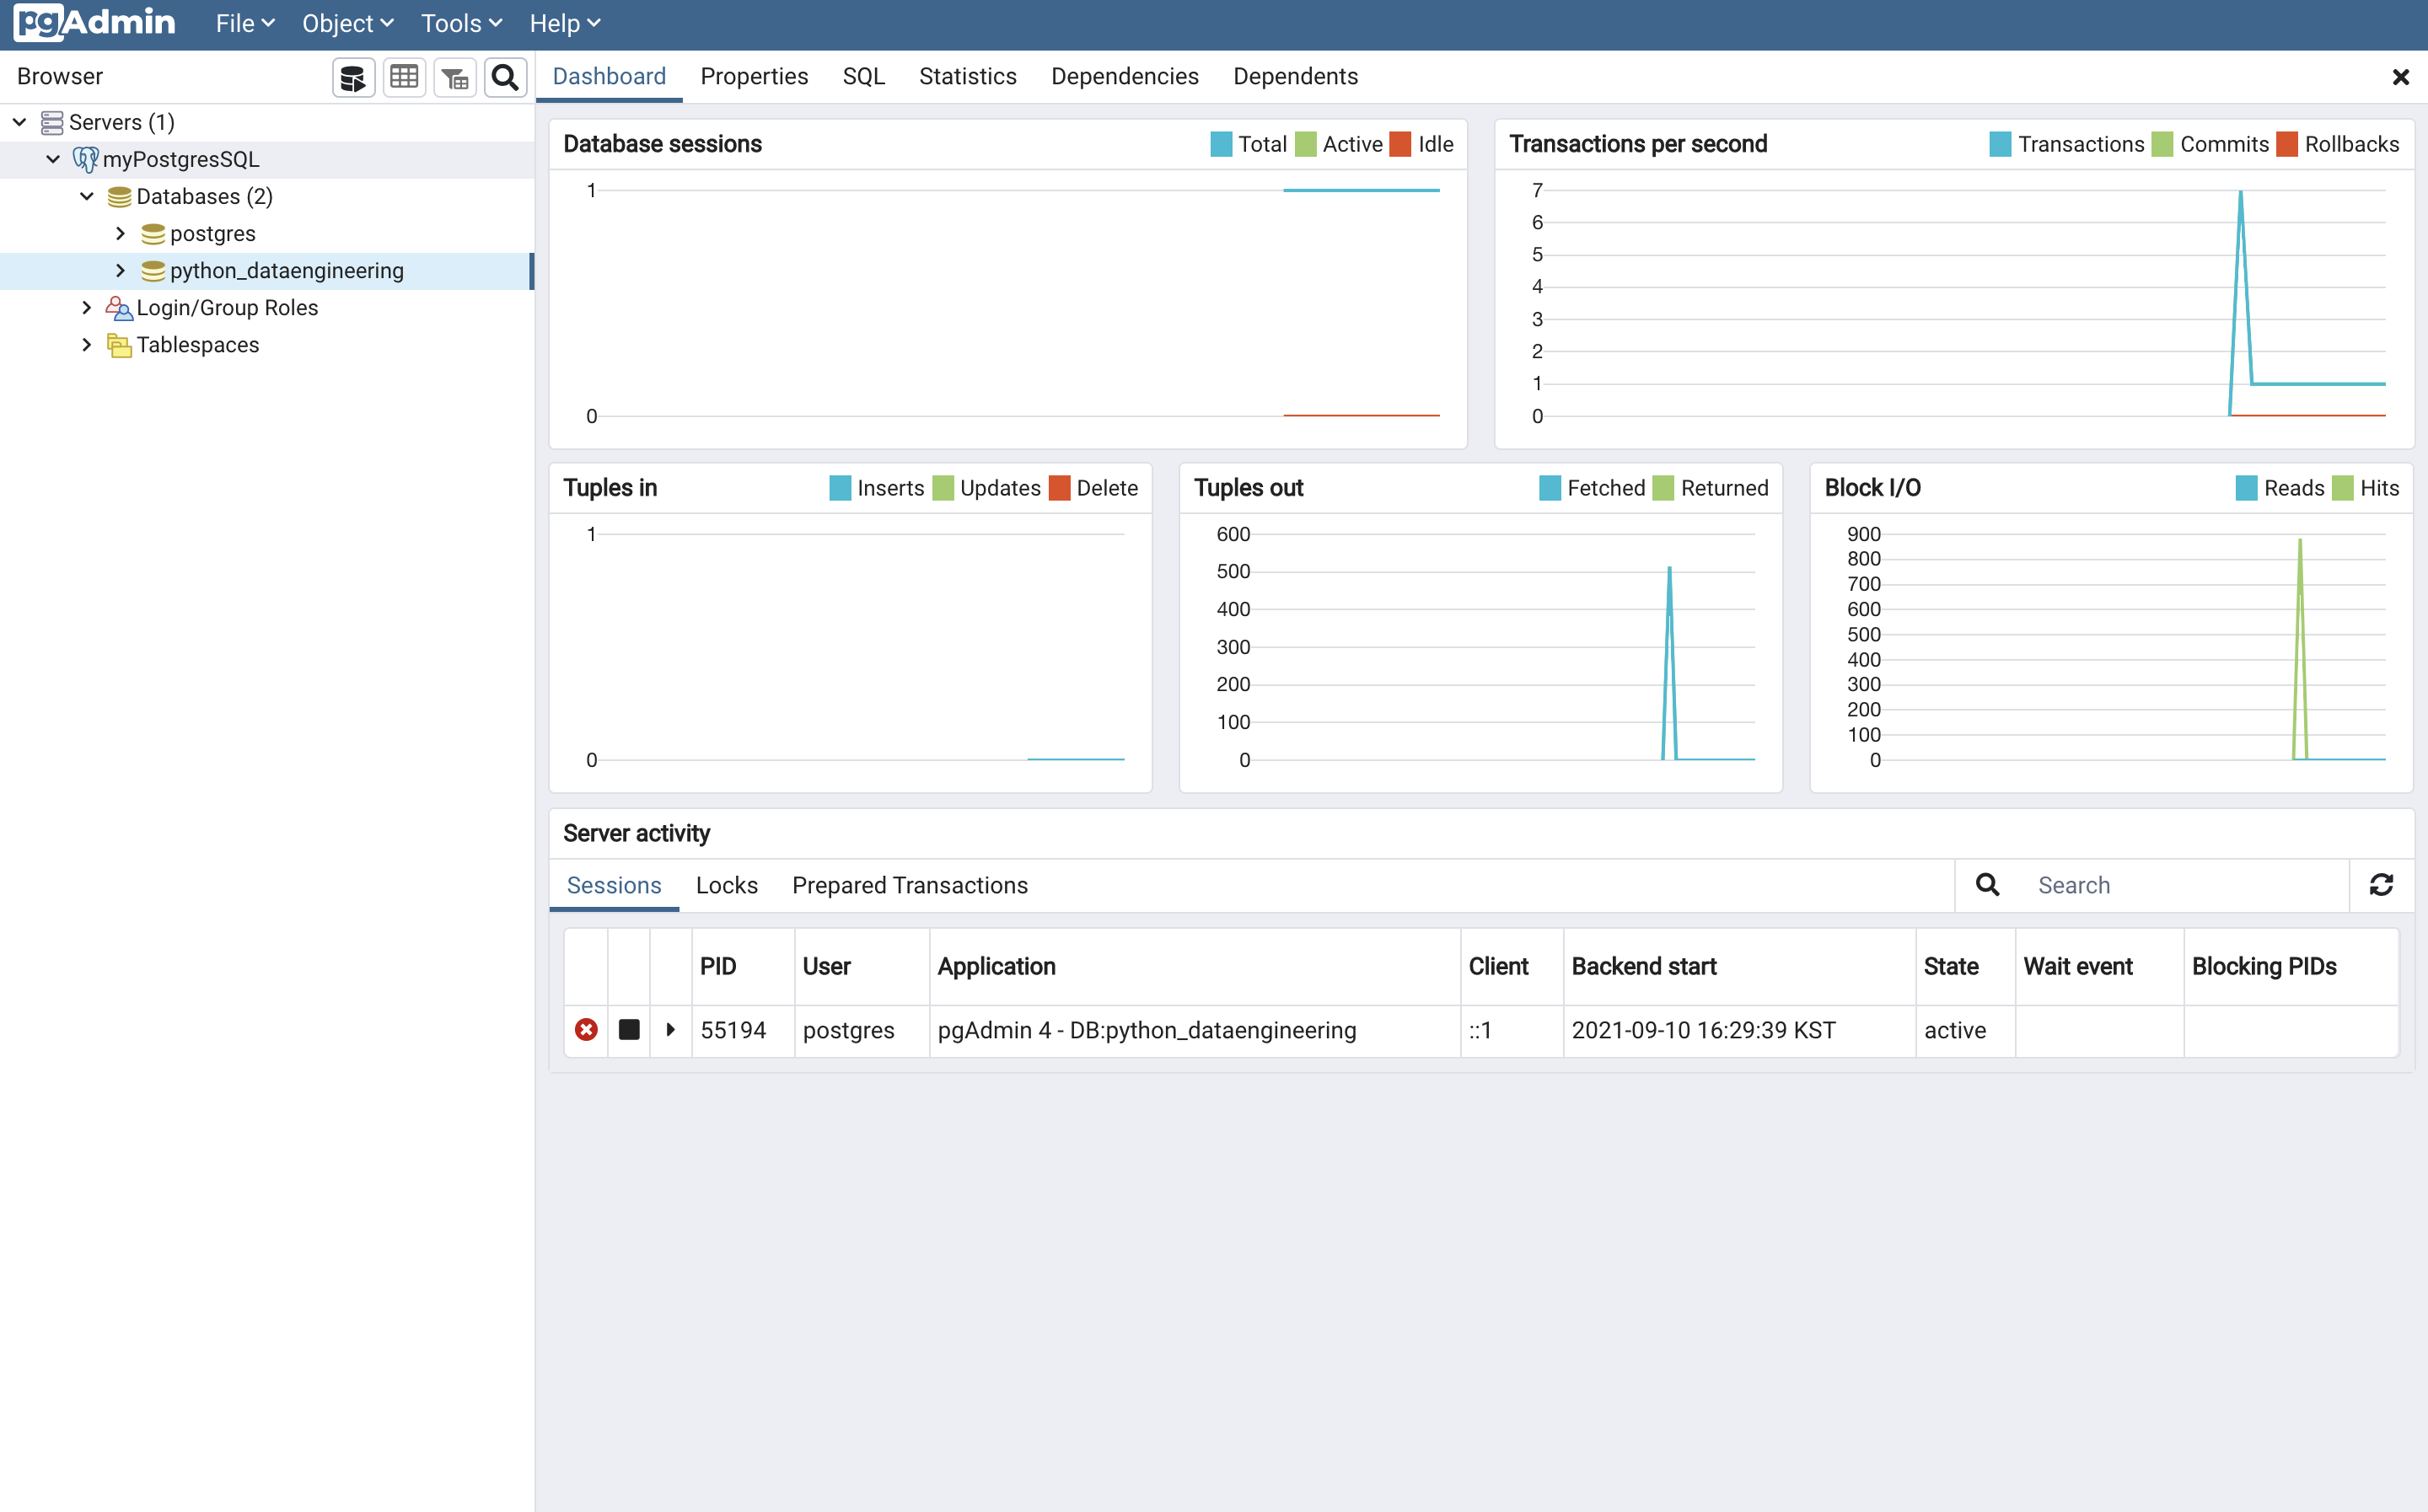
Servers를 확장하면 터미널에서 만든python_dataengineering데이터베이스가 확인될 것이다.
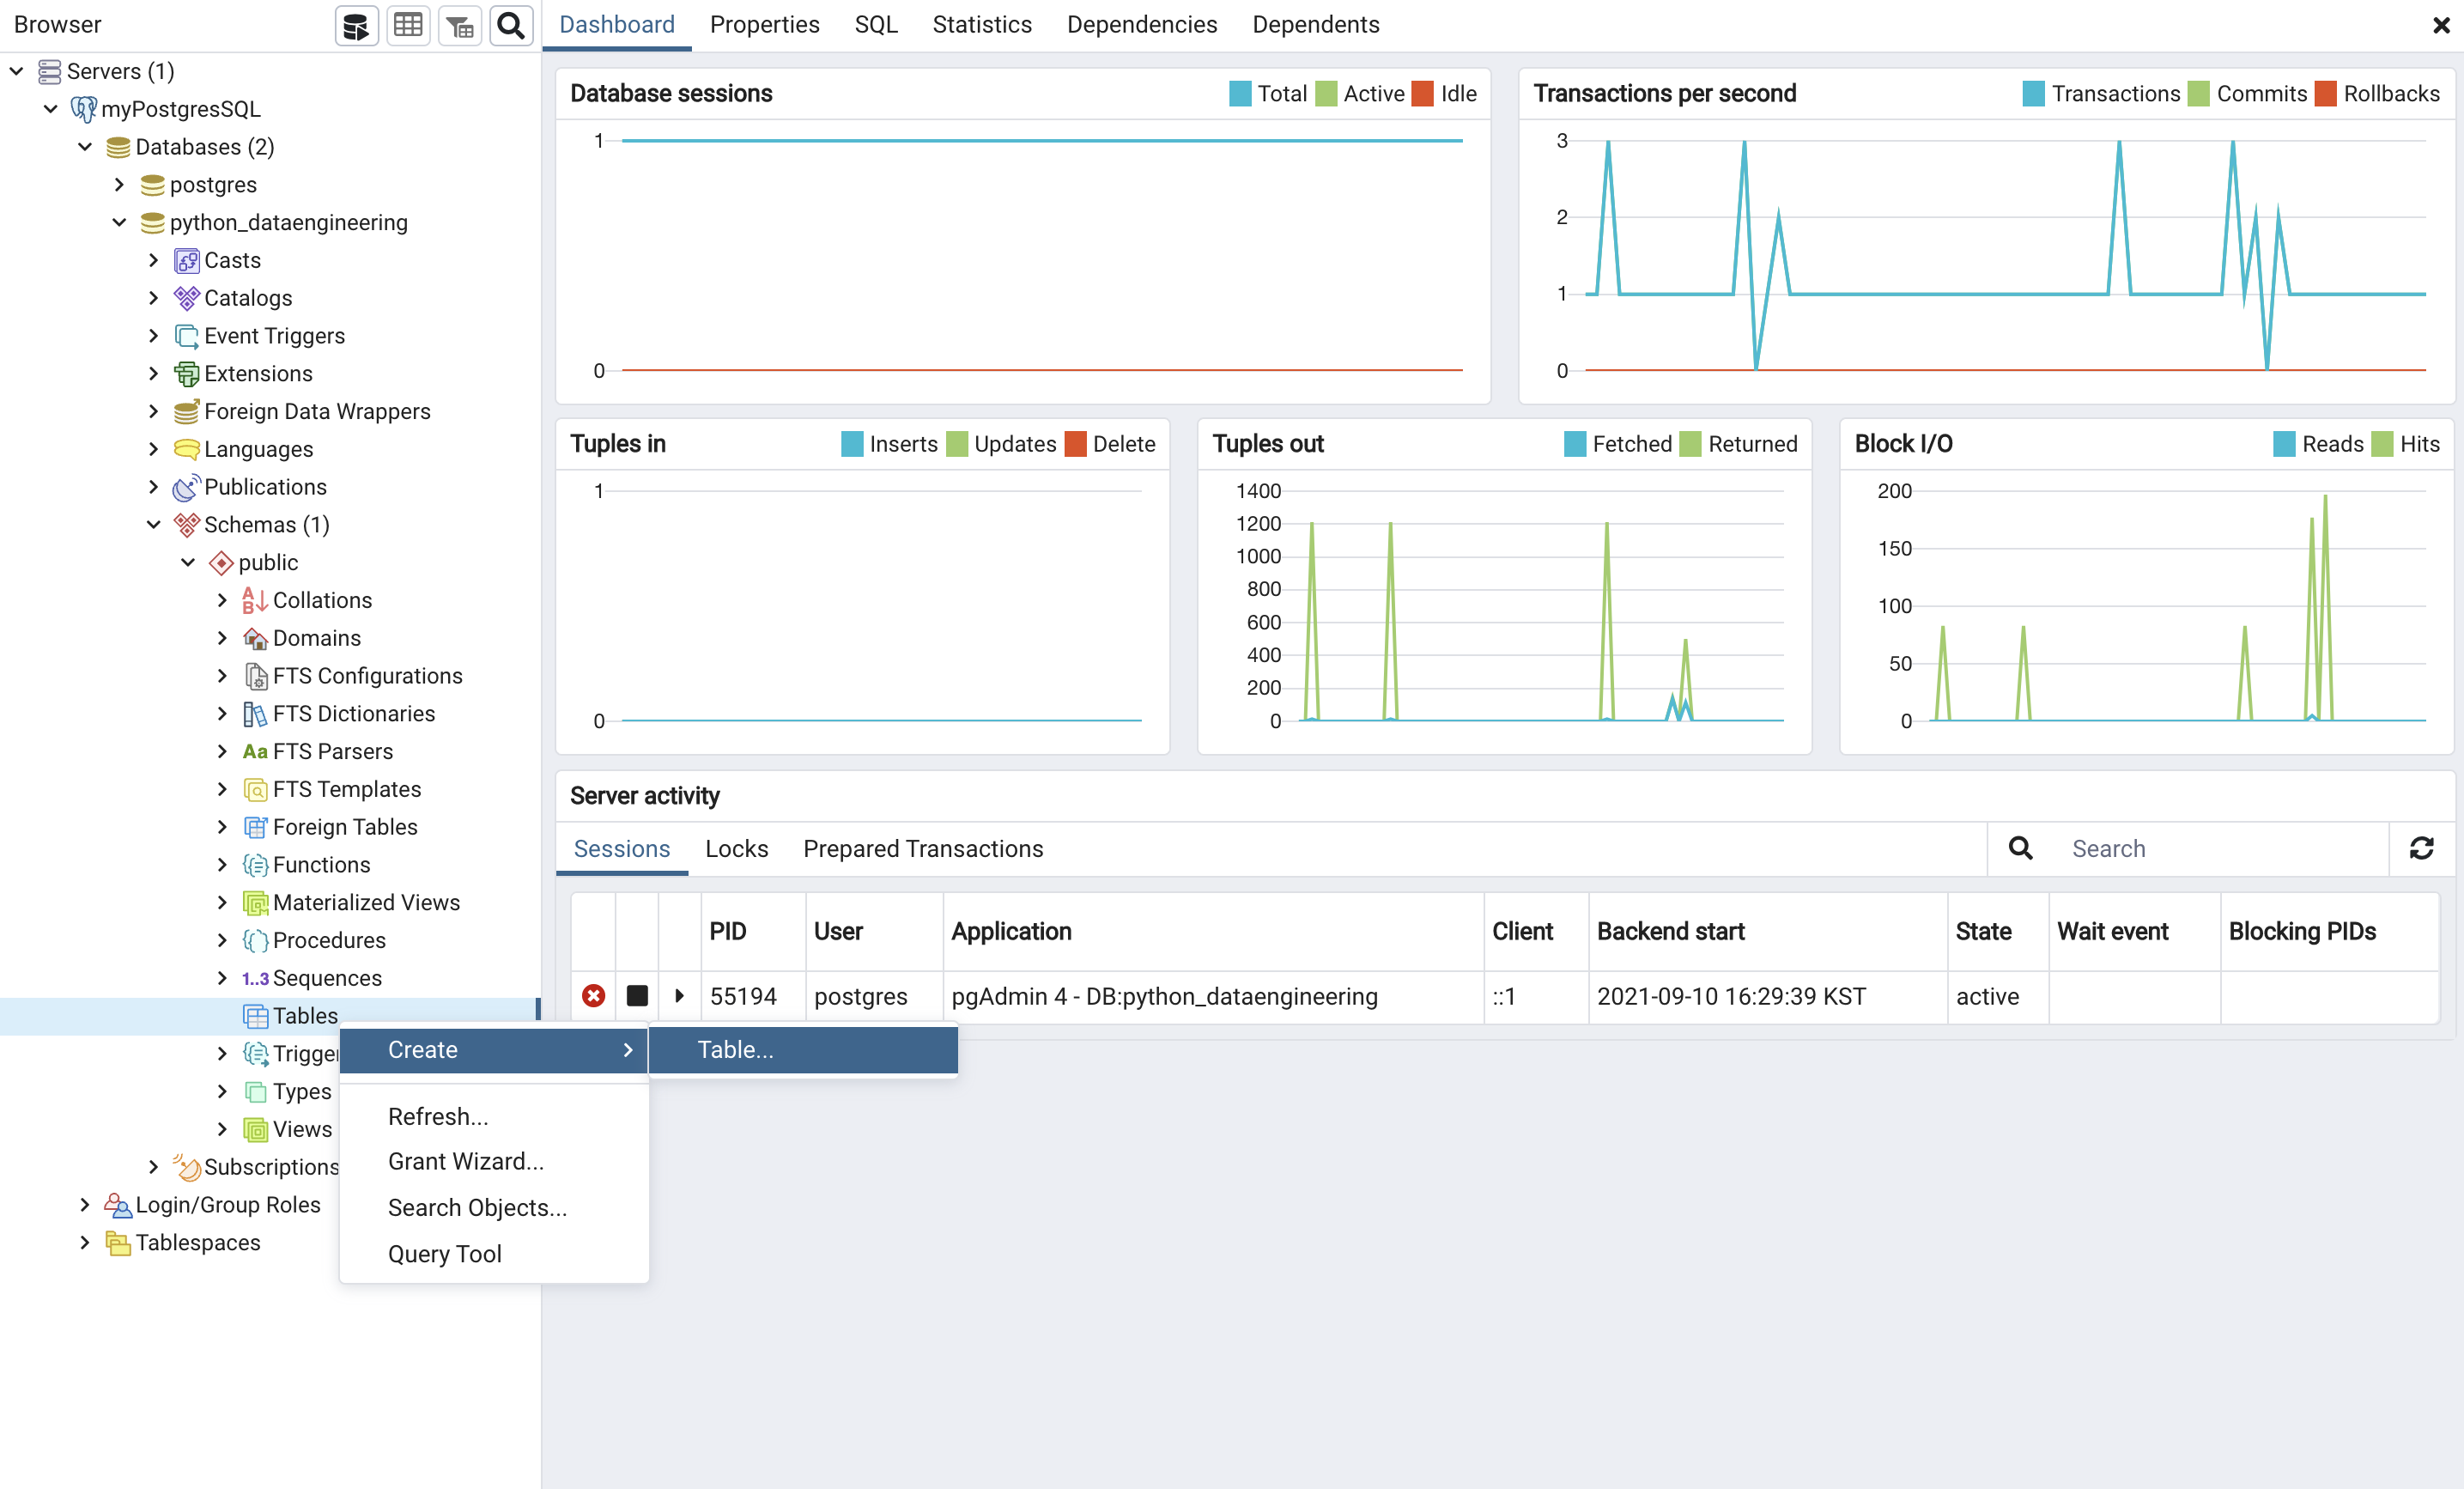
- 해당 DB의 아이콘을 확장하고, schema 메뉴를 확장하고, 마지막으로 public 메뉴를 확장한다.
- 그리고, 아래 그림과 같이
Tables를 메뉴를 클릭 한다.
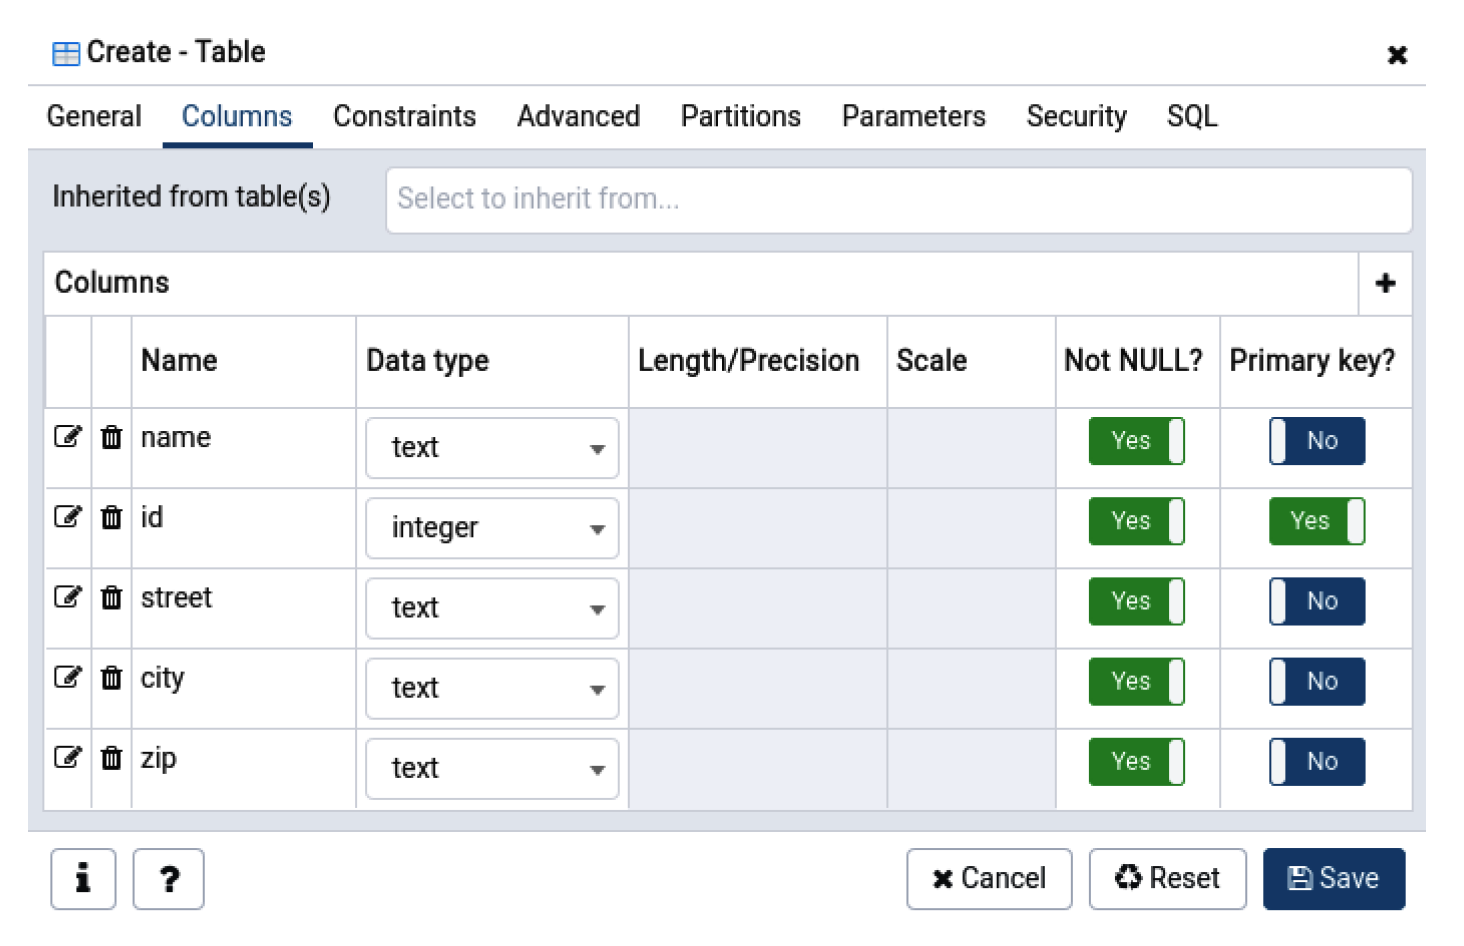
General메뉴에서users지정하고,Columns탭에서 다섯가지 Column을 아래 그림과 같이 생성한다.
- 여기까지 했다면, 본격적으로 파이썬 파일을 작성하도록 한다.
Step 01. Database와 관련된 다양한 파이썬 라이브러리
- 파이썬에서는 DB 연동과 관련된 pyodbc, sqlalchemy, psycopg2와 같은 라이브러리들이 존재한다.
- psycopg2 라이브러리는 PostgreSQL 연동에 특화된 라이브러리이다.
- 그러나, 일반적으로는
SQLAlchemy와 같은 도구로 연습을 하는 것을 추천한다.- SQLAlchemy: https://www.sqlalchemy.org/
- 여기에서는 psycopg2 라이브러리 설치를 진행한다.
(venv) $ pip3 install psycopg2
Collecting psycopg2
  Downloading psycopg2-2.9.1.tar.gz (379 kB)
     |████████████████████████████████| 379 kB 497 kB/s
Building wheels for collected packages: psycopg2
  Building wheel for psycopg2 (setup.py) ... done
  Created wheel for psycopg2: filename=psycopg2-2.9.1-cp39-cp39-macosx_11_0_arm64.whl size=143059 sha256=57a2711edc863e368cb39e421d71944929d7b39ebb16ab533f93366f22dc5d50
  Stored in directory: /Users/evan/Library/Caches/pip/wheels/45/d6/2e/e3754ab051b88bc61600becca31679204854009c4a2adbc586
Successfully built psycopg2
Installing collected packages: psycopg2
Successfully installed psycopg2-2.9.1
Step 02. PostgreSQL 연동
- 연동 코드를 작성한다. (파일명: step01_insert.py)
import psycopg2 as db
conn_string="dbname='python_dataengineering' host='localhost' user='postgres' password='evan'"
conn=db.connect(conn_string)
cur=conn.cursor()
query = "insert into users (id,name,street,city,zip) values({},'{}','{}','{}','{}')".format(1,'Big Bird','Sesame Street','Fakeville','12345')
print(cur.mogrify(query))
query2 = "insert into users (id,name,street,city,zip) values(%s,%s,%s,%s,%s)"
data=(1,'Big Bird','Sesame Street','Fakeville','12345')
print(cur.mogrify(query2,data))
cur.execute(query2,data)
conn.commit()
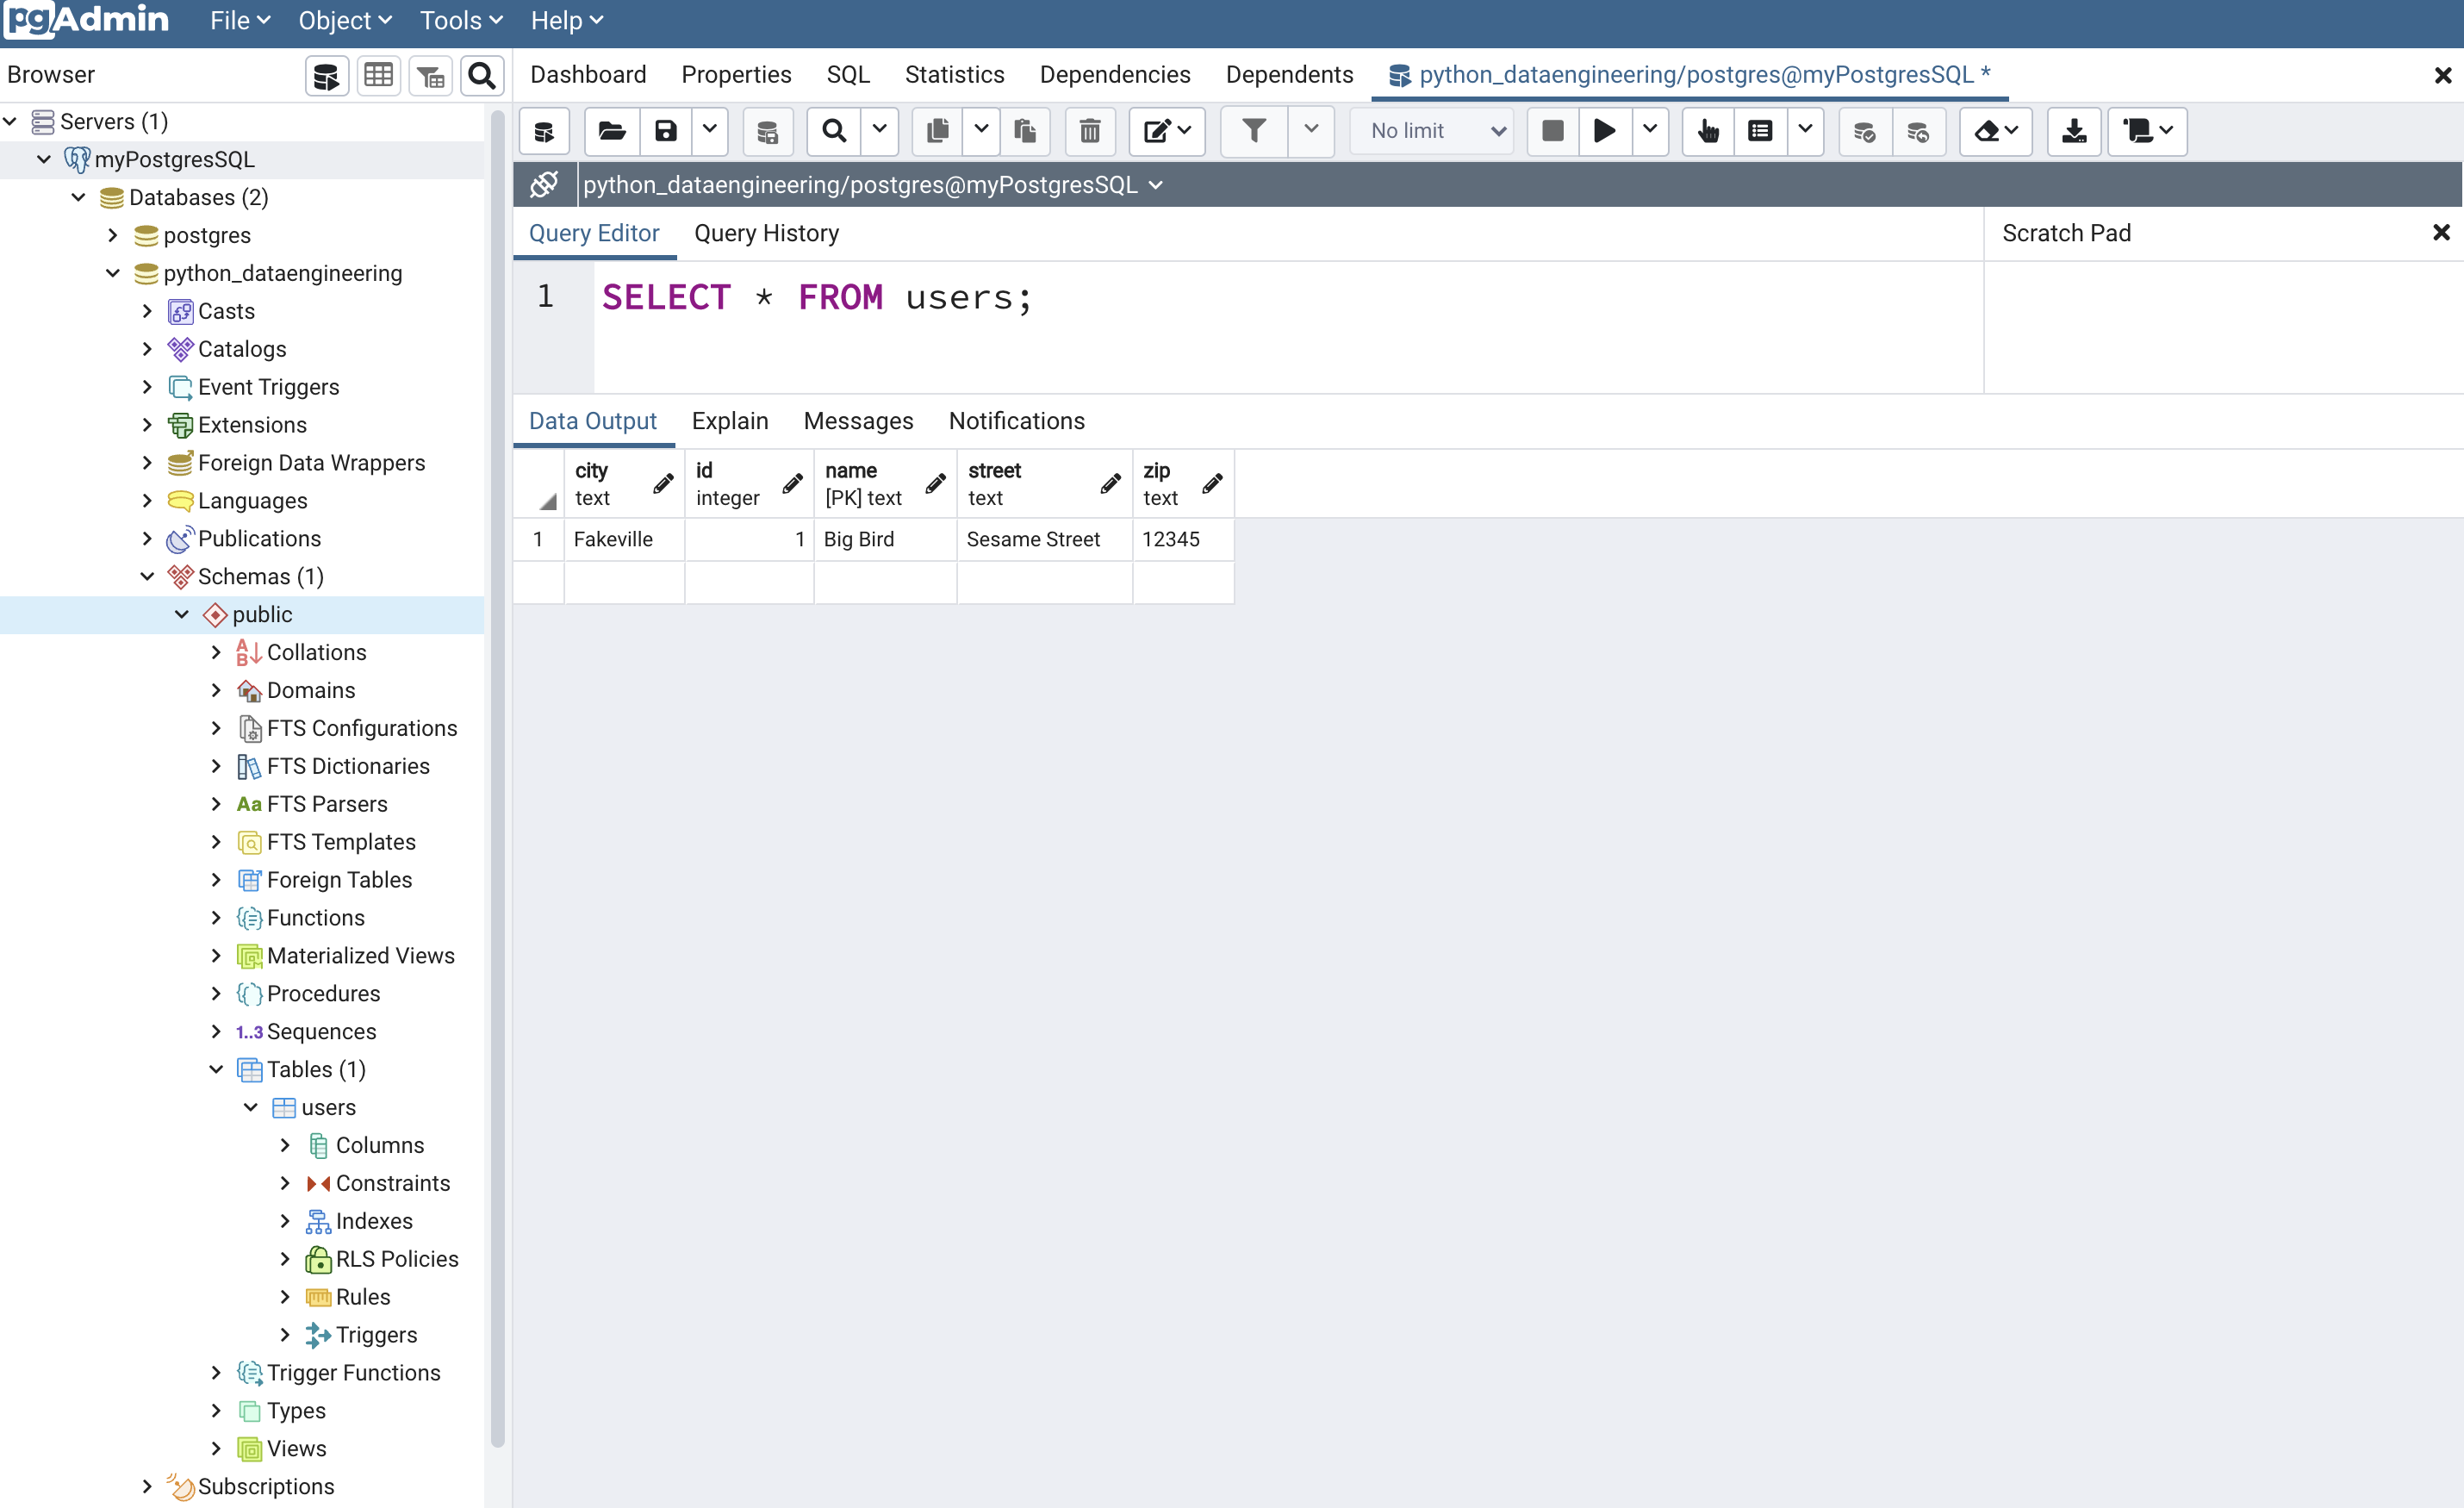
- 이제 위 파일을 실행하면 아래와 같은 결과를 얻게 된다.
(venv) $ python3 step01_insert.py
b"insert into users (id,name,street,city,zip) values(1,'Big Bird','Sesame Street','Fakeville','12345')"
b"insert into users (id,name,street,city,zip) values(1,'Big Bird','Sesame Street','Fakeville','12345')"
- pgAdmin에서 SQL 쿼리를 조회하면, 아래와 같이 나타나는 것을 확인할 수 있을 것이다.
Step 03. 소스코드 설명
- 이제 각 코드를 설명하도록 한다. 코드는 크게 두개로 정의할 수 있다.
- 먼저 DB 연동하는 코드이다.
import psycopg2 as db
conn_string="dbname='python_dataengineering' host='localhost' user='postgres' password='evan'"
conn=db.connect(conn_string)
cur=conn.cursor()
- dbname, host, user, password 구문에서는 각자 본인에게 맞는 형식대로 수정하면 된다.
- db.connect()를 활용하여 연결 객체를 생성한다.
- 마지막으로 conn.cursor() 활용하여 커서 객체를 생성한다. 여기가 Python과 DB의 연동 부분이라고 보면 된다.
- 이번에는 데이터를 삽입하는 코드를 작성한다.
query는INSERT구문을 작성하는 코드를 말한다.cur.mogify()의 반환값이 실제 작성된 최종적인 질의문이라고 보면 된다.- 즉, 해당 쿼리를 출력하여 오류 값이 없는지 확인하는 용도로 쓰라는 뜻이다.
cur.execute()는 실제 PostgreSQL에 실행하는 걸 말하며, DB에 삽입이 가능하다.conn.commit()SQL의Insert문처럼 데이터베이스를 수정하는 질의문을 실행한 후 트랜잭션을 Commit 해줘야 반영이 된다.
query = "insert into users (id,name,street,city,zip) values({},'{}','{}','{}','{}')".format(1,'Big Bird','Sesame Street','Fakeville','12345')
print(cur.mogrify(query))
query2 = "insert into users (id,name,street,city,zip) values(%s,%s,%s,%s,%s)"
data=(1,'Big Bird','Sesame Street','Fakeville','12345')
print(cur.mogrify(query2,data))
cur.execute(query2,data)
conn.commit()
Step 04. 다량의 데이터 삽입
- 이번 단계에서는 users 테이블에 넣을 다량의 레코드를 만들고, 기존에 배운 코드를 기반으로 데이터를 추가하는 코드를 작성한다. (
step02_multipleInsert.py) - 데이터를 생성하는 기존에 배웠던 코드와 유사하기 때문에 설명은 생략한다.
- 파이썬을 활용한 CSV 파일 입출력 예제 with faker
- ID를 2부터 시작하는 것은 앞서 Big Bird 레코드가 1이기 때문이며, 또한, 해당 칼럼은 PK로 중복값이 허용되지 않기 때문이다.
- 각 데이터를 tuple로 변환하였다. 이는 executemany() 함수의 입력값이 리스트 또는 tuple로 입력받기 때문이다. tuple의 장점은 데이터가 수정 삭제 등이 불가하기 때문에, 이렇게 튜플로 넘겨주는 것이 좋다.
import psycopg2 as db
from faker import Faker
fake=Faker()
data=[]
i=2
for r in range(1000):
    data.append((i,fake.name(),fake.street_address(), fake.city(),fake.zipcode()))
    i+=1
data_for_db=tuple(data)
print(data_for_db)
conn_string="dbname='python_dataengineering' host='localhost' user='postgres' password='evan'"
conn=db.connect(conn_string)
cur=conn.cursor()
query = "insert into users (id,name,street,city,zip) values(%s,%s,%s,%s,%s)"
print(cur.mogrify(query,data_for_db[1]))
cur.executemany(query,data_for_db)
conn.commit()
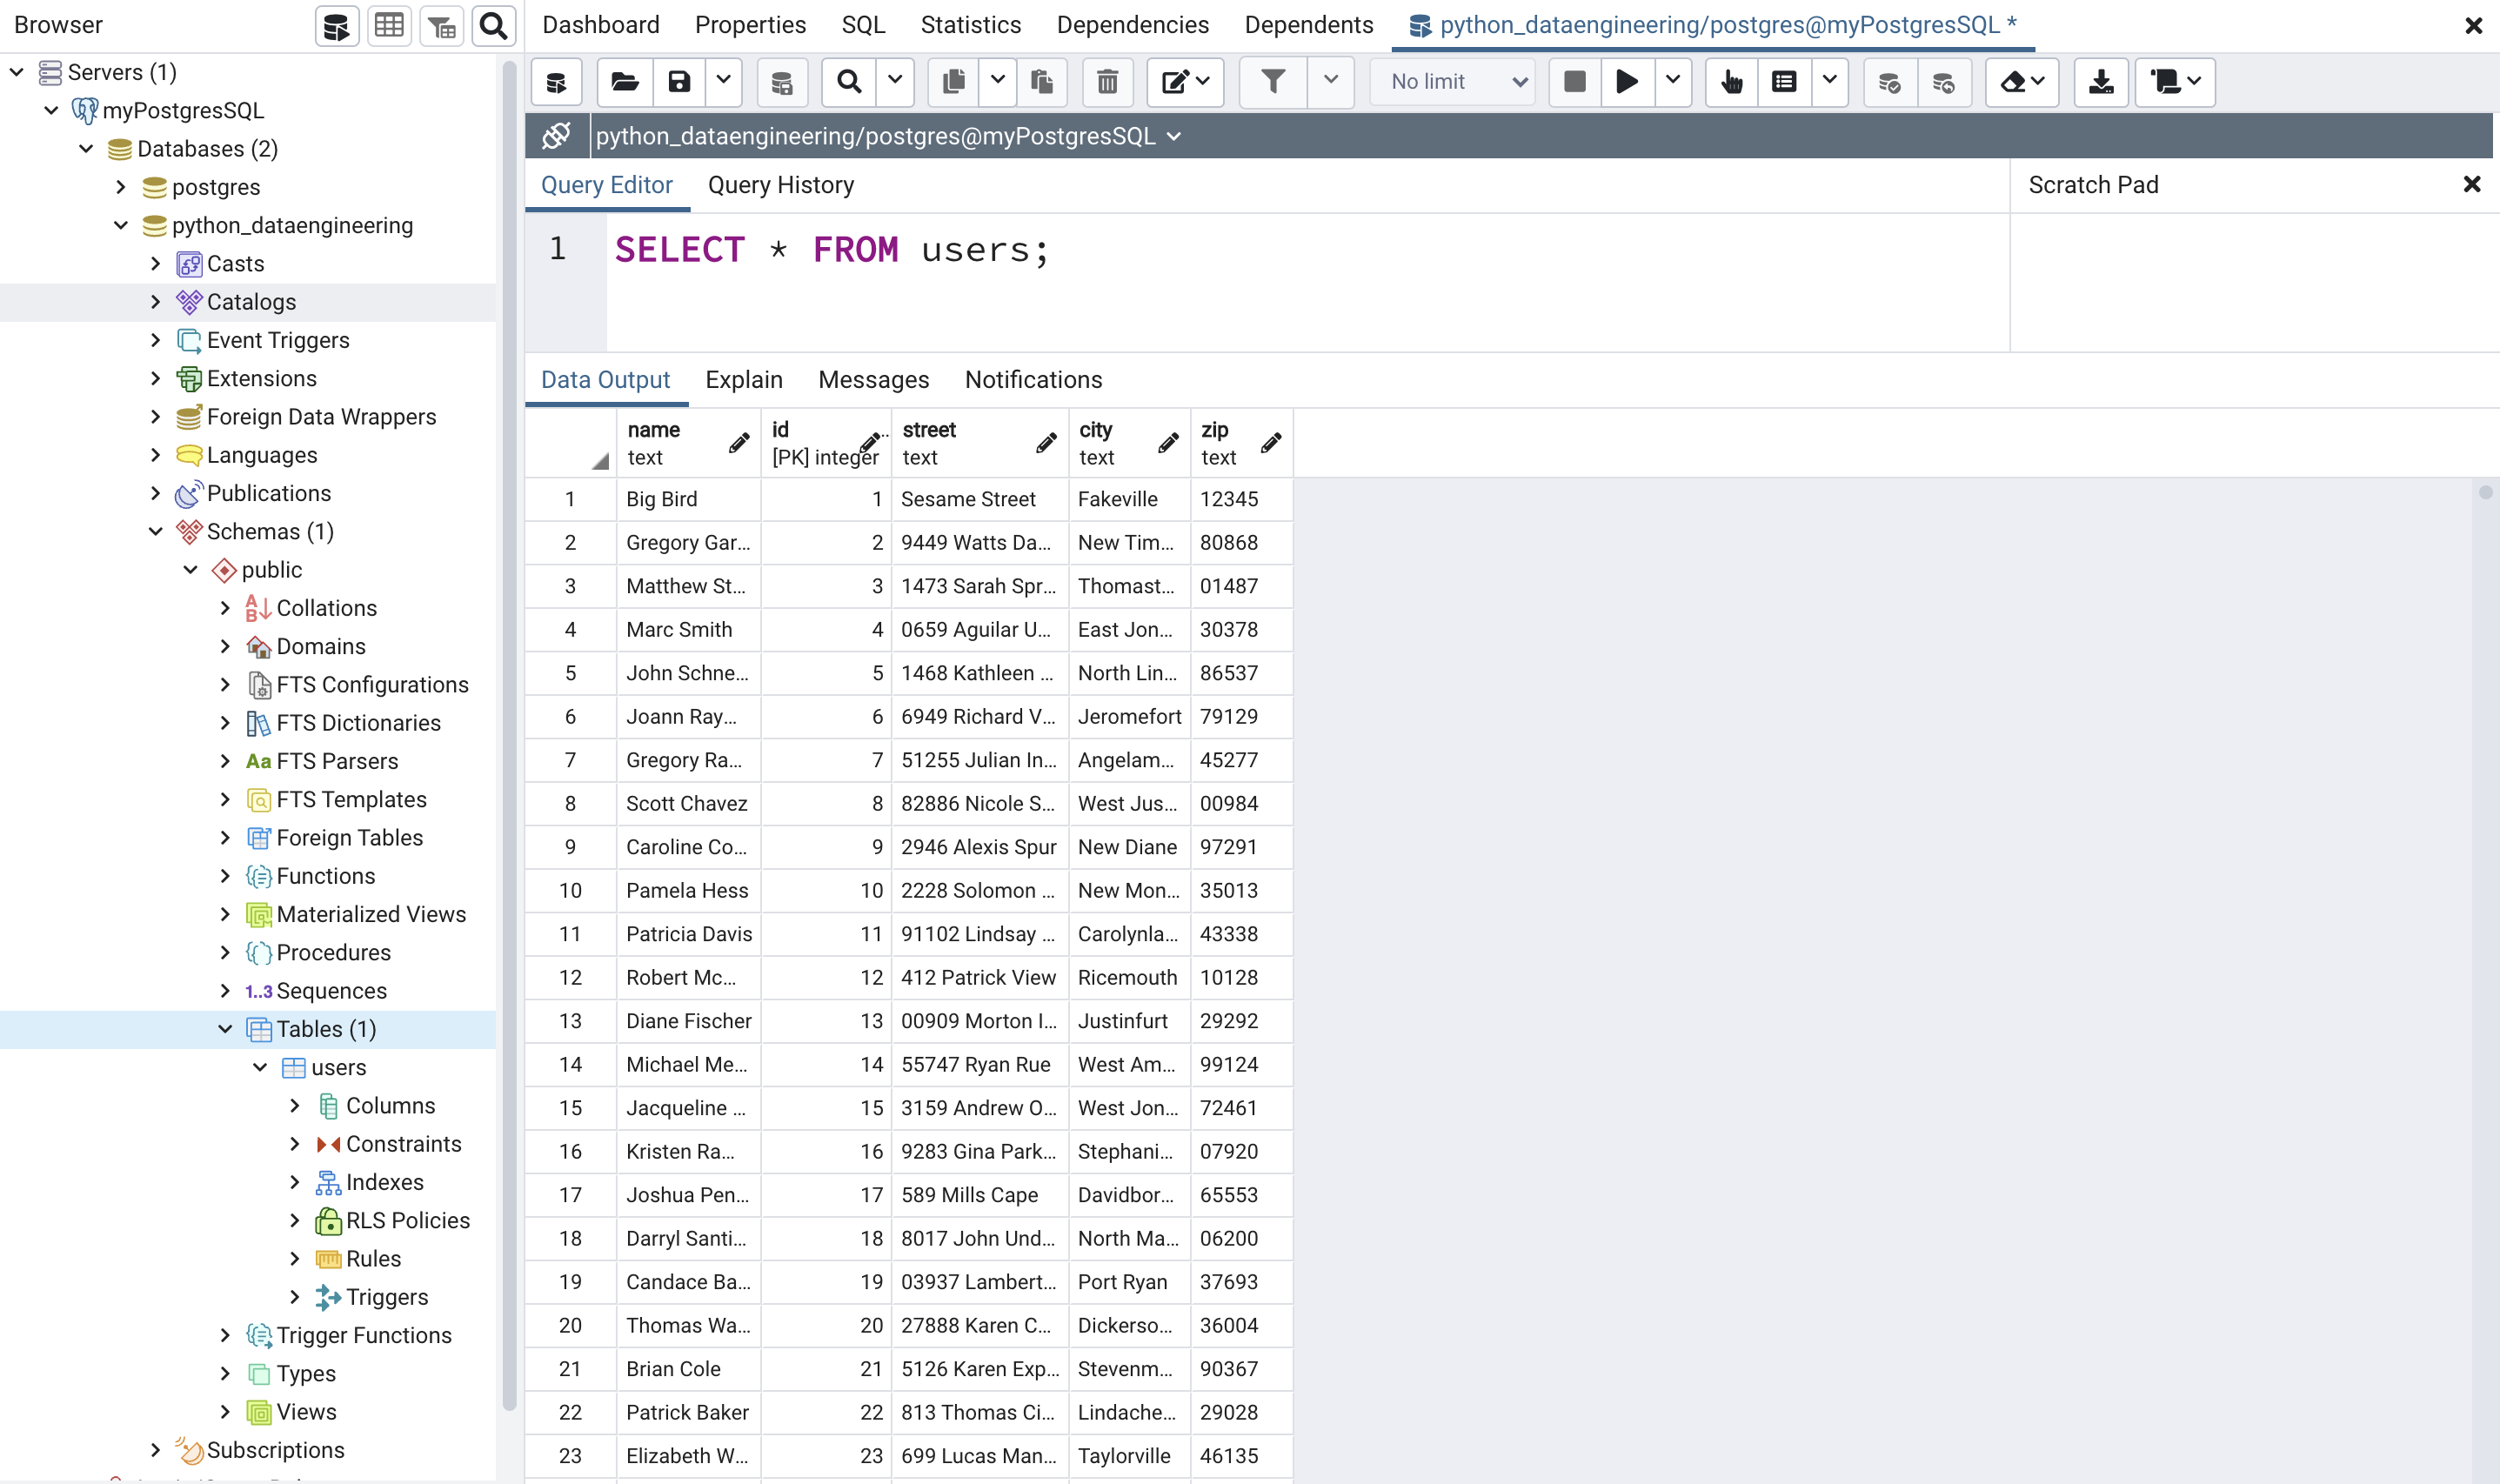
- 이제 위 파일을 실행한다.
(venv) $ python3 step02_multipleInsert.py
((2, 'Gregory Garza', '9449 Watts Dam Suite 990', 'New Timothy', '80868'), (3, 'Matthew Stephens', '1473 Sarah Springs Apt. 667', 'Thomaston', '01487'), ...
b"insert into users (id,name,street,city,zip) values(3,'Matthew Stephens','1473 Sarah Springs Apt. 667','Thomaston','01487')"
- 마지막으로, 쿼리를 조회해본다.
Step 05. PostgreSQL에서 데이터를 추출하기
- 데이터를 추출하는 방법과 삽입하는 방법의 기본적인 구조는 동일하다. 다만, 쿼리 구문을
insert대신select를 사용하는 것이다. (step03_1_fetchusers.py) - 각 레코드별로 추출하는 코드를 작성해본다.
- 그리고,
fromdb.csv파일을 만들고 또한 불러오는 작업을 진행하도록 한다.
import psycopg2 as db
conn_string="dbname='python_dataengineering' host='localhost' user='postgres' password='evan'"
conn=db.connect(conn_string)
cur=conn.cursor()
query="select * from users"
cur.execute(query)

idx=0
for record in cur:
    if idx == 5:
        break
    idx += 1
    print("index is", idx, ": ", record)
# print("featchall:", cur.fetchall())
print("fetchmany(5):", cur.fetchmany(5))
print("fetchone:", cur.fetchone())
print("rowcount:", cur.rowcount)
print("rownumber:", cur.rownumber)

# csv 파일 만들기
f = open('fromdb.csv', 'w')
cur.copy_to(f, 'users', sep=",")
f.close()

# 파일 열기
data_file = open('fromdb.csv', 'r')
data_lines = data_file.readlines()
idx=0
for record in data_lines:
    if idx == 5:
        break
    idx += 1
    print("index {}: {}".format(idx, record))
- 결괏값은 다음과 같다.
- 각 함수에 대한 설명은 결괏값을 보고 판단한다.
index is 1 :  ('Big Bird', 1, 'Sesame Street', 'Fakeville', '12345')
index is 2 :  ('Gregory Garza', 2, '9449 Watts Dam Suite 990', 'New Timothy', '80868')
index is 3 :  ('Matthew Stephens', 3, '1473 Sarah Springs Apt. 667', 'Thomaston', '01487')
index is 4 :  ('Marc Smith', 4, '0659 Aguilar Union', 'East Jonathanfurt', '30378')
index is 5 :  ('John Schneider', 5, '1468 Kathleen Plain Apt. 600', 'North Linda', '86537')
fetchmany(5): [('Gregory Ramos', 7, '51255 Julian Inlet', 'Angelamouth', '45277'), ('Scott Chavez', 8, '82886 Nicole Stream Apt. 450', 'West Justin', '00984'), ('Caroline Contreras', 9, '2946 Alexis Spur', 'New Diane', '97291'), ('Pamela Hess', 10, '2228 Solomon Crossing', 'New Monica', '35013'), ('Patricia Davis', 11, '91102 Lindsay Manor', 'Carolynland', '43338')]
fetchone: ('Robert Mcmillan', 12, '412 Patrick View', 'Ricemouth', '10128')
rowcount: 1001
rownumber: 12
index 1: Big Bird,1,Sesame Street,Fakeville,12345
index 2: Gregory Garza,2,9449 Watts Dam Suite 990,New Timothy,80868
index 3: Matthew Stephens,3,1473 Sarah Springs Apt. 667,Thomaston,01487
index 4: Marc Smith,4,0659 Aguilar Union,East Jonathanfurt,30378
index 5: John Schneider,5,1468 Kathleen Plain Apt. 600,North Linda,86537
- 이번에는
pandas라이브러리를 통해서 데이터를 가져오도록 한다. (step03_2_fetchusers.py)
import psycopg2 as db
import pandas as pd

conn_string="dbname='python_dataengineering' host='localhost' user='postgres' password='evan'"
conn=db.connect(conn_string)
query="select * from users"
df = pd.read_sql(query, conn)
print(df.head())
- 결괏값은 아래와 같이 나올 것이다.
name  id                        street               city    zip
0          Big Bird   1                 Sesame Street          Fakeville  12345
1     Gregory Garza   2      9449 Watts Dam Suite 990        New Timothy  80868
2  Matthew Stephens   3   1473 Sarah Springs Apt. 667          Thomaston  01487
3        Marc Smith   4            0659 Aguilar Union  East Jonathanfurt  30378
4    John Schneider   5  1468 Kathleen Plain Apt. 600        North Linda  86537
References
- Data Engineering with Python by Paul Crickard, https://www.packtpub.com/product/data-engineering-with-python/9781839214189
