EDA with Housing Price Prediction - Handling Outliers
Page content
강의 홍보
- 취준생을 위한 강의를 제작하였습니다.
- 본 블로그를 통해서 강의를 수강하신 분은 게시글 제목과 링크를 수강하여 인프런 메시지를 통해 보내주시기를 바랍니다.
스타벅스 아이스 아메리카노를 선물로 보내드리겠습니다.
- [비전공자 대환영] 제로베이스도 쉽게 입문하는 파이썬 데이터 분석 - 캐글입문기

I. 개요
- 이제 본격적으로 Kaggle 데이터를 활용하여 분석을 진행한다.
- 데이터는 이미 다운 받은 상태를 전제로 하며, 만약에 데이터가 없다면 이전 포스팅에서 절차를 확인하기 바란다. (미리보기 가능)
II. 구글 드라이브 연동
- 구글 코랩을 시작하면 언제든지 가장 먼저 해야 하는 것은 드라이브 연동이다.
from google.colab import drive # 패키지 불러오기
from os.path import join

ROOT = "/content/drive"     # 드라이브 기본 경로
print(ROOT)                 # print content of ROOT (Optional)
drive.mount(ROOT)           # 드라이브 기본 경로 Mount

MY_GOOGLE_DRIVE_PATH = 'My Drive/Colab Notebooks/inflearn_kaggle/' # 프로젝트 경로
PROJECT_PATH = join(ROOT, MY_GOOGLE_DRIVE_PATH) # 프로젝트 경로
print(PROJECT_PATH)
/content/drive
Go to this URL in a browser: https://accounts.google.com/o/oauth2/auth?client_id=947318989803-6bn6qk8qdgf4n4g3pfee6491hc0brc4i.apps.googleusercontent.com&redirect_uri=urn%3aietf%3awg%3aoauth%3a2.0%3aoob&response_type=code&scope=email%20https%3a%2f%2fwww.googleapis.com%2fauth%2fdocs.test%20https%3a%2f%2fwww.googleapis.com%2fauth%2fdrive%20https%3a%2f%2fwww.googleapis.com%2fauth%2fdrive.photos.readonly%20https%3a%2f%2fwww.googleapis.com%2fauth%2fpeopleapi.readonly

Enter your authorization code:
··········
Mounted at /content/drive
/content/drive/My Drive/Colab Notebooks/inflearn_kaggle/
%cd "{PROJECT_PATH}"
/content/drive/My Drive/Colab Notebooks/inflearn_kaggle
- 위 코드가 에러 없이 돌아간다면 이제 데이터를 불러올 차례다.
!ls
data docs source
- 필자는
inflearn_kaggle폴더안에data,docs,source등의 하위 폴더를 추가로 만들었다. - 즉,
data안에 다운로드 받은 파일이 있을 것이다.
III. 캐글 데이터 수집 및 EDA
- 우선 데이터를 수집하기에 앞서서
EDA에 관한 필수 패키지를 설치하자.
import pandas as pd
import pandas_profiling
import numpy as np
import matplotlib as mpl
import matplotlib.pyplot as plt
from matplotlib.pyplot import figure
import seaborn as sns

from IPython.core.display import display, HTML
from pandas_profiling import ProfileReport
/usr/local/lib/python3.6/dist-packages/statsmodels/tools/_testing.py:19: FutureWarning: pandas.util.testing is deprecated. Use the functions in the public API at pandas.testing instead.
  import pandas.util.testing as tm
%matplotlib inline
import matplotlib.pylab as plt

plt.rcParams["figure.figsize"] = (14,4)
plt.rcParams['lines.linewidth'] = 2
plt.rcParams['lines.color'] = 'r'
plt.rcParams['axes.grid'] = True
(1) 데이터 수집
- 지난 시간에 받은 데이터가 총 4개임을 확인했다.
- data_description.txt
- sample_submission.csv
- test.csv
- train.csv
- 여기에서는 우선
test.csv&train.csv파일을 받도록 한다.
train = pd.read_csv('data/train.csv')
test = pd.read_csv('data/test.csv')
print("data import is done")
data import is done
(2) 데이터 확인
Kaggle데이터를 불러오면 우선 확인해야 하는 것은 데이터셋의 크기다.- 변수의 갯수
- Numeric 변수 & Categorical 변수의 개수 등을 파악해야 한다.
- Point 1 -
train데이터에서 굳이 훈련데이터와 테스트 데이터를 구분할 필요는 없다.- 보통
Kaggle에서는 테스트 데이터를 주기적으로 업데이트 해준다.
- 보통
- Point 2 - 보통
test데이터의 변수의 개수가 하나 더 작다.
train.shape, test.shape
((1460, 81), (1459, 80))
- 그 후
train데이터의상위 5개의 데이터만 확인한다.
display(train.head())
| Id | MSSubClass | MSZoning | LotFrontage | LotArea | Street | Alley | LotShape | LandContour | Utilities | LotConfig | LandSlope | Neighborhood | Condition1 | Condition2 | BldgType | HouseStyle | OverallQual | OverallCond | YearBuilt | YearRemodAdd | RoofStyle | RoofMatl | Exterior1st | Exterior2nd | MasVnrType | MasVnrArea | ExterQual | ExterCond | Foundation | BsmtQual | BsmtCond | BsmtExposure | BsmtFinType1 | BsmtFinSF1 | BsmtFinType2 | BsmtFinSF2 | BsmtUnfSF | TotalBsmtSF | Heating | ... | CentralAir | Electrical | 1stFlrSF | 2ndFlrSF | LowQualFinSF | GrLivArea | BsmtFullBath | BsmtHalfBath | FullBath | HalfBath | BedroomAbvGr | KitchenAbvGr | KitchenQual | TotRmsAbvGrd | Functional | Fireplaces | FireplaceQu | GarageType | GarageYrBlt | GarageFinish | GarageCars | GarageArea | GarageQual | GarageCond | PavedDrive | WoodDeckSF | OpenPorchSF | EnclosedPorch | 3SsnPorch | ScreenPorch | PoolArea | PoolQC | Fence | MiscFeature | MiscVal | MoSold | YrSold | SaleType | SaleCondition | SalePrice | |
|---|---|---|---|---|---|---|---|---|---|---|---|---|---|---|---|---|---|---|---|---|---|---|---|---|---|---|---|---|---|---|---|---|---|---|---|---|---|---|---|---|---|---|---|---|---|---|---|---|---|---|---|---|---|---|---|---|---|---|---|---|---|---|---|---|---|---|---|---|---|---|---|---|---|---|---|---|---|---|---|---|---|
| 0 | 1 | 60 | RL | 65.0 | 8450 | Pave | NaN | Reg | Lvl | AllPub | Inside | Gtl | CollgCr | Norm | Norm | 1Fam | 2Story | 7 | 5 | 2003 | 2003 | Gable | CompShg | VinylSd | VinylSd | BrkFace | 196.0 | Gd | TA | PConc | Gd | TA | No | GLQ | 706 | Unf | 0 | 150 | 856 | GasA | ... | Y | SBrkr | 856 | 854 | 0 | 1710 | 1 | 0 | 2 | 1 | 3 | 1 | Gd | 8 | Typ | 0 | NaN | Attchd | 2003.0 | RFn | 2 | 548 | TA | TA | Y | 0 | 61 | 0 | 0 | 0 | 0 | NaN | NaN | NaN | 0 | 2 | 2008 | WD | Normal | 208500 |
| 1 | 2 | 20 | RL | 80.0 | 9600 | Pave | NaN | Reg | Lvl | AllPub | FR2 | Gtl | Veenker | Feedr | Norm | 1Fam | 1Story | 6 | 8 | 1976 | 1976 | Gable | CompShg | MetalSd | MetalSd | None | 0.0 | TA | TA | CBlock | Gd | TA | Gd | ALQ | 978 | Unf | 0 | 284 | 1262 | GasA | ... | Y | SBrkr | 1262 | 0 | 0 | 1262 | 0 | 1 | 2 | 0 | 3 | 1 | TA | 6 | Typ | 1 | TA | Attchd | 1976.0 | RFn | 2 | 460 | TA | TA | Y | 298 | 0 | 0 | 0 | 0 | 0 | NaN | NaN | NaN | 0 | 5 | 2007 | WD | Normal | 181500 |
| 2 | 3 | 60 | RL | 68.0 | 11250 | Pave | NaN | IR1 | Lvl | AllPub | Inside | Gtl | CollgCr | Norm | Norm | 1Fam | 2Story | 7 | 5 | 2001 | 2002 | Gable | CompShg | VinylSd | VinylSd | BrkFace | 162.0 | Gd | TA | PConc | Gd | TA | Mn | GLQ | 486 | Unf | 0 | 434 | 920 | GasA | ... | Y | SBrkr | 920 | 866 | 0 | 1786 | 1 | 0 | 2 | 1 | 3 | 1 | Gd | 6 | Typ | 1 | TA | Attchd | 2001.0 | RFn | 2 | 608 | TA | TA | Y | 0 | 42 | 0 | 0 | 0 | 0 | NaN | NaN | NaN | 0 | 9 | 2008 | WD | Normal | 223500 |
| 3 | 4 | 70 | RL | 60.0 | 9550 | Pave | NaN | IR1 | Lvl | AllPub | Corner | Gtl | Crawfor | Norm | Norm | 1Fam | 2Story | 7 | 5 | 1915 | 1970 | Gable | CompShg | Wd Sdng | Wd Shng | None | 0.0 | TA | TA | BrkTil | TA | Gd | No | ALQ | 216 | Unf | 0 | 540 | 756 | GasA | ... | Y | SBrkr | 961 | 756 | 0 | 1717 | 1 | 0 | 1 | 0 | 3 | 1 | Gd | 7 | Typ | 1 | Gd | Detchd | 1998.0 | Unf | 3 | 642 | TA | TA | Y | 0 | 35 | 272 | 0 | 0 | 0 | NaN | NaN | NaN | 0 | 2 | 2006 | WD | Abnorml | 140000 |
| 4 | 5 | 60 | RL | 84.0 | 14260 | Pave | NaN | IR1 | Lvl | AllPub | FR2 | Gtl | NoRidge | Norm | Norm | 1Fam | 2Story | 8 | 5 | 2000 | 2000 | Gable | CompShg | VinylSd | VinylSd | BrkFace | 350.0 | Gd | TA | PConc | Gd | TA | Av | GLQ | 655 | Unf | 0 | 490 | 1145 | GasA | ... | Y | SBrkr | 1145 | 1053 | 0 | 2198 | 1 | 0 | 2 | 1 | 4 | 1 | Gd | 9 | Typ | 1 | TA | Attchd | 2000.0 | RFn | 3 | 836 | TA | TA | Y | 192 | 84 | 0 | 0 | 0 | 0 | NaN | NaN | NaN | 0 | 12 | 2008 | WD | Normal | 250000 |
| ... | ... | ... | ... | ... | ... | ... | ... | ... | ... | ... | ... | ... | ... | ... | ... | ... | ... | ... | ... | ... | ... | ... | ... | ... | ... | ... | ... | ... | ... | ... | ... | ... | ... | ... | ... | ... | ... | ... | ... | ... | ... | ... | ... | ... | ... | ... | ... | ... | ... | ... | ... | ... | ... | ... | ... | ... | ... | ... | ... | ... | ... | ... | ... | ... | ... | ... | ... | ... | ... | ... | ... | ... | ... | ... | ... | ... | ... | ... | ... | ... | ... |
| 1455 | 1456 | 60 | RL | 62.0 | 7917 | Pave | NaN | Reg | Lvl | AllPub | Inside | Gtl | Gilbert | Norm | Norm | 1Fam | 2Story | 6 | 5 | 1999 | 2000 | Gable | CompShg | VinylSd | VinylSd | None | 0.0 | TA | TA | PConc | Gd | TA | No | Unf | 0 | Unf | 0 | 953 | 953 | GasA | ... | Y | SBrkr | 953 | 694 | 0 | 1647 | 0 | 0 | 2 | 1 | 3 | 1 | TA | 7 | Typ | 1 | TA | Attchd | 1999.0 | RFn | 2 | 460 | TA | TA | Y | 0 | 40 | 0 | 0 | 0 | 0 | NaN | NaN | NaN | 0 | 8 | 2007 | WD | Normal | 175000 |
| 1456 | 1457 | 20 | RL | 85.0 | 13175 | Pave | NaN | Reg | Lvl | AllPub | Inside | Gtl | NWAmes | Norm | Norm | 1Fam | 1Story | 6 | 6 | 1978 | 1988 | Gable | CompShg | Plywood | Plywood | Stone | 119.0 | TA | TA | CBlock | Gd | TA | No | ALQ | 790 | Rec | 163 | 589 | 1542 | GasA | ... | Y | SBrkr | 2073 | 0 | 0 | 2073 | 1 | 0 | 2 | 0 | 3 | 1 | TA | 7 | Min1 | 2 | TA | Attchd | 1978.0 | Unf | 2 | 500 | TA | TA | Y | 349 | 0 | 0 | 0 | 0 | 0 | NaN | MnPrv | NaN | 0 | 2 | 2010 | WD | Normal | 210000 |
| 1457 | 1458 | 70 | RL | 66.0 | 9042 | Pave | NaN | Reg | Lvl | AllPub | Inside | Gtl | Crawfor | Norm | Norm | 1Fam | 2Story | 7 | 9 | 1941 | 2006 | Gable | CompShg | CemntBd | CmentBd | None | 0.0 | Ex | Gd | Stone | TA | Gd | No | GLQ | 275 | Unf | 0 | 877 | 1152 | GasA | ... | Y | SBrkr | 1188 | 1152 | 0 | 2340 | 0 | 0 | 2 | 0 | 4 | 1 | Gd | 9 | Typ | 2 | Gd | Attchd | 1941.0 | RFn | 1 | 252 | TA | TA | Y | 0 | 60 | 0 | 0 | 0 | 0 | NaN | GdPrv | Shed | 2500 | 5 | 2010 | WD | Normal | 266500 |
| 1458 | 1459 | 20 | RL | 68.0 | 9717 | Pave | NaN | Reg | Lvl | AllPub | Inside | Gtl | NAmes | Norm | Norm | 1Fam | 1Story | 5 | 6 | 1950 | 1996 | Hip | CompShg | MetalSd | MetalSd | None | 0.0 | TA | TA | CBlock | TA | TA | Mn | GLQ | 49 | Rec | 1029 | 0 | 1078 | GasA | ... | Y | FuseA | 1078 | 0 | 0 | 1078 | 1 | 0 | 1 | 0 | 2 | 1 | Gd | 5 | Typ | 0 | NaN | Attchd | 1950.0 | Unf | 1 | 240 | TA | TA | Y | 366 | 0 | 112 | 0 | 0 | 0 | NaN | NaN | NaN | 0 | 4 | 2010 | WD | Normal | 142125 |
| 1459 | 1460 | 20 | RL | 75.0 | 9937 | Pave | NaN | Reg | Lvl | AllPub | Inside | Gtl | Edwards | Norm | Norm | 1Fam | 1Story | 5 | 6 | 1965 | 1965 | Gable | CompShg | HdBoard | HdBoard | None | 0.0 | Gd | TA | CBlock | TA | TA | No | BLQ | 830 | LwQ | 290 | 136 | 1256 | GasA | ... | Y | SBrkr | 1256 | 0 | 0 | 1256 | 1 | 0 | 1 | 1 | 3 | 1 | TA | 6 | Typ | 0 | NaN | Attchd | 1965.0 | Fin | 1 | 276 | TA | TA | Y | 736 | 68 | 0 | 0 | 0 | 0 | NaN | NaN | NaN | 0 | 6 | 2008 | WD | Normal | 147500 |
1460 rows × 81 columns
- 그 다음 확인해야 하는 것은
Numerical변수와Categorical변수를 구분한다.- 먼저
numerical_features를 구분하자.
- 먼저
numeric_features = train.select_dtypes(include=[np.number])
print(numeric_features.columns)
print("The total number of numeric features are: ", len(numeric_features.columns))
Index(['Id', 'MSSubClass', 'LotFrontage', 'LotArea', 'OverallQual',
       'OverallCond', 'YearBuilt', 'YearRemodAdd', 'MasVnrArea', 'BsmtFinSF1',
       'BsmtFinSF2', 'BsmtUnfSF', 'TotalBsmtSF', '1stFlrSF', '2ndFlrSF',
       'LowQualFinSF', 'GrLivArea', 'BsmtFullBath', 'BsmtHalfBath', 'FullBath',
       'HalfBath', 'BedroomAbvGr', 'KitchenAbvGr', 'TotRmsAbvGrd',
       'Fireplaces', 'GarageYrBlt', 'GarageCars', 'GarageArea', 'WoodDeckSF',
       'OpenPorchSF', 'EnclosedPorch', '3SsnPorch', 'ScreenPorch', 'PoolArea',
       'MiscVal', 'MoSold', 'YrSold', 'SalePrice'],
      dtype='object')
The total number of numeric features are:  38
numeric_features을 제외한 나머지 변수를 추출하자.
categorical_features = train.select_dtypes(exclude=[np.number])
print(categorical_features.columns)
print("The total number of numeric features are: ", len(categorical_features.columns))
Index(['MSZoning', 'Street', 'Alley', 'LotShape', 'LandContour', 'Utilities',
       'LotConfig', 'LandSlope', 'Neighborhood', 'Condition1', 'Condition2',
       'BldgType', 'HouseStyle', 'RoofStyle', 'RoofMatl', 'Exterior1st',
       'Exterior2nd', 'MasVnrType', 'ExterQual', 'ExterCond', 'Foundation',
       'BsmtQual', 'BsmtCond', 'BsmtExposure', 'BsmtFinType1', 'BsmtFinType2',
       'Heating', 'HeatingQC', 'CentralAir', 'Electrical', 'KitchenQual',
       'Functional', 'FireplaceQu', 'GarageType', 'GarageFinish', 'GarageQual',
       'GarageCond', 'PavedDrive', 'PoolQC', 'Fence', 'MiscFeature',
       'SaleType', 'SaleCondition'],
      dtype='object')
The total number of numeric features are:  43
IV. 연도 데이터 탐색 개요
-
지난시간에 각 데이터에서
categorical_features와numeric_features를 각각 추출하는 방법에 대해 배웠다.- categorical_features: Alley, BldgType, BsmtCond, BsmtExposure, BsmtFinType1, BsmtFinType2, BsmtQual, CentralAir, Condition1, Condition2, Electrical, ExterCond, ExterQual, Exterior1st, Exterior2nd, Fence, FireplaceQu, Foundation, Functional, GarageCond, GarageFinish, GarageQual, GarageType, Heating, HeatingQC, HouseStyle, KitchenQual, LandContour, LandSlope, LotConfig, LotShape, MSZoning, MasVnrType, MiscFeature, Neighborhood, PavedDrive, PoolQC, RoofMatl, RoofStyle, SaleCondition, SaleType, Street, Utilitif
- numeric_features:‘Id’, ‘MSSubClass’, ‘LotFrontage’, ‘LotArea’, ‘OverallQual’, ‘OverallCond’, ‘YearBuilt’, ‘YearRemodAdd’, ‘MasVnrArea’, ‘BsmtFinSF1’, ‘BsmtFinSF2’, ‘BsmtUnfSF’, ‘TotalBsmtSF’, ‘1stFlrSF’, ‘2ndFlrSF’, ‘LowQualFinSF’, ‘GrLivArea’, ‘BsmtFullBath’, ‘BsmtHalfBath’, ‘FullBath’, ‘HalfBath’, ‘BedroomAbvGr’, ‘KitchenAbvGr’, ‘TotRmsAbvGrd’, ‘Fireplaces’, ‘GarageYrBlt’, ‘GarageCars’, ‘GarageArea’, ‘WoodDeckSF’, ‘OpenPorchSF’, ‘EnclosedPorch’, ‘3SsnPorch’, ‘ScreenPorch’, ‘PoolArea’, ‘MiscVal’, ‘MoSold’, ‘YrSold’, ‘SalePrice’
-
여기에서 우선
categorical_features는 논의에서 제외한다. -
이 중에서, 우선
numeric_features를 다시 살펴본다.- 우선 훈련데이터의
ID는 삭제한다. - 또한, 종속변수인
salesprice는 테스트 데이터에는 존재하지 않는다. - 그럼 결과적으로
36개의numeric_features만 남게 된다.
- 우선 훈련데이터의
-
36개의
features만 남았다.- 여기에서 유심히 살펴보면
Year과 관련된features가 보인다.
- 여기에서 유심히 살펴보면
-
특히 매출과 관련된 데이터를 다루는데 있어서,
연,월,일은 매우 중요하다. 패턴을 찾아서 특정 변수만 추출하는 코드가 필요하다.YearBuilt,YearRemodAdd,GarageYrBlt,YrSold만 추출해보자.
year_fea = [fea for fea in numeric_features if 'Yr' in fea or 'Year' in fea]
print(year_fea)
['YearBuilt', 'YearRemodAdd', 'GarageYrBlt', 'YrSold']
(1) 연도의 변수 처리 방법
- 여기에서 잊지 말아야 하는 것은 새로운 데이터셋을 만들더라도 항상 종속변수(
sales price)는 늘 함께 움직여야 한다. - 각각의 변수는 어떻게 이해해야 할까?
- 이 때, 필요한 것이 일종의
데이터 정의서가 필요하다. data_description.txt를 참고하자.
- 이 때, 필요한 것이 일종의
- 각 변수는 다음과 같다.
- YearBuilt: Original construction date
- YearRemodAdd: Remodel date (same as construction date if no remodeling or additions)
- GarageYrBlt: Year garage was built
- YrSold: Year Sold (YYYY)
- 여기에서 우선 각 변수별로 연도가 차이가 나는지 확인해보자.
for fea in year_fea:
  data = train.copy()
  data[fea].value_counts(sort=False).plot(kind='bar')
  plt.xlabel(fea)
  plt.title(fea)
  plt.show()
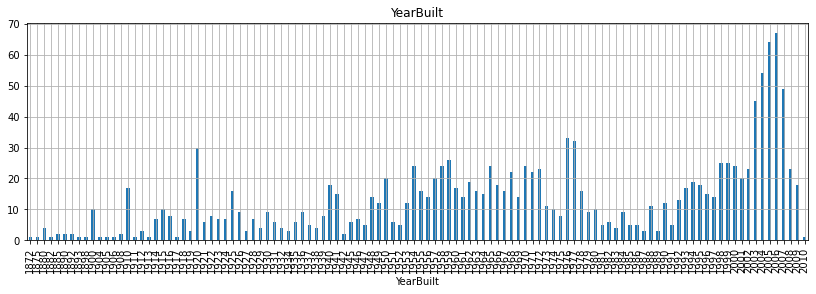
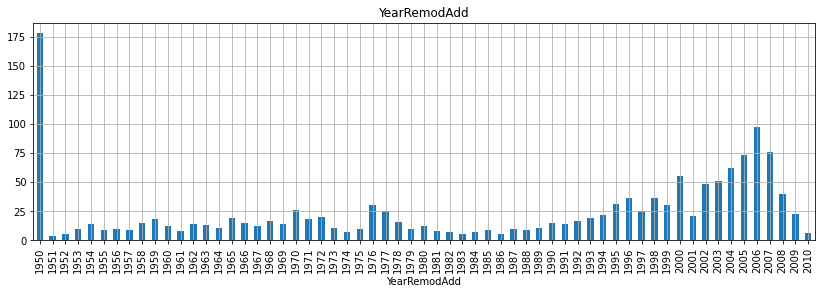
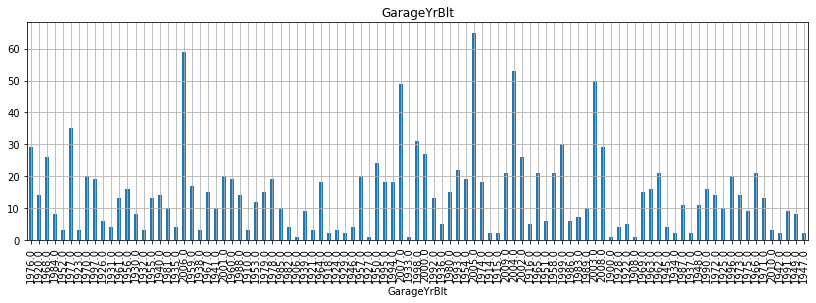
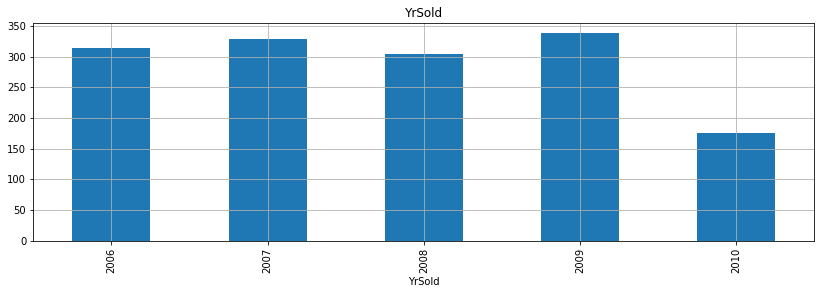
- 위 그래프를 보면서 알 수 있는 것은 무엇일까?
- 우선, 첫 건축 시기는 1872년이고 첫 리모델링 시기는 1950년이고, 마지막으로 첫 차고 건축시기는 1930년으로 확인된다.
- 그리고 매매 시기는 2006-2010년 사이로 집계된 것으로 확인할 수 있다.
(2) SalePrice와의 관계
- 위 데이터는 각 연도의 특성을 이해하는데는 도움이 될지 모르지만, 결국
Kaggle대회에서 중요한 것은종속변수와의 관계다 - 조금 의미있는 변수를 만들어야 한다. (위 4가지 변수의 조합)
- 보통 실무에서는 이를 도출변수라고 하는데.. 이 부분은
Intermediate level에서 조금 더 자세히 다루기로 한다. - 여기서 강사가 하고자 하는 것은
YrSold에서 그 외 다른 변수와의 연도 시기의 차이를 계산하면 통상적으로 연수가 짧으면 짧을수록 매매가도 올라가고 연수가 길면 길수록 매매가가 하락하는 것을 예상할 수 있다. - 실제 그러한 그래프를 그리도록 해보자.
- 보통 실무에서는 이를 도출변수라고 하는데.. 이 부분은
for fea in year_fea:
    if fea!='YrSold': # `YrSold` 변수는 제외 한다.
        data=train.copy() # 이렇게 해주는 것이 좋다. (원본 데이터는 늘 보존할 수 있다)
        data[fea]=data['YrSold']-data[fea] #  여기가 사실 핵심 포인트다. 연수 차이 계산
        plt.scatter(data[fea], data['SalePrice']) # 산점도 그래프를 그린다.
        plt.title(fea)
        plt.xlabel(fea)
        plt.ylabel('SalePrice')
        plt.show()


- 굳이 회귀선을 그리지 않더라도, 연수의 차이가 작을수록 매매가가 높게 형성된 것을 확인할 수 있다.
V. 양적 변수 시각화 - 이산형 그래프
- 양적 변수 중 이산형 그래프 시각화에 관한 내용은 이전 포스트 EDA with Housing Price Prediction - Handling Discrete Variables를 확인하기 바란다.
VI. 양적 변수 시각화 - 연속형 그래프
- 양적 변수 중 연속형 그래프 시각화에 관한 내용은 이전 포스트 EDA with Housing Price Prediction - Handling Continuous Variables를 확인하기 바란다.
VII. 범주형 변수 탐색
- 범주형 변수에 관한 내용은 이전 포스트 EDA with Housing Price Prediction - Handling Categorical Variables를 확인하기 바란다.
VIII. 결측치 처리
- 결측치 처리에 관한 내용은 이전 포스트 EDA with Housing Price Prediction - Handling Missing Values를 확인하기 바란다.
IX. 이상치 확인 및 처리방법
- 이상치를 정의하는 것은 쉽지가 않다.
- 도메인 지식이 없을 경우, 가장 쉬운 방법은 통계적인 방법으로 처리하는 것이다.
- 중급 레벨에서는
모수/비모수에 대해 조금 설명한 뒤, 구체적으로 방법론도 제시하지만, 여기에는간단한 통계적인 방법으로 제거하는 방법을 소개한다.
(1) 표준편차와 박스 플롯의 활용
- 지금까지 우리는 박스플롯 그래프를 작성하면서 어느 정도 이상치에 대해 개념적으로는 알고 있다.

- 이를 활용하여 함수를 작성해본다.
train['LotArea'].describe()
count      1460.000000
mean      10516.828082
std        9981.264932
min        1300.000000
25%        7553.500000
50%        9478.500000
75%       11601.500000
max      215245.000000
Name: LotArea, dtype: float64
def out_std(series, nstd=3.0, return_thresholds=False):
    """
    판다스 시리즈에 표준편차 함수를 적용하여 이상치인지 아닌지 BOOL값으로 반환한다.
    using standard deviation, works column-wise.
    param nstd:
        표준편차를 지정하는 값을 설정한다. nstd는 사용자가 직접 설계할 수 있다.
    :type nstd: ``float`` 형식을 따른다.
    param return_thresholds:
        True returns the lower and upper bounds, 그래프 작성 시 적용한다.
        False returns the masked array
    :type return_thresholds: ``bool``
    """
    data_mean, data_std = series.mean(), series.std()
    cut_off = data_std * nstd
    lower, upper = data_mean - cut_off, data_mean + cut_off
    if return_thresholds:
        return lower, upper
    else:
        return [True if x < lower or x > upper else False for x in series]

def out_iqr(series, k=1.5, return_thresholds=False):
    """
    판다스 시리즈에 IQR(사분위) 함수를 적용하여 이상치인지 아닌지 BOOL값으로 반환한다.
    using interquartile range, works column-wise.
    param k:
        some cutoff to multiply by the iqr
    :type k: ``float``
    param return_thresholds:
        True returns the lower and upper bounds, 그래프 작성 시 적용한다.
        False returns the masked array
    :type return_thresholds: ``bool``
    """
    # calculate interquartile range
    q25, q75 = np.percentile(series, 25), np.percentile(series, 75)
    iqr = q75 - q25
    # calculate the outlier cutoff
    cut_off = iqr * k
    lower, upper = q25 - cut_off, q75 + cut_off
    if return_thresholds:
        return lower, upper
    else: # identify outliers
        return [True if x < lower or x > upper else False for x in series]
out_std를 활용한 함수를 적용하여 이상치를 판별하여 보자. (예: LotArea)
lotArea_outlier = out_std(train['LotArea'], nstd = 1)
print(lotArea_outlier[:10])
[False, False, False, False, False, False, False, False, False, False]
- 이제
low와high값을 구해보자.
data = train.copy()
data['LotArea'][lotArea_outlier]
53       50271
113      21000
120      21453
171      31770
185      22950
197      25419
249     159000
271      39104
313     215245
335     164660
384      53107
411      34650
417      22420
422      21750
451      70761
457      53227
523      40094
529      32668
558      21872
563      21780
588      25095
661      46589
664      20896
691      21535
692      26178
706     115149
726      21695
769      53504
807      21384
828      28698
848      45600
876      25286
934      27650
939      24090
943      25000
1010     21286
1048     21750
1057     29959
1107     23257
1169     35760
1184     35133
1190     32463
1260     24682
1270     23595
1287     36500
1298     63887
1346     20781
1383     25339
1396     57200
1409     20544
1430     21930
1446     26142
Name: LotArea, dtype: int64
- 위 값은 이상치로 판정 받은 관측치이다.
- 이제 시각화를 진행한다. 연속형 변수이기 때문에 이번에는 히스토그램을 작성한다.
plt.figure(figsize=(8,6))
sns.distplot(data['LotArea'], kde=False);
plt.vlines(data['LotArea'][lotArea_outlier], ymin=0, ymax=100, linestyles='dashed');
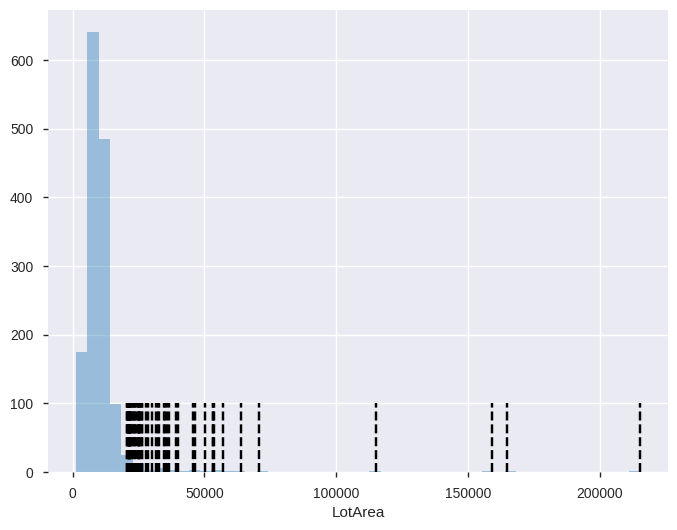
- 위 검은색 선이 모두 이상치라고 판정을 받은 것이다.
- 이번에는
IQR를 활용해서 그래프까지 작성해보자.
lotArea_outlier_iqr = out_iqr(train['LotArea'])
data = train.copy()
data['LotArea'][lotArea_outlier_iqr]
53      50271
66      19900
113     21000
120     21453
159     19378
        ...
1396    57200
1409    20544
1423    19690
1430    21930
1446    26142
Name: LotArea, Length: 69, dtype: int64
plt.figure(figsize=(8,6))
sns.distplot(data['LotArea'], kde=False);
plt.vlines(data['LotArea'][lotArea_outlier_iqr], ymin=0, ymax=100, linestyles='dashed');
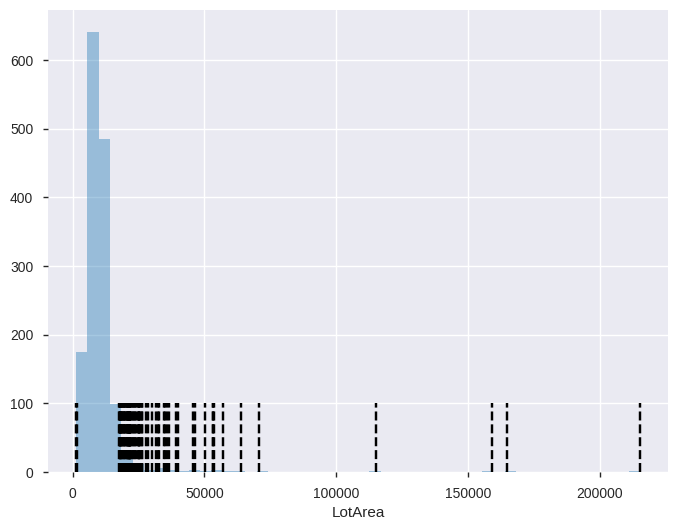
- 앞의 그래프와 다르게 0에 해당하는 값도 표시가 된 것을 확인할 수 있다.
(2) 이상치 제거
- 제거하는 방법은
lotArea_outlier값이 BOOL이기 때문에, TRUE에 해당하는 값만 확인해서 제거하면 된다.
data = train.copy()
len(data)
1460
data['outlier_LotArea'] = lotArea_outlier_iqr
data2 = data[data['outlier_LotArea'] == False]
len(data2)
1391
- 위와 같은 방법으로 제거하면 된다.
- Manual 형태로 제거하는 방법은
EDA에서는 유용하지만 예측 모형 또는 다변량의 통계적 모형을 적용할 때에는 쉬운 것은 아니다. 즉,EDA에서 활용하는 것을 권한다. - 실무적으로 이상치를 제거하는 것은 쉽지 않다. 변수간의 관계도 확인해야 하기 때문에, 보통은
Automatic Outlier Detection을 활용한다. 특히 이 기법은 머신러닝 기법에 활용할 때 적용된다.
X. Review & What’s next
- 처음 프로그래밍을 입문하시는 분들에게
for-loop또는if문법에 대해 고민하지 말 것을 권한다.- 우선
intermediate들어가기전에 그래프의 종류, 기초 문법, 데이터 타입의 종류 등에 대해 한번 정리를 할 것이다.
- 우선
이산형 그래프의 핵심은 다변량의 그래프를for-loop를 통해서 비교적 쉽고 빠르게 그래프를 구현했다는 점이다.- 금일 업데이트 한 소스코드를 복습하고, 또한
boxplot의 개념이 약하신 분들은 교재를 한번 더 참고하기를 바란다.
- 금일 업데이트 한 소스코드를 복습하고, 또한
연속형 그래프의 핵심은 여러 그래프를 한 이미지로 확인할 수 있도록 구현하기 위해 그래프의 좌표평면 기법을 도입했다는 것을 확인한다.범주형 변수탐색의 핵심은유일한 값이 몇개가 존재하는지 파악하는 것이 우선이다.- 이산형 그래프와 같이
박스플롯그래프를 작성했지만,SalePrice의 값이 매우 크게 요동치는 것을 확인할 수 있었다.
- 이산형 그래프와 같이
- 지금까지 배운 것은
EDA작업할 때 반드시 확인해야 하는 작업이다. - 사실 더 많은 것을 실무에서는 그리고 또 그려야 한다. 중요한 것은 결국 종속변수와의 관계다.
- EDA를 한번쯤 작업했다면, 이번에는 약간 기초문법과 시각화의 기본적인 개념에 대해 다시 배우도록 하자.
