Programmings

MLFlow with Scikit-Learn

개요

  • Scikit-Learn 모델을 만든 후, MLFlow로 모델을 배포한다.
  • 머신러닝 코드에 대한 설명은 생략한다.
  • 가상환경 설정에 관한 내용도 생략한다.

라이브러리 불러오기

  • 기존 코드에서 mlflow 라이브러리만 추가한다.
%matplotlib inline

import numpy as np 
import pandas as pd 
import matplotlib as mpl
import matplotlib.pyplot as plt 
import sklearn
import seaborn as sns
import mlflow 
import mlflow.sklearn
from sklearn.linear_model import LogisticRegression
from sklearn.model_selection import train_test_split, KFold
from sklearn.preprocessing import StandardScaler
from sklearn.metrics import roc_auc_score, plot_roc_curve, confusion_matrix 

print(f"numpy version {np.__version__}")
print(f"pandas version {pd.__version__}")
print(f"matplotlib version {mpl.__version__}")
print(f"seaborn version {sns.__version__}")
print(f"sklearn version {sklearn.__version__}")
print(f"MLFlow version {mlflow.__version__}")
numpy version 1.23.1
pandas version 1.4.3
matplotlib version 3.5.2
seaborn version 0.11.2
sklearn version 1.1.1
MLFlow version 1.27.0

데이터 불러오기

  • 데이터를 불러오도록 한다.
DATA_PATH = "C:\\Users\\your_id\\Desktop\\mlops_tutorial\\data\\creditcard.csv"

df = pd.read_csv(DATA_PATH)
print(df.head())
   Time        V1        V2        V3        V4        V5        V6        V7  \
0   0.0 -1.359807 -0.072781  2.536347  1.378155 -0.338321  0.462388  0.239599   
1   0.0  1.191857  0.266151  0.166480  0.448154  0.060018 -0.082361 -0.078803   
2   1.0 -1.358354 -1.340163  1.773209  0.379780 -0.503198  1.800499  0.791461   
3   1.0 -0.966272 -0.185226  1.792993 -0.863291 -0.010309  1.247203  0.237609   
4   2.0 -1.158233  0.877737  1.548718  0.403034 -0.407193  0.095921  0.592941   

         V8        V9  ...       V21       V22       V23       V24       V25  \
0  0.098698  0.363787  ... -0.018307  0.277838 -0.110474  0.066928  0.128539   
1  0.085102 -0.255425  ... -0.225775 -0.638672  0.101288 -0.339846  0.167170   
2  0.247676 -1.514654  ...  0.247998  0.771679  0.909412 -0.689281 -0.327642   
3  0.377436 -1.387024  ... -0.108300  0.005274 -0.190321 -1.175575  0.647376   
4 -0.270533  0.817739  ... -0.009431  0.798278 -0.137458  0.141267 -0.206010   

        V26       V27       V28  Amount  Class  
0 -0.189115  0.133558 -0.021053  149.62      0  
1  0.125895 -0.008983  0.014724    2.69      0  
2 -0.139097 -0.055353 -0.059752  378.66      0  
3 -0.221929  0.062723  0.061458  123.50      0  
4  0.502292  0.219422  0.215153   69.99      0  

[5 rows x 31 columns]

로지스틱 모형 만들기

  • 기존 코드를 참조하여 모델을 만든다.
  • 데이터셋 분리를 한다.

normal = df[df['Class'] == 0].sample(frac=0.5, random_state=42).reset_index(drop=True)
anomaly = df[df['Class']==1]

normal_train, normal_test = train_test_split(normal, test_size = 0.2, random_state=42)
anomary_train, anomary_test = train_test_split(anomaly, test_size = 0.2, random_state=42)

normal_train, normal_validate = train_test_split(normal_train, test_size = 0.25, random_state=42)
anomary_train, anomary_validate = train_test_split(anomary_train, test_size = 0.25, random_state=42)

normal_train.shape, normal_validate.shape, anomary_train.shape, anomary_validate.shape
((85294, 31), (28432, 31), (294, 31), (99, 31))
  • 최종 학습, 테스트 및 검증 세트를 생성하기 위해 각각의 정상 및 이상 데이터 분할을 연결해야 한다.
X_train = pd.concat((normal_train, anomary_train))
X_test = pd.concat((normal_test, anomary_test))
X_validate = pd.concat((normal_validate, anomary_validate))

y_train = np.array(X_train["Class"])
y_test = np.array(X_test["Class"])
y_validate = np.array(X_validate["Class"])

X_train = X_train.drop("Class", axis = 1)
X_test = X_test.drop("Class", axis = 1)
X_validate = X_validate.drop("Class", axis = 1)

X_train.shape, X_validate.shape, X_test.shape, y_train.shape, y_validate.shape, y_test.shape
((85588, 30), (28531, 30), (28531, 30), (85588,), (28531,), (28531,))
  • 표준화를 진행한다.
scaler = StandardScaler()
scaler.fit(X_train)

X_train = scaler.transform(X_train)
X_test = scaler.transform(X_test)
X_validate = scaler.transform(X_validate)

MLFlow를 통한 학습 및 평가

  • MLFlow 기능으로 검증에 사용하는 사용자 정의 함수를 만들어 본다.
  • 여기서 핵심은
    • mlflow.log_metric() 함수를 통해 지표를 로깅할 수 있음
    • mlflow.log_artifact() 함수를 통해 그래프를 저장할 수 잇음.
def train(sk_model, X_train, y_train):
    sk_model = sk_model.fit(X_train, y_train)
    train_acc = sk_model.score(X_train, y_train)
    mlflow.log_metric("train_acc", train_acc)
    
    print(f"Train Accuracy: (train_acc:.3%)")
    

def evaluate(sk_model, X_test, y_test):
    eval_acc = sk_model.score(X_test, y_test)
    preds = sk_model.predict(X_test)
    auc_score = roc_auc_score(y_test, preds)
    mlflow.log_metric("eval_acc", eval_acc)
    mlflow.log_metric("auc_score", auc_score)
    
    print(f"Auc Score : {auc_score:.3%}")
    print(f"Eval Score : {eval_acc:.3%}")
    roc_plot = plot_roc_curve(sk_model, X_test, y_test, name="Scikit-Learn ROC Curve")
    plt.savefig("sklearn_roc_plot.png")
    plt.show()
    plt.clf()
    conf_matrix = confusion_matrix(y_test, preds)
    ax = sns.heatmap(conf_matrix, annot=True, fmt='g')
    ax.invert_xaxis()
    ax.invert_yaxis()
    plt.ylabel("Actual")
    plt.xlabel("Predicted")
    plt.title("Confusion Matrix")
    plt.savefig("sklearn_conf_matrix.png")
    mlflow.log_artifact("sklearn_roc_plot.png")
    mlflow.log_artifact("sklearn_conf_matrix.png")

MLFlow 실행 로깅 및 확인

  • 실제 실험 이름을 설정하고, MLFlow 실행 시작. 해당 코드를 모두 실행한다.
# 모델 설정
sk_model = LogisticRegression(random_state=None, max_iter=400, solver='newton-cg')

# 실험 이름 설정
mlflow.set_experiment("sklearn_experiment")

# 해당 이름으로 실행 배치
with mlflow.start_run():
    train(sk_model, X_train, y_train)
    evaluate(sk_model, X_test, y_test)
    
    # 하나의 MLFlow 실행 컨텍스트에서 모든 코드를 묶을 수 있음. 
    # 참조 : https://mlflow.org/docs/latest/models.html#model-customization
    mlflow.sklearn.log_model(sk_model, 'log_reg_model')
    
    # 본질적으로 모델과 지표가 로깅되는 현재 실행을 가져오고 출력함. 
    print("Model run: ", mlflow.active_run().info.run_uuid)
mlflow.end_run()
Train Accuracy: (train_acc:.3%)
Auc Score : 86.355%
Eval Score : 99.888%


C:\Users\your_id\Desktop\mlops_tutorial\venv\lib\site-packages\sklearn\utils\deprecation.py:87: FutureWarning: Function plot_roc_curve is deprecated; Function :func:`plot_roc_curve` is deprecated in 1.0 and will be removed in 1.2. Use one of the class methods: :meth:`sklearn.metric.RocCurveDisplay.from_predictions` or :meth:`sklearn.metric.RocCurveDisplay.from_estimator`.
  warnings.warn(msg, category=FutureWarning)

png

주요 핵심 머신러닝 리뷰

강의 홍보

개요

  • 수강생들의 머신러닝을 활용한 웹 개발 프로젝트 전 복습 차원에서 준비함.
  • 주 내용은 주요 참고자료를 기반으로 작성하였으며, 참고자료에 없는 코드는 직접 작성하였음을 밝힘.

가장 인기 있는 모델

  • XGBoost와 LightGBM
  • 그 외, 선형회귀, 로지스틱 회귀, 결정 트리, 앙상블 학습, 랜덤 포레스트, XGBoost, LightGBM

선형 회귀

  • 선형 회귀식을 활용한 모델
  • 회귀 계수와 절편을 찾는 것이 중요
  • 기초통계에서 다루는 선형 회귀와 기본적인 개념에서는 동일하나, 기초통계에서와 예측 모델에서의 쓰임새는 다르다는 것을 기억한다.

데이터 생성

  • 단순 선형 회귀식 $y = 3x + 4$에 근사한 데이터 50개 생성
import numpy as np 
import pandas as pd 

np.random.seed(0) # 시드값 고정
intercept = 4 # 절편
slope = 3 # 기울기

# 변동성 주기 위해 노이즈 생성
noise = np.random.randn(50, 1)

# 50개의 x값 생성
x = 5 * np.random.rand(50, 1) # 0과 5사이의 실숫값 50개 생성
y = slope * x + intercept + noise

# 데이터 프레임 생성
data = pd.DataFrame({'X': x[:, 0], 'Y': y[:, 0]})
print(data.head())
          X          Y
0  0.794848   8.148596
1  0.551876   6.055784
2  3.281648  14.823682
3  0.690915   8.313637
4  0.982912   8.816293
  • 위 데이터를 시각화로 구현한다.
import matplotlib.pyplot as plt

fig, ax = plt.subplots()
ax.scatter(data['X'], data['Y'])
plt.show()

png

django Web 개발 - IRIS Prediction

개요

  • Python Django와 Sklearn을 활용하여 간단한 iris prediction 웹을 만들어본다.

사전준비

  • 머신러닝 기본 이론 및 원리는 어느정도 알고 있다고 가정한다.
  • Django 앱에 대해 어느정도 알고 있다고 가정한다.

무엇을 배우는가?

  • 머신러닝 모델을 활용하여 배포하는 과정을 배운다.

가상환경 설정

  • 가상환경을 생성한다.
$ virtualenv venv
created virtual environment CPython3.9.1.final.0-64 in 475ms
  creator CPython3Posix(dest=/Users/evan/Desktop/django-iris-tutorial/venv, clear=False, no_vcs_ignore=False, global=False)
  seeder FromAppData(download=False, pip=bundle, setuptools=bundle, wheel=bundle, via=copy, app_data_dir=/Users/evan/Library/Application Support/virtualenv)
    added seed packages: pip==22.1.1, setuptools==62.3.2, wheel==0.37.1
  activators BashActivator,CShellActivator,FishActivator,NushellActivator,PowerShellActivator,PythonActivator
  • 만들어진 가상환경에 접속한다.
$ source venv/bin/activate
(venv) $
  • 크게 3개의 라이브러리를 설치한다.
    • jupyterlab : 머신러닝 개발 과정을 진행할 에디터로 활용한다.
    • sklearn : 머신러닝 개발 관련 라이브러리이다.
    • django : django 웹 프레임워크 라이브러리이다.
(venv) $ pip install jupyterlab sklearn django

머신러닝 개발

  • iris 데이터를 불러오고 sklearn을 활용하여 모형 개발을 진행한다.
  • 모형 개발 시, 주요 Feature Engineering 과정은 생략한다.

(1) 모형 개발

  • jupyterlab을 실행한다.
(venv) $ python -m jupyterlab
  • 아래와 같이 코드를 입력한다.
# Module 불러오기
from pandas import read_csv
from sklearn.model_selection import train_test_split
from sklearn.svm import SVC
import pandas as pd

# 데이터셋 불러오기
df = pd.read_csv("data/iris.csv")

# 독립변수와 종속변수 분리
X = df[['sepal_length','sepal_width','petal_length','petal_width']]
y = df['classification']

# 훈련데이터와 종속데이터 분리
X_train, X_test, Y_train, Y_test = train_test_split(X, y, test_size=0.20, random_state=1)

# 모형 학습
model = SVC(gamma='auto')
model.fit(X_train, Y_train)

# 모형 예측
sepal_length = float(1.5)
sepal_width = float(5)
petal_length = float(4)
petal_width = float(3)

result = model.predict([[sepal_length,sepal_width,petal_length,petal_width]])  # input must be 2D array
print(result)
['Iris-virginica']
/Library/Frameworks/Python.framework/Versions/3.8/lib/python3.8/site-packages/sklearn/base.py:445: UserWarning: X does not have valid feature names, but SVC was fitted with feature names
  warnings.warn(

(2) 모형 저장

  • pickle을 통해 모형 저장을 할 수 있다.
pd.to_pickle(model, r'models/svc_model.pickle')

Django 시작

  • django 웹사이트 프로젝트를 시작한다.
(venv) $ django-admin startproject iris
(venv) $ cd iris
(venv) $ python manage.py startapp predict

settings.py

  • iris/settings.py를 열고 아래와 같이 수정한다.
.
.
# Application definition

INSTALLED_APPS = [
    'django.contrib.admin',
    'django.contrib.auth',
    'django.contrib.contenttypes',
    'django.contrib.sessions',
    'django.contrib.messages',
    'django.contrib.staticfiles',
    'predict', 
]
.
.

urls.py

  • iris/urls.py를 열고 아래와 같이 수정한다.
from django.contrib import admin
from django.urls import path, include

urlpatterns = [
    path('admin/', admin.site.urls),
    path('', include('predict.urls', namespace='predict'))
]
  • predict/urls.py를 새로 생성하고 아래와 같이 코드를 추가한다.
from django.urls import path
from . import views

app_name = 'predict'

urlpatterns = [
    path('', views.predict, name='predict'),
]

views.py

  • 이제 predict/views.py에서 predict 함수를 만들어 백엔드 처리를 진행하고, 최종 결괏값을 predict.html로 돌려주는 함수를 구현할 것이다.
from django.shortcuts import render

# Create your views here.
def predict(request):
    return render(request, 'predict.html', {})

predict.html

  • predict/templates 폴더를 만들고, predict.html 파일을 새로 생성한다.
hello
  • predict.html 파일이 잘 열리는지 확인한다.
(venv) iris$ python manage.py runserver 

MySQL Database 생성 및 권한 부여

개요

  • MySQL 관리자 계정인 root로 DB 관리시스템에 접속 후 DB를 생성한다.

사전준비

DB 생성

  • 콘솔창에서 MySQL 명령을 실행한다.
C:\Users\your_name>mysql -uroot -p
Enter password: ****
Welcome to the MySQL monitor.  Commands end with ; or \g.
Your MySQL connection id is 19
Server version: 8.0.28 MySQL Community Server - GPL

Copyright (c) 2000, 2022, Oracle and/or its affiliates.

Oracle is a registered trademark of Oracle Corporation and/or its
affiliates. Other names may be trademarks of their respective
owners.

Type 'help;' or '\h' for help. Type '\c' to clear the current input statement.

mysql>
  • DB 생성 명령을 실행한다. DB명은 homestead 로 지정했다.
mysql> CREATE DATABASE homestead;
Query OK, 1 row affected (0.01 sec)

DB사용자 생성

  • 해당 DB에 접근할 수 있는 계정을 생성한다.
    • {username}과 {password}에 각 개인이 원하는대로 지정한다.
mysql> CREATE USER '{username}'@'localhost' IDENTIFIED BY '{password}';
mysql> CREATE USER '{username}'@'%' IDENTIFIED BY '{password}';
  • 필자는 아래와 같이 했다.
mysql> CREATE USER 'homestead'@'localhost' IDENTIFIED BY 'secret';
Query OK, 0 rows affected (0.02 sec)
  • 생성한 계정에 권한을 부여한다.
  • 첫번째 명령어는 해당 DB에 모든 권한을 부여한다는 뜻이다.
  • 두번째 명령어는 DBMS에 적용하라는 의미를 말하며, 반드시 실행해야 한다.
mysql> GRANT ALL PRIVILEGES ON homestead.* TO 'homestead'@'localhost';
Query OK, 0 rows affected (0.00 sec)
mysql> FLUSH PRIVILEGES;
Query OK, 0 rows affected (0.00 sec)

접속

  • 이제 homestead DB에 접속한다.
  • 기존 cmd 창은 root 계정이기 때문에 exit를 통해 선 종료 한다.
mysql> exit 
Bye
  • 직접 해당 DB에 접근하는 것은 다음과 같다.
mysql -h127.0.0.1 -u{username} -p {database} # 예시
mysql -h127.0.0.1 -uhomestead -p homestead # 적용
  • 실제로 적용하면 아래와 같이 실행될 것이다.
C:\Users\your_name>mysql -h127.0.0.1 -uhomestead -p homestead
Enter password: ******
Welcome to the MySQL monitor.  Commands end with ; or \g.
Your MySQL connection id is 21
Server version: 8.0.28 MySQL Community Server - GPL

Copyright (c) 2000, 2022, Oracle and/or its affiliates.

Oracle is a registered trademark of Oracle Corporation and/or its
affiliates. Other names may be trademarks of their respective
owners.

Type 'help;' or '\h' for help. Type '\c' to clear the current input statement.

mysql> 
  • 현재 DB의 종류를 조회해본다.
mysql> show databases;
+--------------------+
| Database           |
+--------------------+
| homestead          |
| information_schema |
+--------------------+
2 rows in set (0.00 sec)

MySQL Workbench 사용

  • 이제 DB를 사용했으니, Workbench를 통해 접속해본다.
  • 윈도우 돋보기에서 MySQL을 조회 후, Workbench 8.0 CE를 실행한다.

Untitled

MySQL 설치 및 환경변수 설정 Windows 11

개요

  • Windows 11에 MySQL을 설치합니다.

MySQL

  • 챗봇 시스템의 학습 데이터 관리 위해 MySQL을 사용함
  • 설치 주소 : https://dev.mysql.com/downloads/
    • MySQL Installer for Windows 파일을 선택함

tutorial_01.png

  • MSI Installer를 다운로드 받는다.

Untitled

  • 다운로드 받은 파일을 순차적으로 설치 한다.

Untitled

Untitled

Untitled

Untitled

Untitled

Untitled

  • 비밀번호는 잃어버리면 안된다. (비번 : 1234)

Untitled

Untitled

Untitled

Untitled

Untitled

Untitled

Untitled

  • 앞서 설정한 비밀번호를 입력하고 체크 버튼을 누른다.

Untitled

Untitled

Untitled

Untitled

  • 정상적으로 설치가 완료되었다.

Untitled

  • 윈도우에서 돋보기 모양을 누른 후, MySQL 8.0 Command Line Client를 클릭한다.
  • root 계정 비밀번호를 입력 후 접속한다.

Untitled

S3 with Python Basic Tutorial

Bucket 만들기

  • Bucket을 만들어보도록 한다.
import boto3
print(boto3.__version__)
1.23.5
bucket = boto3.resource('s3')

response = bucket.create_bucket(
    Bucket = "your_bucket_name",
    ACL="private", # public-read
    
    CreateBucketConfiguration = {
        'LocationConstraint' : 'ap-northeast-2'
    }
)

print(response)
s3.Bucket(name='your_bucket_name')
  • 버킷 대시보드에서 실제 Bucket이 만들어졌는지 확인한다.

Client Bucket

  • 이번에는 client 버킷을 생성한다.
client = boto3.client('s3')

response = client.create_bucket(
    Bucket = "your_bucket_name",
    ACL = "private",
    
    CreateBucketConfiguration = {
        'LocationConstraint' : 'ap-northeast-2'
    }

)

print(response)
{'ResponseMetadata': {'RequestId': '1X0BAXRG653Q7Y61', 'HostId': 'WwKyxNBcd1V9x6D/WZn8twMKSWKBnkwVCPWtvarZvyNSSvqr7Q77J6OFAdWuYAwiv/nQfXoW/0U=', 'HTTPStatusCode': 200, 'HTTPHeaders': {'x-amz-id-2': 'WwKyxNBcd1V9x6D/WZn8twMKSWKBnkwVCPWtvarZvyNSSvqr7Q77J6OFAdWuYAwiv/nQfXoW/0U=', 'x-amz-request-id': '1X0BAXRG653Q7Y61', 'date': 'Wed, 25 May 2022 03:16:52 GMT', 'location': 'http://your_bucket_name.s3.amazonaws.com/', 'server': 'AmazonS3', 'content-length': '0'}, 'RetryAttempts': 0}, 'Location': 'http://your_bucket_name.s3.amazonaws.com/'}

Resource와 Client의 차이

  • Resource
    • high-level, 객체지향적 인터페이스
    • resource description에 의해 만들어짐
    • 식별자(identifier)와 속성(attribute)을 사용
    • 자원에 대한 조작 위주
  • Client
    • low-level 인터페이스
    • service description에 의해 만들어짐
    • botocore 수준의 client를 공개(botocore는 AWS CLI와 boto3의 기초가 되는 라이브러리)
    • AWS API와 1:1 매핑됨
    • 메소드가 스네이크 케이스로 정의되어 있음

이미지 업로드 및 조회

  • 일반적으로 이미지를 업로드 하는 코드는 다음과 같다.
    • 단, Django나 Flask 등을 활용하여 이미지를 업로드할 때는 코드 작성 방법이 달라지니 참고용으로 확인한다.
  • 코드 실행 후, Web UI에서 직접 확인한다.

Google Adsense with Hugo

동기부여

  • 블로그 광고수익 비교 글을 보게 되었다.

  • 그런데, 현재 운영중인 이 블로그의 일일 방문자수가 300-400명이어서 방치하면 안될 것 같았다.

  • 간단하게 Google Adsense를 Hugo Website에 추가하도록 한다.

사전준비

Google Adsense

  • 우선 Google Adsense에 접속한다.

  • Google Ads에서 아래 그림과 같이 사이트를 클릭한다.

  • 사이트 추가 버튼을 누른다.

IAM User Practice

라이브러리 불러오기

  • 기 설치된 라이브러리를 불러오도록 한다.
import boto3
print(boto3.__version__)
1.23.5

IAM User 관련 주요 코드

  • 다음 코드는 유저를 생성하는 코드이다.
def create_user(username):
    iam = boto3.client('iam')
    response = iam.create_user(UserName=username)
    print(response)

create_user('testuser2fromwsl2')
{'User': {'Path': '/', 'UserName': 'testuser2fromwsl2', 'UserId': 'AIDAVRRRQ3HFXFQPOOY7Q', 'Arn': 'arn:aws:iam::381282212299:user/testuser2fromwsl2', 'CreateDate': datetime.datetime(2022, 5, 24, 5, 30, 6, tzinfo=tzutc())}, 'ResponseMetadata': {'RequestId': 'd5fa242b-9aa9-4ad9-a75a-ed23e041d4ba', 'HTTPStatusCode': 200, 'HTTPHeaders': {'x-amzn-requestid': 'd5fa242b-9aa9-4ad9-a75a-ed23e041d4ba', 'content-type': 'text/xml', 'content-length': '495', 'date': 'Tue, 24 May 2022 05:30:05 GMT'}, 'RetryAttempts': 0}}
  • 이번에는 모든 사용자를 가져오는 코드를 작성한다.
def all_users():
    iam = boto3.client('iam')
    paginator = iam.get_paginator('list_users')
    for response in paginator.paginate():
        for user in response['Users']:
            username = user['UserName']
            Arn = user['Arn']
            print('Username : {} Arn : {}'.format(username, Arn))

all_users()
Username : aws-wsl2 Arn : arn:aws:iam::381282212299:user/aws-wsl2
Username : human Arn : arn:aws:iam::381282212299:user/human
Username : human-m1 Arn : arn:aws:iam::381282212299:user/human-m1
Username : testuser Arn : arn:aws:iam::381282212299:user/testuser
Username : testuser2 Arn : arn:aws:iam::381282212299:user/testuser2
Username : testuser2fromwsl2 Arn : arn:aws:iam::381282212299:user/testuser2fromwsl2
Username : testuser3 Arn : arn:aws:iam::381282212299:user/testuser3
  • 이번에는 사용자 이름을 변경한다.
    • testuser2fromwsl2 이름을 updatetest로 변경하는 코드다.
def update_user(old_username, new_username):
    iam = boto3.client('iam')
    
    response = iam.update_user(
        UserName=old_username, 
        NewUserName=new_username
    )
    
    print(response)

update_user('testuser2fromwsl2', 'updatetest')
all_users()
{'ResponseMetadata': {'RequestId': '4a567c96-d5ce-4e76-9344-6ab762fc9e01', 'HTTPStatusCode': 200, 'HTTPHeaders': {'x-amzn-requestid': '4a567c96-d5ce-4e76-9344-6ab762fc9e01', 'content-type': 'text/xml', 'content-length': '200', 'date': 'Tue, 24 May 2022 05:30:16 GMT'}, 'RetryAttempts': 0}}
Username : aws-wsl2 Arn : arn:aws:iam::381282212299:user/aws-wsl2
Username : human Arn : arn:aws:iam::381282212299:user/human
Username : human-m1 Arn : arn:aws:iam::381282212299:user/human-m1
Username : testuser Arn : arn:aws:iam::381282212299:user/testuser
Username : testuser2 Arn : arn:aws:iam::381282212299:user/testuser2
Username : testuser3 Arn : arn:aws:iam::381282212299:user/testuser3
Username : updatetest Arn : arn:aws:iam::381282212299:user/updatetest

Python AWS 연동 예제

import boto3
import json

def create_policy():
    iam = boto3.client('iam')

    user_policy = {
        "Version":"2012-10-17",
        "Statement":[
            {
                "Effect": "Allow",
                "Action": "*",
                "Resource": "*"
            }
        ]
    }

    response = iam.create_policy(
        PolicyName = 'pyFullAccess',
        PolicyDocument=json.dumps(user_policy)
    )
    print(response)


create_policy()
{'Policy': {'PolicyName': 'pyFullAccess', 'PolicyId': 'ANPAVRRRQ3HFQIRVWB2MX', 'Arn': 'arn:aws:iam::381282212299:policy/pyFullAccess', 'Path': '/', 'DefaultVersionId': 'v1', 'AttachmentCount': 0, 'PermissionsBoundaryUsageCount': 0, 'IsAttachable': True, 'CreateDate': datetime.datetime(2022, 5, 23, 5, 40, 21, tzinfo=tzutc()), 'UpdateDate': datetime.datetime(2022, 5, 23, 5, 40, 21, tzinfo=tzutc())}, 'ResponseMetadata': {'RequestId': '8da83bae-6c24-4104-9da4-22795e46652a', 'HTTPStatusCode': 200, 'HTTPHeaders': {'x-amzn-requestid': '8da83bae-6c24-4104-9da4-22795e46652a', 'content-type': 'text/xml', 'content-length': '759', 'date': 'Mon, 23 May 2022 05:40:21 GMT'}, 'RetryAttempts': 0}}
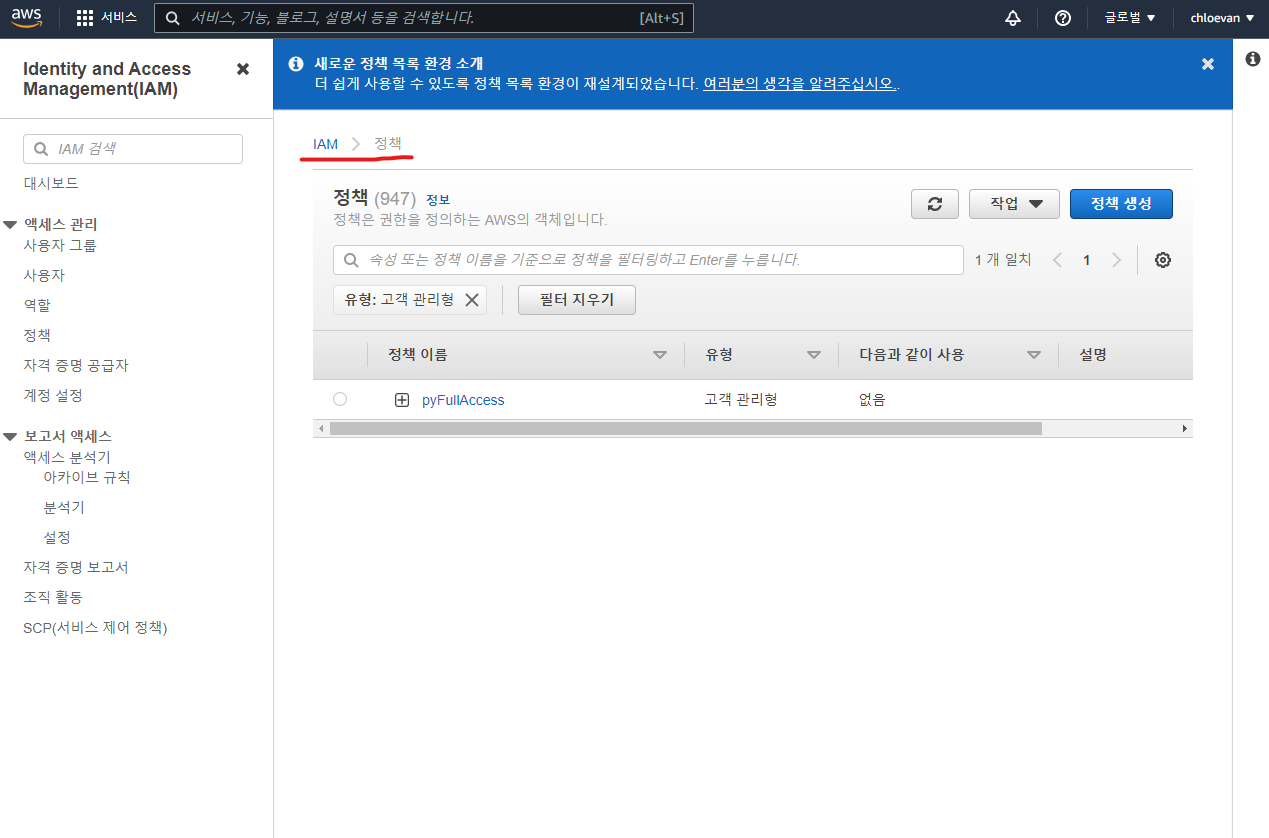
  • AWS 콘솔창에서 IAM 대시보드에서 정책을 클릭하면 PolicyName인 pyFullAccess가 등록되어 있는 것을 확인할 수 있다.

AWS 개발환경 설정 - WSL2 & S3 & RDS

개요

  • 윈도우 WSL2에서 AWS 개발을 위한 기본 개발환경 설정을 진행한다.

WSL2 설치

Restart WSL2

  • WSL2 처음 작업할 때, 실행한다.
exec $SHELL

WSL2 주요 필수 패키지 설치

  • Python 3.8 버전을 설치한다.
sudo apt update
sudo apt install software-properties-common
sudo add-apt-repository ppa:deadsnakes/ppa
sudo apt install python3.7
  • Python 버전은 다음과 같다.
$ python3 --version
Python 3.8.10
  • 만약 Python 버전 변경이 안되면 전체 삭제하고 진행한다.

(옵션) Python 삭제

  • 현재 설치된 모든 파이썬 버전을 보여줌
ls /usr/bin/python* 
  • python3 버전과 관련된 모든 파일을 삭제함
sudo apt-get purge --auto-remove python3.8

awsebcli 설치 및 AWS CLI Configuration

  • awscli를 설치한다.
sudo apt install awscli
  • 버전은 다음과 같다.
$ aws --version
aws-cli/1.18.69 Python/3.8.10 Linux/5.10.16.3-microsoft-standard-WSL2 botocore/1.16.19

IAM 사용자 추가

  • AWS 회원가입은 완료된 상태에서 시작한다.

Django with Elastic Beanstalk - Settings

한줄 요약

  • 생각보다 쉽지 않기 때문에 Windows로 하기 보다는 WSL2로 하는 것을 권한다.
    • 이 부분은 추후 업데이트 할 예정이다.

Windows에 EB CLI 설치

C:\WINDOWS\system32>python --version
Python 3.7.4

C:\WINDOWS\system32>pip --version
pip 19.0.3 from c:\users\human\appdata\local\programs\python\python37-32\lib\site-packages\pip (python 3.7)
  • pip을 이용하여 EB CLI를 설치한다.
C:\Windows\System32> pip install awsebcli --upgrade --user
  • 환경변수를 설정한다.
    • Python 3.7 버전으로 설치 했다면, 아래 코드를 환경변수에 추가한다.
%USERPROFILE%\AppData\roaming\Python\Python37\scripts