강의 홍보
개요
- 정리되지 못한 엑셀 파일을 불러와서 하나의 테이블을 만드는 과정을 진행해본다.
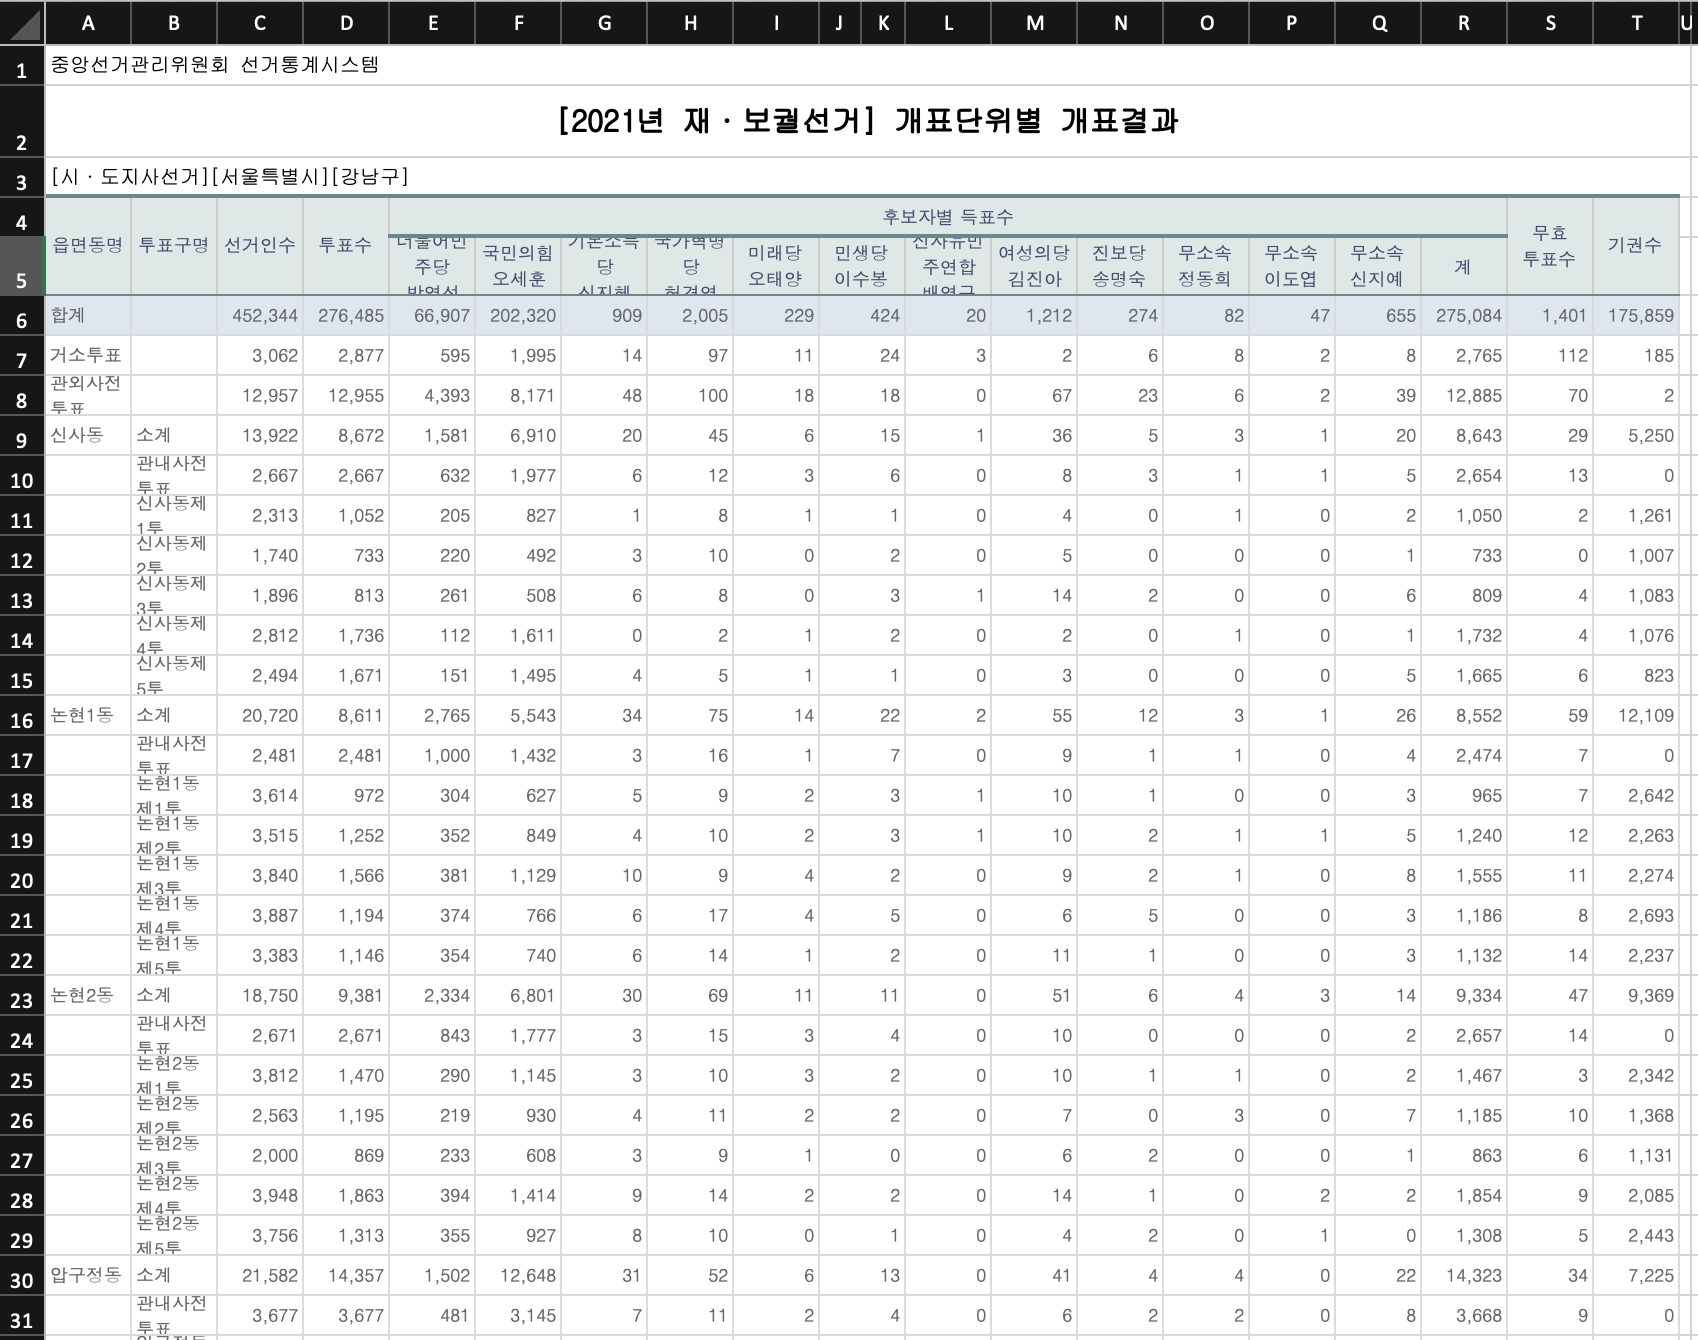
- 위 데이터를 원본 그대로 받아서 pandas 데이터 프레임에 추가한다.
- A3 셀에 있는
[시·도지사선거][서울특별시][강남구] 분리하여 각 column에 추가한다.
라이브러리 불러오기
import pandas as pd
import openpyxl
import os
파일 확인
- data 폴더 내 데이터를 확인한다.
- 추후, 엑셀 데이터만 추려서 반복문을 활용하여 동일하게 처리할 수 있도록 상상을 한다.
print(os.listdir('data'))
['1 강남구-[2021년_재·보궐선거]_개표단위별_개표결과.xlsx', '.DS_Store', '~$1 강남구-[2021년_재·보궐선거]_개표단위별_개표결과.xlsx']
openpyxl 라이브러리 할용
openpyxl 라이브러리는 A Python library to read/write Excel 2010 xlsx/xlsm files을 가지고 있다.- 먼저 A3 셀에 있는
[시·도지사선거][서울특별시][강남구] 데이터를 가져오도록 한다. - 이 때,
openpyxl 라이브리를 활용하면 각 셀에 접근해서 개별적으로 데이터를 가져올 수 있다.
DATA_PATH = "data"
FILE_PATH = os.listdir(DATA_PATH)[0]
wb_obt= openpyxl.load_workbook("data/" + FILE_PATH)
sheet = wb_obt.active
values = sheet["A3"].value
values
'[시·도지사선거][서울특별시][강남구]'
문자열 전처리
- 먼저 하나의 셀로 연결되어 있는 것을 각각 분리하도록 하는 코드를 작성한다.
- strip(‘pattern’)는 특정 문자를 제거하는 것이고, split(‘pattern’)는 문자열을 특수문자로 분리하는 것이다.
city_list = values.strip("[]").split("][")
city_list
['시·도지사선거', '서울특별시', '강남구']
데이터 수집 및 전처리
- 이 때 중요한 parameters는 skiprows, header이다.
- 먼저 skiprows는 특정 행은 건너 뛴다는 의미를 가지고 있다. 즉, 데이터프레임에 접근하기 전까지의 행은 건너 뛴다는 의미다.
- header는 엑셀의 열에 해당하는데, 본 데이터에서는
multiple headers가 있다. 따라서, 이를 리스트 처리하면 해당 열은 모두 가져올 수 있다.
df = pd.read_excel("data/1 강남구-[2021년_재·보궐선거]_개표단위별_개표결과.xlsx", skiprows=3,  header=[0, 1], )
df.drop(columns=df.columns[-1], axis=1, inplace=True) # 마지막 column은 NAN라 삭제.
print(df.head())
                읍면동명               투표구명               선거인수                투표수  \
  Unnamed: 0_level_1 Unnamed: 1_level_1 Unnamed: 2_level_1 Unnamed: 3_level_1
0                 합계                              452344.0           276485.0
1               거소투표                                3062.0             2877.0
2             관외사전투표                               12957.0            12955.0
3                신사동                 소계            13922.0             8672.0
4                                관내사전투표             2667.0             2667.0

     후보자별 득표수                                                               \
  더불어민주당\n박영선 국민의힘\n오세훈 기본소득당\n신지혜 국가혁명당\n허경영 미래당\n오태양 민생당\n이수봉 민생당\n이수봉.1
0     66907.0  202320.0      909.0     2005.0    229.0    424.0        NaN
1       595.0    1995.0       14.0       97.0     11.0     24.0        NaN
2      4393.0    8171.0       48.0      100.0     18.0     18.0        NaN
3      1581.0    6910.0       20.0       45.0      6.0     15.0        NaN
4       632.0    1977.0        6.0       12.0      3.0      6.0        NaN

                                                                        \
  신자유민주연합\n배영규 여성의당\n김진아 진보당\n송명숙 무소속\n정동희 무소속\n이도엽 무소속\n신지예         계
0         20.0    1212.0    274.0     82.0     47.0    655.0  275084.0
1          3.0       2.0      6.0      8.0      2.0      8.0    2765.0
2          0.0      67.0     23.0      6.0      2.0     39.0   12885.0
3          1.0      36.0      5.0      3.0      1.0     20.0    8643.0
4          0.0       8.0      3.0      1.0      1.0      5.0    2654.0

              무효\n투표수                 기권수
  Unnamed: 18_level_1 Unnamed: 19_level_1
0              1401.0            175859.0
1               112.0               185.0
2                70.0                 2.0
3                29.0              5250.0
4                13.0                 0.0
header[0]값은 읍면동명, 투표구명, 선거인수, 투표수 등으로 정리가 되어 있다.header[1]값은 각 후보들의 값이 나타난 것을 확인할 수 있다.- 여기에서 후보자별 득표수만 지우기만 하면 된다. 다만, 각각 가져와야 하는 값이 서로 다르다.
- 이 때, MultiIndex에 대응하기 위해 get_level_values() 함수를 사용한다.
MultiIndex([(    '읍면동명',  'Unnamed: 0_level_1'),
            (    '투표구명',  'Unnamed: 1_level_1'),
            (    '선거인수',  'Unnamed: 2_level_1'),
            (     '투표수',  'Unnamed: 3_level_1'),
            ('후보자별 득표수',         '더불어민주당\n박영선'),
            ('후보자별 득표수',           '국민의힘\n오세훈'),
            ('후보자별 득표수',          '기본소득당\n신지혜'),
            ('후보자별 득표수',          '국가혁명당\n허경영'),
            ('후보자별 득표수',            '미래당\n오태양'),
            ('후보자별 득표수',            '민생당\n이수봉'),
            ('후보자별 득표수',          '민생당\n이수봉.1'),
            ('후보자별 득표수',        '신자유민주연합\n배영규'),
            ('후보자별 득표수',           '여성의당\n김진아'),
            ('후보자별 득표수',            '진보당\n송명숙'),
            ('후보자별 득표수',            '무소속\n정동희'),
            ('후보자별 득표수',            '무소속\n이도엽'),
            ('후보자별 득표수',            '무소속\n신지예'),
            ('후보자별 득표수',                   '계'),
            ( '무효\n투표수', 'Unnamed: 18_level_1'),
            (     '기권수', 'Unnamed: 19_level_1')],
           )
df.columns.get_level_values(0)
Index(['읍면동명', '투표구명', '선거인수', '투표수', '후보자별 득표수', '후보자별 득표수', '후보자별 득표수',
       '후보자별 득표수', '후보자별 득표수', '후보자별 득표수', '후보자별 득표수', '후보자별 득표수', '후보자별 득표수',
       '후보자별 득표수', '후보자별 득표수', '후보자별 득표수', '후보자별 득표수', '후보자별 득표수', '무효\n투표수',
       '기권수'],
      dtype='object')
df.columns.get_level_values(1)
Index(['Unnamed: 0_level_1', 'Unnamed: 1_level_1', 'Unnamed: 2_level_1',
       'Unnamed: 3_level_1', '더불어민주당\n박영선', '국민의힘\n오세훈', '기본소득당\n신지혜',
       '국가혁명당\n허경영', '미래당\n오태양', '민생당\n이수봉', '민생당\n이수봉.1', '신자유민주연합\n배영규',
       '여성의당\n김진아', '진보당\n송명숙', '무소속\n정동희', '무소속\n이도엽', '무소속\n신지예', '계',
       'Unnamed: 18_level_1', 'Unnamed: 19_level_1'],
      dtype='object')
- 이제, 각각의 index를 list로 변환후 하나의 column으로 합치는 과정을 진행한다.
- 총 20개의 column이 정렬된 것을 확인할 수 있다.
col_1 = df.columns.get_level_values(0)[0:4].tolist()
col_2 = df.columns.get_level_values(1)[4:-2].tolist()
col_3 = df.columns.get_level_values(0)[-3:-1].tolist()
cols = col_1 + col_2 + col_3
cols
['읍면동명',
 '투표구명',
 '선거인수',
 '투표수',
 '더불어민주당\n박영선',
 '국민의힘\n오세훈',
 '기본소득당\n신지혜',
 '국가혁명당\n허경영',
 '미래당\n오태양',
 '민생당\n이수봉',
 '민생당\n이수봉.1',
 '신자유민주연합\n배영규',
 '여성의당\n김진아',
 '진보당\n송명숙',
 '무소속\n정동희',
 '무소속\n이도엽',
 '무소속\n신지예',
 '계',
 '후보자별 득표수',
 '무효\n투표수']
df.columns = cols
df.columns
Index(['읍면동명', '투표구명', '선거인수', '투표수', '더불어민주당\n박영선', '국민의힘\n오세훈', '기본소득당\n신지혜',
       '국가혁명당\n허경영', '미래당\n오태양', '민생당\n이수봉', '민생당\n이수봉.1', '신자유민주연합\n배영규',
       '여성의당\n김진아', '진보당\n송명숙', '무소속\n정동희', '무소속\n이도엽', '무소속\n신지예', '계',
       '후보자별 득표수', '무효\n투표수'],
      dtype='object')
df['시도'] = city_list[1]
df['시군구'] = city_list[2]
     읍면동명    투표구명      선거인수       투표수  더불어민주당\n박영선  국민의힘\n오세훈  기본소득당\n신지혜  \
0      합계          452344.0  276485.0      66907.0   202320.0       909.0
1    거소투표            3062.0    2877.0        595.0     1995.0        14.0
2  관외사전투표           12957.0   12955.0       4393.0     8171.0        48.0
3     신사동      소계   13922.0    8672.0       1581.0     6910.0        20.0
4          관내사전투표    2667.0    2667.0        632.0     1977.0         6.0
5          신사동제1투    2313.0    1052.0        205.0      827.0         1.0
6          신사동제2투    1740.0     733.0        220.0      492.0         3.0
7          신사동제3투    1896.0     813.0        261.0      508.0         6.0
8          신사동제4투    2812.0    1736.0        112.0     1611.0         0.0
9          신사동제5투    2494.0    1671.0        151.0     1495.0         4.0

   국가혁명당\n허경영  미래당\n오태양  민생당\n이수봉  ...  여성의당\n김진아  진보당\n송명숙  무소속\n정동희  \
0      2005.0     229.0     424.0  ...     1212.0     274.0      82.0
1        97.0      11.0      24.0  ...        2.0       6.0       8.0
2       100.0      18.0      18.0  ...       67.0      23.0       6.0
3        45.0       6.0      15.0  ...       36.0       5.0       3.0
4        12.0       3.0       6.0  ...        8.0       3.0       1.0
5         8.0       1.0       1.0  ...        4.0       0.0       1.0
6        10.0       0.0       2.0  ...        5.0       0.0       0.0
7         8.0       0.0       3.0  ...       14.0       2.0       0.0
8         2.0       1.0       2.0  ...        2.0       0.0       1.0
9         5.0       1.0       1.0  ...        3.0       0.0       0.0

   무소속\n이도엽  무소속\n신지예         계  후보자별 득표수   무효\n투표수     시도  시군구
0      47.0     655.0  275084.0    1401.0  175859.0  서울특별시  강남구
1       2.0       8.0    2765.0     112.0     185.0  서울특별시  강남구
2       2.0      39.0   12885.0      70.0       2.0  서울특별시  강남구
3       1.0      20.0    8643.0      29.0    5250.0  서울특별시  강남구
4       1.0       5.0    2654.0      13.0       0.0  서울특별시  강남구
5       0.0       2.0    1050.0       2.0    1261.0  서울특별시  강남구
6       0.0       1.0     733.0       0.0    1007.0  서울특별시  강남구
7       0.0       6.0     809.0       4.0    1083.0  서울특별시  강남구
8       0.0       1.0    1732.0       4.0    1076.0  서울특별시  강남구
9       0.0       5.0    1665.0       6.0     823.0  서울특별시  강남구

[10 rows x 22 columns]