공지
본 Tutorial은 교재 시작하세요 텐서플로 2.0 프로그래밍의 강사에게 국비교육 강의를 듣는 사람들에게 자료 제공을 목적으로 제작하였습니다.
강사의 주관적인 판단으로 압축해서 자료를 정리하였기 때문에, 자세하게 공부를 하고 싶으신 분은 반드시 교재를 구매하실 것을 권해드립니다.
- 본 교재 외에 강사가 추가한 내용에 대한 Reference를 확인하셔서, 추가적으로 학습하시는 것을 권유드립니다.
Tutorial
이전 강의가 궁금하신 분들은 아래에서 선택하여 추가 학습 하시기를 바랍니다.
I. 개요
- 이미지에서 단순히 경계선을 추출하는 작업은 전통적인 알고리즘의 필터나 한 층의 컨볼루션 레이어로도 가능하지만, 의미 있는 부분과 그렇지 않은 부분으로 분할하기 위해서는 학습이 필요합니다.
- 앞 절에서 정의한
REDNet을 조금만 수정하면 이미지 분할(Segmentation)에서 사용할 수 있습니다. - 이미지의 경계선과 내용, 그리고 외곽의 3가지로 분류하는
Oxford-IIIT Pet 데이터세트로 이미지 분할 문제를 학습합니다. - 교재에 있는 코드에서 몇몇 에러가 발생하였습니다. 내용상 텐서플로 홈페이지와 유사하여 텐서플로 공식 홈페이지에 있는 소스코드를 참고하였습니다.
- 먼저 필수 파일들을
pip 도구를 활용하여 설치합니다.
!pip install git+https://github.com/tensorflow/examples.git
!pip install -U tfds-nightly
Collecting git+https://github.com/tensorflow/examples.git
Cloning https://github.com/tensorflow/examples.git to /tmp/pip-req-build-36g0gu68
Running command git clone -q https://github.com/tensorflow/examples.git /tmp/pip-req-build-36g0gu68
Requirement already satisfied: absl-py in /usr/local/lib/python3.6/dist-packages (from tensorflow-examples===63ee35adcc3e3dd2d228bc3283e27f6a1e2158ab-) (0.9.0)
Requirement already satisfied: six in /usr/local/lib/python3.6/dist-packages (from tensorflow-examples===63ee35adcc3e3dd2d228bc3283e27f6a1e2158ab-) (1.12.0)
Building wheels for collected packages: tensorflow-examples
Building wheel for tensorflow-examples (setup.py) ... �[?25l�[?25hdone
Created wheel for tensorflow-examples: filename=tensorflow_examples-63ee35adcc3e3dd2d228bc3283e27f6a1e2158ab_-cp36-none-any.whl size=125226 sha256=f2f0d0a9e57edde6593979e55a26983574dba25b3f7008be261173181109f5b8
Stored in directory: /tmp/pip-ephem-wheel-cache-f32yqfdy/wheels/83/64/b3/4cfa02dc6f9d16bf7257892c6a7ec602cd7e0ff6ec4d7d714d
Successfully built tensorflow-examples
Installing collected packages: tensorflow-examples
Successfully installed tensorflow-examples-63ee35adcc3e3dd2d228bc3283e27f6a1e2158ab-
Collecting tfds-nightly
�[?25l Downloading https://files.pythonhosted.org/packages/8c/42/df5f05f2124f9d1b6e16b88c518f04a7d282d77daf3113ba548baadc4ce5/tfds_nightly-3.1.0.dev202005100106-py3-none-any.whl (3.3MB)
�[K |████████████████████████████████| 3.3MB 11.6MB/s
�[?25hRequirement already satisfied, skipping upgrade: wrapt in /usr/local/lib/python3.6/dist-packages (from tfds-nightly) (1.12.1)
Requirement already satisfied, skipping upgrade: requests>=2.19.0 in /usr/local/lib/python3.6/dist-packages (from tfds-nightly) (2.23.0)
Requirement already satisfied, skipping upgrade: tqdm in /usr/local/lib/python3.6/dist-packages (from tfds-nightly) (4.41.1)
Requirement already satisfied, skipping upgrade: attrs>=18.1.0 in /usr/local/lib/python3.6/dist-packages (from tfds-nightly) (19.3.0)
Requirement already satisfied, skipping upgrade: future in /usr/local/lib/python3.6/dist-packages (from tfds-nightly) (0.16.0)
Requirement already satisfied, skipping upgrade: absl-py in /usr/local/lib/python3.6/dist-packages (from tfds-nightly) (0.9.0)
Requirement already satisfied, skipping upgrade: dill in /usr/local/lib/python3.6/dist-packages (from tfds-nightly) (0.3.1.1)
Requirement already satisfied, skipping upgrade: promise in /usr/local/lib/python3.6/dist-packages (from tfds-nightly) (2.3)
Collecting tensorflow-metadata<0.16,>=0.15
Downloading https://files.pythonhosted.org/packages/3b/0c/afb81ea6998f6e26521671585d1cd9d3f7945a8b9834764e91757453dc25/tensorflow_metadata-0.15.2-py2.py3-none-any.whl
Requirement already satisfied, skipping upgrade: six in /usr/local/lib/python3.6/dist-packages (from tfds-nightly) (1.12.0)
Requirement already satisfied, skipping upgrade: protobuf>=3.6.1 in /usr/local/lib/python3.6/dist-packages (from tfds-nightly) (3.10.0)
Requirement already satisfied, skipping upgrade: numpy in /usr/local/lib/python3.6/dist-packages (from tfds-nightly) (1.18.4)
Requirement already satisfied, skipping upgrade: termcolor in /usr/local/lib/python3.6/dist-packages (from tfds-nightly) (1.1.0)
Requirement already satisfied, skipping upgrade: chardet<4,>=3.0.2 in /usr/local/lib/python3.6/dist-packages (from requests>=2.19.0->tfds-nightly) (3.0.4)
Requirement already satisfied, skipping upgrade: certifi>=2017.4.17 in /usr/local/lib/python3.6/dist-packages (from requests>=2.19.0->tfds-nightly) (2020.4.5.1)
Requirement already satisfied, skipping upgrade: idna<3,>=2.5 in /usr/local/lib/python3.6/dist-packages (from requests>=2.19.0->tfds-nightly) (2.9)
Requirement already satisfied, skipping upgrade: urllib3!=1.25.0,!=1.25.1,<1.26,>=1.21.1 in /usr/local/lib/python3.6/dist-packages (from requests>=2.19.0->tfds-nightly) (1.24.3)
Requirement already satisfied, skipping upgrade: googleapis-common-protos in /usr/local/lib/python3.6/dist-packages (from tensorflow-metadata<0.16,>=0.15->tfds-nightly) (1.51.0)
Requirement already satisfied, skipping upgrade: setuptools in /usr/local/lib/python3.6/dist-packages (from protobuf>=3.6.1->tfds-nightly) (46.1.3)
Installing collected packages: tensorflow-metadata, tfds-nightly
Found existing installation: tensorflow-metadata 0.21.2
Uninstalling tensorflow-metadata-0.21.2:
Successfully uninstalled tensorflow-metadata-0.21.2
Successfully installed tensorflow-metadata-0.15.2 tfds-nightly-3.1.0.dev202005100106
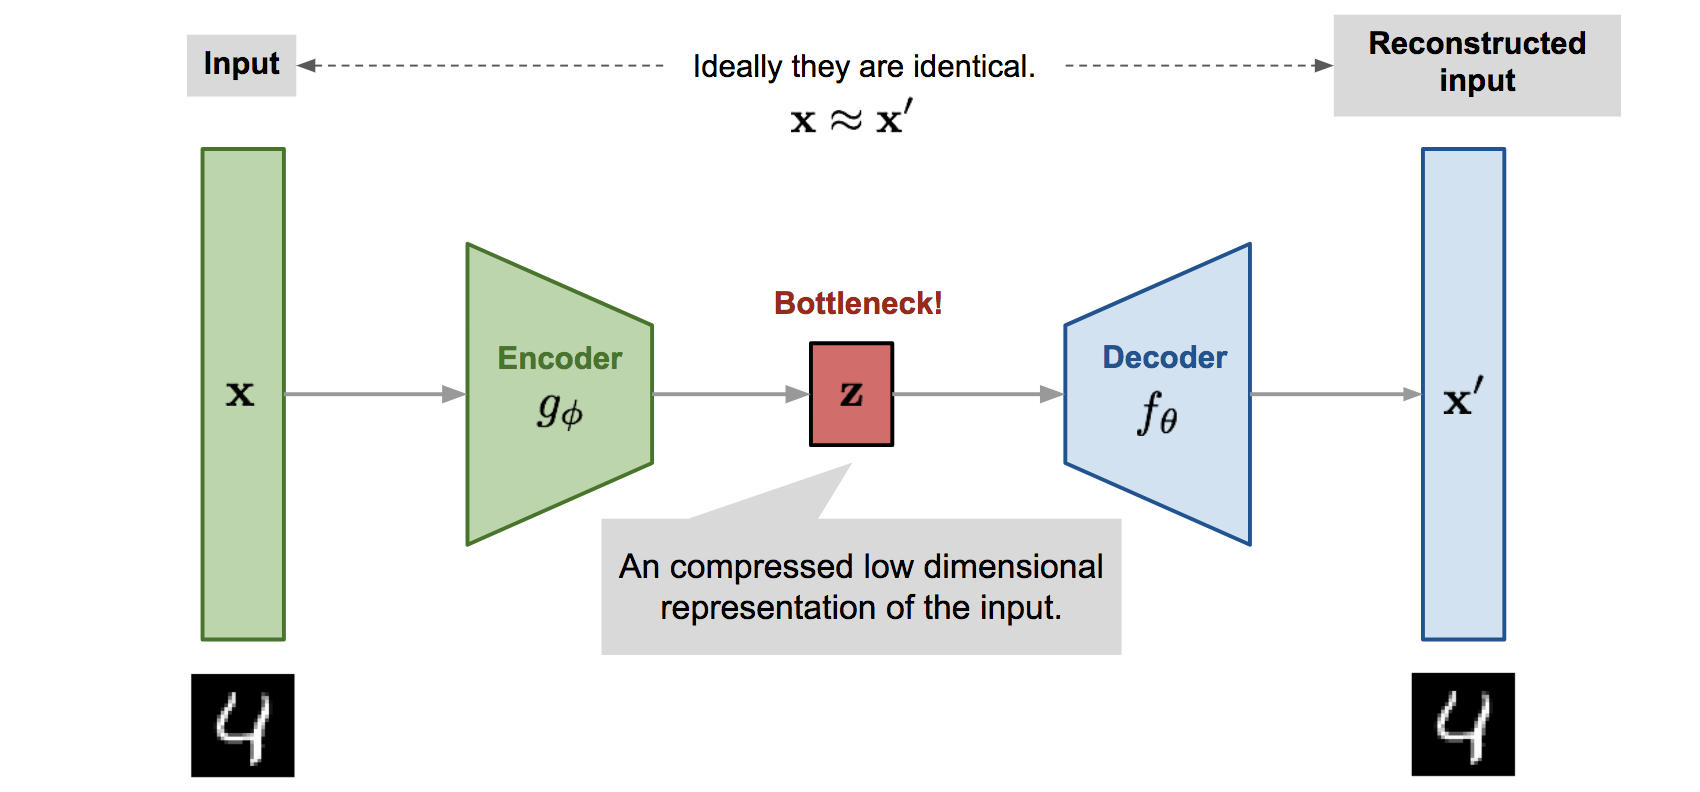
II. REDNet[^1]
REDNet은 Residual Encoder-Decoder Network의 약자이며, Residual은 ResNet등에서 사용하는 건너뛴 연결(skip-connection)입니다.- 다수의 레이어가 중첩되는 구조에서 앞쪽의 정보를 잃어버리기 않기 위해 뒤쪽에 정보를 그대로 전달해줄 때 건너뛴 연결이 사용됩니다.
import tensorflow as tf
from tensorflow_examples.models.pix2pix import pix2pix

import tensorflow_datasets as tfds
tfds.disable_progress_bar()

from IPython.display import clear_output
import matplotlib.pyplot as plt
III. 데이터 불러오기
tf.keras.utils.get_file() 데이터를 불러옵니다.- 교재에서는
oxford_iiit_pet:3.0.0으로 되어 있었는데, 버전을 3.*.*으로 수정하여 다운로드를 하기를 바랍니다.
dataset, info = tfds.load('oxford_iiit_pet:3.*.*', with_info=True)
�[1mDownloading and preparing dataset oxford_iiit_pet/3.2.0 (download: 773.52 MiB, generated: 774.69 MiB, total: 1.51 GiB) to /root/tensorflow_datasets/oxford_iiit_pet/3.2.0...�[0m
Shuffling and writing examples to /root/tensorflow_datasets/oxford_iiit_pet/3.2.0.incompleteONHCBY/oxford_iiit_pet-train.tfrecord
Shuffling and writing examples to /root/tensorflow_datasets/oxford_iiit_pet/3.2.0.incompleteONHCBY/oxford_iiit_pet-test.tfrecord
�[1mDataset oxford_iiit_pet downloaded and prepared to /root/tensorflow_datasets/oxford_iiit_pet/3.2.0. Subsequent calls will reuse this data.�[0m
tfds.core.DatasetInfo(
    name='oxford_iiit_pet',
    version=3.2.0,
    description='The Oxford-IIIT pet dataset is a 37 category pet image dataset with roughly 200
images for each class. The images have large variations in scale, pose and
lighting. All images have an associated ground truth annotation of breed.',
    homepage='http://www.robots.ox.ac.uk/~vgg/data/pets/',
    features=FeaturesDict({
        'file_name': Text(shape=(), dtype=tf.string),
        'image': Image(shape=(None, None, 3), dtype=tf.uint8),
        'label': ClassLabel(shape=(), dtype=tf.int64, num_classes=37),
        'segmentation_mask': Image(shape=(None, None, 1), dtype=tf.uint8),
        'species': ClassLabel(shape=(), dtype=tf.int64, num_classes=2),
    }),
    total_num_examples=7349,
    splits={
        'test': 3669,
        'train': 3680,
    },
    supervised_keys=('image', 'label'),
    citation="""@InProceedings{parkhi12a,
      author       = "Parkhi, O. M. and Vedaldi, A. and Zisserman, A. and Jawahar, C.~V.",
      title        = "Cats and Dogs",
      booktitle    = "IEEE Conference on Computer Vision and Pattern Recognition",
      year         = "2012",
    }""",
    redistribution_info=,
)
Dataset의 주요 정보를 구성하고 있는 부분은 features입니다. 여기에는 image, label, segmentation_mask가 보입니다.