Python

정형데이터와 함께하는 텍스트 마이닝

공지

  • 해당 포스트는 취업 준비반 대상 강의 교재로 파이썬 머신러닝 완벽가이드를 축약한 내용입니다.
    • 매우 좋은 책이니 가급적 구매하시기를 바랍니다.

개요

데이터 다운로드

  • 데이터를 다운로드 받도록 한다.
!pip install kaggle
!sudo apt install p7zip p7zip-full # 7z 파일을 풀기 위한 것이다. 
Requirement already satisfied: kaggle in /usr/local/lib/python3.6/dist-packages (1.5.10)
Requirement already satisfied: python-dateutil in /usr/local/lib/python3.6/dist-packages (from kaggle) (2.8.1)
Requirement already satisfied: python-slugify in /usr/local/lib/python3.6/dist-packages (from kaggle) (4.0.1)
Requirement already satisfied: certifi in /usr/local/lib/python3.6/dist-packages (from kaggle) (2020.12.5)
Requirement already satisfied: requests in /usr/local/lib/python3.6/dist-packages (from kaggle) (2.23.0)
Requirement already satisfied: urllib3 in /usr/local/lib/python3.6/dist-packages (from kaggle) (1.24.3)
Requirement already satisfied: tqdm in /usr/local/lib/python3.6/dist-packages (from kaggle) (4.41.1)
Requirement already satisfied: six>=1.10 in /usr/local/lib/python3.6/dist-packages (from kaggle) (1.15.0)
Requirement already satisfied: text-unidecode>=1.3 in /usr/local/lib/python3.6/dist-packages (from python-slugify->kaggle) (1.3)
Requirement already satisfied: chardet<4,>=3.0.2 in /usr/local/lib/python3.6/dist-packages (from requests->kaggle) (3.0.4)
Requirement already satisfied: idna<3,>=2.5 in /usr/local/lib/python3.6/dist-packages (from requests->kaggle) (2.10)
Reading package lists... Done
Building dependency tree       
Reading state information... Done
p7zip is already the newest version (16.02+dfsg-6).
p7zip set to manually installed.
p7zip-full is already the newest version (16.02+dfsg-6).
0 upgraded, 0 newly installed, 0 to remove and 14 not upgraded.
from google.colab import files
uploaded = files.upload()
for fn in uploaded.keys():
  print('uploaded file "{name}" with length {length} bytes'.format(
      name=fn, length=len(uploaded[fn])))
  
# kaggle.json을 아래 폴더로 옮긴 뒤, file을 사용할 수 있도록 권한을 부여한다. 
!mkdir -p ~/.kaggle/ && mv kaggle.json ~/.kaggle/ && chmod 600 ~/.kaggle/kaggle.json

Upload widget is only available when the cell has been executed in the current browser session. Please rerun this cell to enable.

텍스트 마이닝 - 감성 분석

공지

  • 해당 포스트는 취업 준비반 대상 강의 교재로 파이썬 머신러닝 완벽가이드를 축약한 내용입니다.
    • 매우 좋은 책이니 가급적 구매하시기를 바랍니다.

감성 분석 개요

  • 문서의 주관적인 감성/의견/감정/기분 등을 파악하기 위한 방법으로 소셜 미디어, 여론조사, 온라인 리뷰, 피드백 등 다양한 분야에서 활용되고 있다.
  • 감성 분석은 크게 지도학습 & 비지도학습 방식으로 수행된다.
  • 데이터는 캐글 대회 데이터를 활용하였다.
  • 따라서, 본 포스트에서는 지도학습 기반과 비지도학습 기반의 감성 분석을 실습한다.

데이터 불러오기

  • 각각 필요한 데이터를 불러오도록 한다.
from google.colab import drive # 패키지 불러오기 
from os.path import join  

ROOT = "/content/drive"     # 드라이브 기본 경로
print(ROOT)                 # print content of ROOT (Optional)
drive.mount(ROOT)           # 드라이브 기본 경로 Mount
/content/drive
Mounted at /content/drive
MY_GOOGLE_DRIVE_PATH = 'My Drive/Colab Notebooks/NLP/' # 프로젝트 경로
PROJECT_PATH = join(ROOT, MY_GOOGLE_DRIVE_PATH) # 프로젝트 경로
print(PROJECT_PATH)
/content/drive/My Drive/Colab Notebooks/NLP/
%cd "{PROJECT_PATH}"
/content/drive/My Drive/Colab Notebooks/NLP
import pandas as pd
review_df = pd.read_csv("data/labeledTrainData.tsv", header = 0, sep="\t", quoting = 3)
review_df.head(3)

텍스트 마이닝 - 뉴스 분류

공지

  • 해당 포스트는 취업 준비반 대상 강의 교재로 파이썬 머신러닝 완벽가이드를 축약한 내용입니다.
    • 매우 좋은 책이니 가급적 구매하시기를 바랍니다.

텍스트 분류 실습 - 뉴스그룹 분류 개요

  • 사이킷런은 fetch_20newsgroups API를 이용해 뉴스그룹의 분류를 수행해 볼 수 있는 예제 데이터 활용 가능함.
  • 희소 행렬에 분류를 효과적으로 처리할 수 있는 알고리즘은 로지스틱 회귀, 선형 서포트 벡터 머신, 나이브 베이즈 등임.

텍스트 정규화

  • fetch_20newsgroups()는 인터넷에서 데이터를 받은 후, 올리는 것이기 때문에 인터넷 연결 유무를 확인한다.
from sklearn.datasets import fetch_20newsgroups
news_data = fetch_20newsgroups(subset='all', random_state=156)
print(news_data.keys())
dict_keys(['data', 'filenames', 'target_names', 'target', 'DESCR'])
  • Target 클래스가 어떻게 구성돼 있는지 확인해 본다.
import pandas as pd
print('target 클래스의 값과 분포도 \n', pd.Series(news_data.target).value_counts().sort_index())
print('target 클래스의 이름들 \n', news_data.target_names)
target 클래스의 값과 분포도 
 0     799
1     973
2     985
3     982
4     963
5     988
6     975
7     990
8     996
9     994
10    999
11    991
12    984
13    990
14    987
15    997
16    910
17    940
18    775
19    628
dtype: int64
target 클래스의 이름들 
 ['alt.atheism', 'comp.graphics', 'comp.os.ms-windows.misc', 'comp.sys.ibm.pc.hardware', 'comp.sys.mac.hardware', 'comp.windows.x', 'misc.forsale', 'rec.autos', 'rec.motorcycles', 'rec.sport.baseball', 'rec.sport.hockey', 'sci.crypt', 'sci.electronics', 'sci.med', 'sci.space', 'soc.religion.christian', 'talk.politics.guns', 'talk.politics.mideast', 'talk.politics.misc', 'talk.religion.misc']
  • Target 클래스의 값은 0부터 19까지 20개로 구성이 되어 있다.
  • 각각의 개별 데이터가 텍스트로 어떻게 구성되어 있는지 확인해 본다.
print(news_data.data[1])
From: jlevine@rd.hydro.on.ca (Jody Levine)
Subject: Re: insect impacts
Organization: Ontario Hydro - Research Division
Lines: 64

I feel childish.

In article <1ppvds$92a@seven-up.East.Sun.COM> egreen@East.Sun.COM writes:
>In article 7290@rd.hydro.on.ca, jlevine@rd.hydro.on.ca (Jody Levine) writes:
>>>>
>>>>how _do_ the helmetless do it?
>>>
>>>Um, the same way people do it on 
>>>horseback
>>
>>not as fast, and they would probably enjoy eating bugs, anyway
>
>Every bit as fast as a dirtbike, in the right terrain.  And we eat
>flies, thank you.

Who mentioned dirtbikes? We're talking highway speeds here. If you go 70mph
on your dirtbike then feel free to contribute.

>>>jeeps
>>
>>you're *supposed* to keep the windscreen up
>
>then why does it go down?

Because it wouldn't be a Jeep if it didn't. A friend of mine just bought one
and it has more warning stickers than those little 4-wheelers (I guess that's
becuase it's a big 4 wheeler). Anyway, it's written in about ten places that
the windshield should remain up at all times, and it looks like they've made
it a pain to put it down anyway, from what he says. To be fair, I do admit
that it would be a similar matter to drive a windscreenless Jeep on the 
highway as for bikers. They may participate in this discussion, but they're
probably few and far between, so I maintain that this topic is of interest
primarily to bikers.

>>>snow skis
>>
>>NO BUGS, and most poeple who go fast wear goggles
>
>So do most helmetless motorcyclists.

Notice how Ed picked on the more insignificant (the lower case part) of the 
two parts of the statement. Besides, around here it is quite rare to see 
bikers wear goggles on the street. It's either full face with shield, or 
open face with either nothing or aviator sunglasses. My experience of 
bicycling with contact lenses and sunglasses says that non-wraparound 
sunglasses do almost nothing to keep the crap out of ones eyes.

>>The question still stands. How do cruiser riders with no or negligible helmets
>>stand being on the highway at 75 mph on buggy, summer evenings?
>
>helmetless != goggleless

Ok, ok, fine, whatever you say, but lets make some attmept to stick to the
point. I've been out on the road where I had to stop every half hour to clean
my shield there were so many bugs (and my jacket would be a blood-splattered
mess) and I'd see guys with shorty helmets, NO GOGGLES, long beards and tight
t-shirts merrily cruising along on bikes with no windscreens. Lets be really
specific this time, so that even Ed understands. Does anbody think that 
splattering bugs with one's face is fun, or are there other reasons to do it?
Image? Laziness? To make a point about freedom of bug splattering?

I've        bike                      like       | Jody Levine  DoD #275 kV
     got a       you can        if you      -PF  | Jody.P.Levine@hydro.on.ca
                         ride it                 | Toronto, Ontario, Canada
  • 뉴스그룹 기사의 내용뿐만 아니라 뉴스그룹 제목, 작성자, 소속, 이메일 등의 다양한 정보를 가지고 있음.
  • 그러나, 불필요한 부분들은 remove 파라미터를 이용하여 제거할 수 있음.
  • 훈련 데이터와 테스트 데이터로 분류하는 코드를 작성해본다.
from sklearn.datasets import fetch_20newsgroups

# subset='train'으로 학습용 데이터만 추출, remove=('headers', 'footers', 'quotes')로 내용만 추출
train_news = fetch_20newsgroups(subset='train', remove=('headers', 'footers', 'quotes'), random_state=156)

X_train = train_news.data
y_train = train_news.target

# subset='test'으로 테스트 데이터만 추출, remove=('headers', 'footers', 'quotes')로 내용만 추출
test_news = fetch_20newsgroups(subset='test', remove=('headers', 'footers', 'quotes'), random_state=156)

X_test = test_news.data
y_test = test_news.target

print('학습 데이터 크기 {0}, 테스트 데이터 크기 {1}'.format(len(train_news.data), len(test_news.data)))
Downloading 20news dataset. This may take a few minutes.
Downloading dataset from https://ndownloader.figshare.com/files/5975967 (14 MB)


학습 데이터 크기 11314, 테스트 데이터 크기 7532

피처 벡터화 변환

  • 이제 피처 벡터화를 진행해야 하는데, 이 때에는 CountVectorizer를 이용해 학습 데이터의 텍스트를 피처 벡터화를 진행
  • 테스트 데이터 역시 피처 벡터화 진행
    • 이 때에는 테스트 데이터를 변환(transform) 해줘야 하며, 이 때, fit_transform() 사용 하면 안됨
from sklearn.feature_extraction.text import CountVectorizer

# Count Vectorization 피처 벡터화 변환 진행
cnt_vect = CountVectorizer()
cnt_vect.fit(X_train)

X_train_cnt_vect = cnt_vect.transform(X_train)

# 테스트 데이터를 feature 벡터화 변환 수행
X_test_cnn_vect = cnt_vect.transform(X_test)

print("학습 데이터 텍스트의 CountVectorizer Shape:", X_train_cnt_vect.shape)
학습 데이터 텍스트의 CountVectorizer Shape: (11314, 101631)
  • 이렇게 만들어진 학습 데이터를 CountVectorizer로 피처를 추출한 결과 11314개의 문서에서, 단어가 101631개로 만들어진 것을 확인함

머신러닝 모델 학습/예측/평가

  • 이제 로지스틱 회귀를 활용하여 뉴스그룹에 대한 분류를 예측해본다.
from sklearn.linear_model import LogisticRegression
from sklearn.metrics import accuracy_score

# Logistic Regresion을 이용해 학습/예측/평가 수행 
lr_clf = LogisticRegression()
lr_clf.fit(X_train_cnt_vect, y_train)
pred = lr_clf.predict(X_test_cnn_vect)

print('CountVectorized Logistic Regression의 예측 정확도는 {0:.3f}'.format(accuracy_score(y_test, pred)))
CountVectorized Logistic Regression의 예측 정확도는 0.608


/usr/local/lib/python3.6/dist-packages/sklearn/linear_model/_logistic.py:940: ConvergenceWarning: lbfgs failed to converge (status=1):
STOP: TOTAL NO. of ITERATIONS REACHED LIMIT.

Increase the number of iterations (max_iter) or scale the data as shown in:
    https://scikit-learn.org/stable/modules/preprocessing.html
Please also refer to the documentation for alternative solver options:
    https://scikit-learn.org/stable/modules/linear_model.html#logistic-regression
  extra_warning_msg=_LOGISTIC_SOLVER_CONVERGENCE_MSG)
  • Count 기반에서 TF-IDF 기반으로 벡터화 변경하여 예측 모델 수행함.
from sklearn.feature_extraction.text import TfidfVectorizer

# TF-IDF 벡터화를 적용하여 학습 데이터 세트와 테스트 데이터 세트 변환. 
tfidf_vect = TfidfVectorizer()
tfidf_vect.fit(X_train)

X_train_tfidf_vect = tfidf_vect.transform(X_train)
X_test_tfidf_vect = tfidf_vect.transform(X_test)
  • 이번에는 LogisticRegression을 이용해 학습/예측/평가 수행.
lr_clf = LogisticRegression()
lr_clf.fit(X_train_tfidf_vect, y_train)
pred = lr_clf.predict(X_test_tfidf_vect)

print("TF-IDF Logistic Regression의 예측 정확도는 {0:.3f}".format(accuracy_score(y_test, pred)))
TF-IDF Logistic Regression의 예측 정확도는 0.674
  • TF-IDF가 단순 카운트 기반보다 훨씬 높은 예측 정확도 제공.

모형 업그레이드 1단계

  • 모형을 업그레이드 하기 위해서는 최상의 피처 전처리 수행이 필요함
# stop words 필터링 추가 & ngram을 기본 (1, 1)에서 (1, 2)로 변경해 피처 벡터화 적용
tfidf_vect = TfidfVectorizer(stop_words="english", ngram_range=(1, 2), max_df=300)
tfidf_vect.fit(X_train)

X_train_tfidf_vect = tfidf_vect.transform(X_train)
X_test_tfidf_vect = tfidf_vect.transform(X_test)

lr_clf = LogisticRegression()
lr_clf.fit(X_train_tfidf_vect, y_train)
pred = lr_clf.predict(X_test_tfidf_vect)

print("TF-IDF Logistic Regression의 예측 정확도는 {0:.3f}".format(accuracy_score(y_test, pred)))
TF-IDF Logistic Regression의 예측 정확도는 0.692

모형 업그레이드 2단계

  • 이번에는 GridSearchCV를 이용하여 로지스틱 회귀의 하이퍼 파라미터 최적화를 수행한다.
from sklearn.model_selection import GridSearchCV
import time 
import datetime

start = time.time()

# 최적 C값 도출 튜닝 수행 / 과적합 방지용
params = {'C' : [0.01, 0.1]} # [0.01, 0.1, 1, 5, 10]
grid_cv_lr = GridSearchCV(lr_clf, param_grid=params, cv=2, scoring="accuracy", verbose=1)
grid_cv_lr.fit(X_train_tfidf_vect, y_train)
print('Logistic Regression best C parameter :', grid_cv_lr.best_params_)
# print('Logistic Regression Best C Parameter :', grid_cv_lr.best_params_)

sec = time.time()-start
times = str(datetime.timedelta(seconds=sec)).split(".")
times = times[0]
print(times)
Fitting 2 folds for each of 2 candidates, totalling 4 fits


[Parallel(n_jobs=1)]: Using backend SequentialBackend with 1 concurrent workers.
[Parallel(n_jobs=1)]: Done   4 out of   4 | elapsed:  2.4min finished


Logistic Regression best C parameter : {'C': 0.1}
0:03:32
import time
import datetime
def bench_mark(start):
  sec = time.time() - start
  times = str(datetime.timedelta(seconds=sec)).split(".")
  times = times[0]
  print(times)
  • 최적 C 값으로 학습된 grid_cv로 예측 및 정확도 평가
pred = grid_cv_lr.predict(X_test_tfidf_vect)
print('TF-IDF Vectorized Logistic Regression의 예측 정확도는 {0:.3f}'.format(accuracy_score(y_test, pred)))
TF-IDF Vectorized Logistic Regression의 예측 정확도는 0.645

사이킷런 파이프라인 활용한 머신러닝 수행

  • 사이킷런의 Pipeline 클래스를 이용하여 피처 벡터화와 ML 알고리즘 학습/예측을 위한 코드 작성을 한 번에 진행 가능함.
  • Pipeline을 이용하여 데이터의 전처리와 머신러닝 학습 과정을 통일된 API 기반에서 처리할 수 있어서 보다 더 직관적인 ML 모델 코드를 생성할 수 있음.
  • 또한 대용량 데이터의 피처 벡터화 결과를 별도 데이터로 저장하지 않고 스트림 기반에서 바로 머신러닝 알고리즘의 데이터로 입력할 수 있기 때문에 수행 시간 절약도 가능함.
  • 다음은 텍스트 분류 예제 코드를 Pipeline을 이용해 재 작성한 코드이다.
from sklearn.pipeline import Pipeline

# TfidfVectorizer 객체를 tfidf_vect로, LogisticRegression 객체를 lr_clf로 생성하는 Pipeline 생성
pipeline = Pipeline([
                     ('tfidf_vect', TfidfVectorizer(stop_words='english', ngram_range=(1,2), max_df = 300)), 
                     ('lr_clf', LogisticRegression(C=10))
])
  • 위 파이프라인을 활용하면 fit(), transform()과 LogisticRegression의 fit(), predict()가 필요 없음
start = time.time()

pipeline.fit(X_train, y_train)
pred = pipeline.predict(X_test)

print('Pipeline을 통한 Logistic Regression의 예측 정확도는 {0:.3f}'.format(accuracy_score(y_test, pred)))

bench_mark(start)
/usr/local/lib/python3.6/dist-packages/sklearn/linear_model/_logistic.py:940: ConvergenceWarning: lbfgs failed to converge (status=1):
STOP: TOTAL NO. of ITERATIONS REACHED LIMIT.

Increase the number of iterations (max_iter) or scale the data as shown in:
    https://scikit-learn.org/stable/modules/preprocessing.html
Please also refer to the documentation for alternative solver options:
    https://scikit-learn.org/stable/modules/linear_model.html#logistic-regression
  extra_warning_msg=_LOGISTIC_SOLVER_CONVERGENCE_MSG)


Pipeline을 통한 Logistic Regression의 예측 정확도는 0.701
0:05:55
  • 지금까지 진행한 것은 단순하게 파이프라인을 활용해 머신러닝을 수행한 것이며, 이제 Pipeline + GridSearchCV를 적용한다.
  • 파라미터를 최적화하려면 너무 많은 튜닝 시간이 소모되기 때문에 주의 하도록 하며, 총 27개의 파라미터 X CV 2 총 54번의 학습을 진행하기 때문에 오래 걸리니 유의니 시간에 유의하도록 한다.
start = time.time()

pipeline = Pipeline([
    ('tfidf_vect', TfidfVectorizer(stop_words='english')),
    ('lr_clf', LogisticRegression())
])

# Pipeline에 기술된 각각의 객체 변수에 언더바(_)2개를 연달아 붙여 GridSearchCV에 사용될 
# 파라미터/하이퍼 파라미터 이름과 값을 설정. . 
params = { 'tfidf_vect__ngram_range': [(1,1), (1,2), (1,3)],
           'tfidf_vect__max_df': [100, 300, 700],
           'lr_clf__C': [1,5,10]
}

# GridSearchCV의 생성자에 Estimator가 아닌 Pipeline 객체 입력
grid_cv_pipe = GridSearchCV(pipeline, param_grid=params, cv=2 , scoring='accuracy', verbose=1)
grid_cv_pipe.fit(X_train, y_train)
print(grid_cv_pipe.best_params_ , grid_cv_pipe.best_score_)

pred = grid_cv_pipe.predict(X_test)
print('Pipeline을 통한 Logistic Regression 의 예측 정확도는 {0:.3f}'.format(accuracy_score(y_test ,pred)))

bench_mark(start)

Reference

  • 권철민. (2020). 파이썬 머신러닝 완벽가이드. 경기, 파주: 위키북스

입문자를 위한 머신러닝 - 오차행렬

용어 정리

  • 영어로는 confusion matrix로 불리우지만, 번역하면서 다양한 단어가 등장하고 있다. 오차행렬, 혼동행렬
  • 제목은 오차행렬이라고 표현했지만, 영어 단어를 그대로 살려 confusion matrix라고 활용한다.

Confusion Matrix

  • 분류 모형을 통해 머신러닝을 학습하게 되면 confusion matrix 표를 우선 작성하게 된다.

  • 이 표에서 무엇을 볼 수 있는가?

    • 우선 전체 데이터의 크기를 확인할 수 있다. (165명)
    • 예측값 YES는 (100+10) 110명이고, 예측값 NO는 (50+5) 55명이다.
    • 실제값 YES는 (100+5) 105명이고, 실제값 NO는 (50+10) 60명이다.
  • 기본 영어를 정의해본다.

입문자를 위한 머신러닝 - GBM

공지

  • 본 소스코는 교재 파이썬 머신러닝 완벽 가이드 코드를 제 수업을 드는 학생들이 보다 편하게 구글 코랩에서 사용할 수 있도록 만든 예제입니다.
  • 책 구매하세요!

Gradient Boosting Machine

  • 이제 GBM에 대해 학습하도록 합니다.
  • GBM에 대해 이해하기 위해서는 경사하강법에 대해 배워야 합니다.
    • 경사하강법은 쉽게 말하면 가장 적은 오차를 찾아가는 방법론 중이 하나입니다.
    • 자세한 내용은 유투 강의를 들어주시기를 바랍니다. (Gradient Descent, Step-by-Step)
    • 위 이론을 sklearn에서 구현한 것이며, 이 이론을 기반으로 다양한 알고리즘이 개발 되어 있습니다.

데이터 불러오기

  • 데이터를 불러오도록 합니다.
!wget https://archive.ics.uci.edu/ml/machine-learning-databases/00240/UCI%20HAR%20Dataset.zip
!unzip 'UCI HAR Dataset.zip'
!mv UCI\ HAR\ Dataset human_activity # 폴더 이름을 변경하는 터미널 명령어 입니다. 
--2020-11-27 05:48:03--  https://archive.ics.uci.edu/ml/machine-learning-databases/00240/UCI%20HAR%20Dataset.zip
Resolving archive.ics.uci.edu (archive.ics.uci.edu)... 128.195.10.252
Connecting to archive.ics.uci.edu (archive.ics.uci.edu)|128.195.10.252|:443... connected.
HTTP request sent, awaiting response... 200 OK
Length: 60999314 (58M) [application/x-httpd-php]
Saving to: ‘UCI HAR Dataset.zip’

UCI HAR Dataset.zip 100%[===================>]  58.17M  31.3MB/s    in 1.9s    

2020-11-27 05:48:05 (31.3 MB/s) - ‘UCI HAR Dataset.zip’ saved [60999314/60999314]

Archive:  UCI HAR Dataset.zip
   creating: UCI HAR Dataset/
  inflating: UCI HAR Dataset/.DS_Store  
   creating: __MACOSX/
   creating: __MACOSX/UCI HAR Dataset/
  inflating: __MACOSX/UCI HAR Dataset/._.DS_Store  
  inflating: UCI HAR Dataset/activity_labels.txt  
  inflating: __MACOSX/UCI HAR Dataset/._activity_labels.txt  
  inflating: UCI HAR Dataset/features.txt  
  inflating: __MACOSX/UCI HAR Dataset/._features.txt  
  inflating: UCI HAR Dataset/features_info.txt  
  inflating: __MACOSX/UCI HAR Dataset/._features_info.txt  
  inflating: UCI HAR Dataset/README.txt  
  inflating: __MACOSX/UCI HAR Dataset/._README.txt  
   creating: UCI HAR Dataset/test/
   creating: UCI HAR Dataset/test/Inertial Signals/
  inflating: UCI HAR Dataset/test/Inertial Signals/body_acc_x_test.txt  
   creating: __MACOSX/UCI HAR Dataset/test/
   creating: __MACOSX/UCI HAR Dataset/test/Inertial Signals/
  inflating: __MACOSX/UCI HAR Dataset/test/Inertial Signals/._body_acc_x_test.txt  
  inflating: UCI HAR Dataset/test/Inertial Signals/body_acc_y_test.txt  
  inflating: __MACOSX/UCI HAR Dataset/test/Inertial Signals/._body_acc_y_test.txt  
  inflating: UCI HAR Dataset/test/Inertial Signals/body_acc_z_test.txt  
  inflating: __MACOSX/UCI HAR Dataset/test/Inertial Signals/._body_acc_z_test.txt  
  inflating: UCI HAR Dataset/test/Inertial Signals/body_gyro_x_test.txt  
  inflating: __MACOSX/UCI HAR Dataset/test/Inertial Signals/._body_gyro_x_test.txt  
  inflating: UCI HAR Dataset/test/Inertial Signals/body_gyro_y_test.txt  
  inflating: __MACOSX/UCI HAR Dataset/test/Inertial Signals/._body_gyro_y_test.txt  
  inflating: UCI HAR Dataset/test/Inertial Signals/body_gyro_z_test.txt  
  inflating: __MACOSX/UCI HAR Dataset/test/Inertial Signals/._body_gyro_z_test.txt  
  inflating: UCI HAR Dataset/test/Inertial Signals/total_acc_x_test.txt  
  inflating: __MACOSX/UCI HAR Dataset/test/Inertial Signals/._total_acc_x_test.txt  
  inflating: UCI HAR Dataset/test/Inertial Signals/total_acc_y_test.txt  
  inflating: __MACOSX/UCI HAR Dataset/test/Inertial Signals/._total_acc_y_test.txt  
  inflating: UCI HAR Dataset/test/Inertial Signals/total_acc_z_test.txt  
  inflating: __MACOSX/UCI HAR Dataset/test/Inertial Signals/._total_acc_z_test.txt  
  inflating: __MACOSX/UCI HAR Dataset/test/._Inertial Signals  
  inflating: UCI HAR Dataset/test/subject_test.txt  
  inflating: __MACOSX/UCI HAR Dataset/test/._subject_test.txt  
  inflating: UCI HAR Dataset/test/X_test.txt  
  inflating: __MACOSX/UCI HAR Dataset/test/._X_test.txt  
  inflating: UCI HAR Dataset/test/y_test.txt  
  inflating: __MACOSX/UCI HAR Dataset/test/._y_test.txt  
  inflating: __MACOSX/UCI HAR Dataset/._test  
   creating: UCI HAR Dataset/train/
   creating: UCI HAR Dataset/train/Inertial Signals/
  inflating: UCI HAR Dataset/train/Inertial Signals/body_acc_x_train.txt  
   creating: __MACOSX/UCI HAR Dataset/train/
   creating: __MACOSX/UCI HAR Dataset/train/Inertial Signals/
  inflating: __MACOSX/UCI HAR Dataset/train/Inertial Signals/._body_acc_x_train.txt  
  inflating: UCI HAR Dataset/train/Inertial Signals/body_acc_y_train.txt  
  inflating: __MACOSX/UCI HAR Dataset/train/Inertial Signals/._body_acc_y_train.txt  
  inflating: UCI HAR Dataset/train/Inertial Signals/body_acc_z_train.txt  
  inflating: __MACOSX/UCI HAR Dataset/train/Inertial Signals/._body_acc_z_train.txt  
  inflating: UCI HAR Dataset/train/Inertial Signals/body_gyro_x_train.txt  
  inflating: __MACOSX/UCI HAR Dataset/train/Inertial Signals/._body_gyro_x_train.txt  
  inflating: UCI HAR Dataset/train/Inertial Signals/body_gyro_y_train.txt  
  inflating: __MACOSX/UCI HAR Dataset/train/Inertial Signals/._body_gyro_y_train.txt  
  inflating: UCI HAR Dataset/train/Inertial Signals/body_gyro_z_train.txt  
  inflating: __MACOSX/UCI HAR Dataset/train/Inertial Signals/._body_gyro_z_train.txt  
  inflating: UCI HAR Dataset/train/Inertial Signals/total_acc_x_train.txt  
  inflating: __MACOSX/UCI HAR Dataset/train/Inertial Signals/._total_acc_x_train.txt  
  inflating: UCI HAR Dataset/train/Inertial Signals/total_acc_y_train.txt  
  inflating: __MACOSX/UCI HAR Dataset/train/Inertial Signals/._total_acc_y_train.txt  
  inflating: UCI HAR Dataset/train/Inertial Signals/total_acc_z_train.txt  
  inflating: __MACOSX/UCI HAR Dataset/train/Inertial Signals/._total_acc_z_train.txt  
  inflating: __MACOSX/UCI HAR Dataset/train/._Inertial Signals  
  inflating: UCI HAR Dataset/train/subject_train.txt  
  inflating: __MACOSX/UCI HAR Dataset/train/._subject_train.txt  
  inflating: UCI HAR Dataset/train/X_train.txt  
  inflating: __MACOSX/UCI HAR Dataset/train/._X_train.txt  
  inflating: UCI HAR Dataset/train/y_train.txt  
  inflating: __MACOSX/UCI HAR Dataset/train/._y_train.txt  
  inflating: __MACOSX/UCI HAR Dataset/._train  
  inflating: __MACOSX/._UCI HAR Dataset  
import pandas as pd

def get_new_feature_name_df(old_feature_name_df):
    feature_dup_df = pd.DataFrame(data=old_feature_name_df.groupby('column_name').cumcount(),
                                  columns=['dup_cnt'])
    feature_dup_df = feature_dup_df.reset_index()
    new_feature_name_df = pd.merge(old_feature_name_df.reset_index(), feature_dup_df, how='outer')
    new_feature_name_df['column_name'] = new_feature_name_df[['column_name', 'dup_cnt']].apply(lambda x : x[0]+'_'+str(x[1]) 
                                                                                         if x[1] >0 else x[0] ,  axis=1)
    new_feature_name_df = new_feature_name_df.drop(['index'], axis=1)
    return new_feature_name_df

def get_human_dataset( ):
    
    # 각 데이터 파일들은 공백으로 분리되어 있으므로 read_csv에서 공백 문자를 sep으로 할당.
    feature_name_df = pd.read_csv('./human_activity/features.txt',sep='\s+',
                        header=None,names=['column_index','column_name'])
    
    # 중복된 피처명을 수정하는 get_new_feature_name_df()를 이용, 신규 피처명 DataFrame생성. 
    new_feature_name_df = get_new_feature_name_df(feature_name_df)
    
    # DataFrame에 피처명을 컬럼으로 부여하기 위해 리스트 객체로 다시 변환
    feature_name = new_feature_name_df.iloc[:, 1].values.tolist()
    
    # 학습 피처 데이터 셋과 테스트 피처 데이터을 DataFrame으로 로딩. 컬럼명은 feature_name 적용
    X_train = pd.read_csv('./human_activity/train/X_train.txt',sep='\s+', names=feature_name )
    X_test = pd.read_csv('./human_activity/test/X_test.txt',sep='\s+', names=feature_name)
    
    # 학습 레이블과 테스트 레이블 데이터을 DataFrame으로 로딩하고 컬럼명은 action으로 부여
    y_train = pd.read_csv('./human_activity/train/y_train.txt',sep='\s+',header=None,names=['action'])
    y_test = pd.read_csv('./human_activity/test/y_test.txt',sep='\s+',header=None,names=['action'])
    
    # 로드된 학습/테스트용 DataFrame을 모두 반환 
    return X_train, X_test, y_train, y_test
from sklearn.ensemble import GradientBoostingClassifier
from sklearn.metrics import accuracy_score
import pandas as pd
import time
import warnings
warnings.filterwarnings('ignore')

# 결정 트리에서 사용한 get_human_dataset( )을 이용해 학습/테스트용 DataFrame 반환
X_train, X_test, y_train, y_test = get_human_dataset()

print("## 학습 피처 데이터 정보 ##")
print(X_train.info())
## 학습 피처 데이터 정보 ##
<class 'pandas.core.frame.DataFrame'>
RangeIndex: 7352 entries, 0 to 7351
Columns: 561 entries, tBodyAcc-mean()-X to angle(Z,gravityMean)
dtypes: float64(561)
memory usage: 31.5 MB
None

(옵션 체크) 구글 코랩 개발환경 확인

  • 간단하게 구글 코랩 개발환경을 확인한다.
!cat /proc/cpuinfo
processor	: 0
vendor_id	: GenuineIntel
cpu family	: 6
model		: 79
model name	: Intel(R) Xeon(R) CPU @ 2.20GHz
stepping	: 0
microcode	: 0x1
cpu MHz		: 2200.000
cache size	: 56320 KB
physical id	: 0
siblings	: 2
core id		: 0
cpu cores	: 1
apicid		: 0
initial apicid	: 0
fpu		: yes
fpu_exception	: yes
cpuid level	: 13
wp		: yes
flags		: fpu vme de pse tsc msr pae mce cx8 apic sep mtrr pge mca cmov pat pse36 clflush mmx fxsr sse sse2 ss ht syscall nx pdpe1gb rdtscp lm constant_tsc rep_good nopl xtopology nonstop_tsc cpuid tsc_known_freq pni pclmulqdq ssse3 fma cx16 pcid sse4_1 sse4_2 x2apic movbe popcnt aes xsave avx f16c rdrand hypervisor lahf_lm abm 3dnowprefetch invpcid_single ssbd ibrs ibpb stibp fsgsbase tsc_adjust bmi1 hle avx2 smep bmi2 erms invpcid rtm rdseed adx smap xsaveopt arat md_clear arch_capabilities
bugs		: cpu_meltdown spectre_v1 spectre_v2 spec_store_bypass l1tf mds swapgs taa
bogomips	: 4400.00
clflush size	: 64
cache_alignment	: 64
address sizes	: 46 bits physical, 48 bits virtual
power management:

processor	: 1
vendor_id	: GenuineIntel
cpu family	: 6
model		: 79
model name	: Intel(R) Xeon(R) CPU @ 2.20GHz
stepping	: 0
microcode	: 0x1
cpu MHz		: 2200.000
cache size	: 56320 KB
physical id	: 0
siblings	: 2
core id		: 0
cpu cores	: 1
apicid		: 1
initial apicid	: 1
fpu		: yes
fpu_exception	: yes
cpuid level	: 13
wp		: yes
flags		: fpu vme de pse tsc msr pae mce cx8 apic sep mtrr pge mca cmov pat pse36 clflush mmx fxsr sse sse2 ss ht syscall nx pdpe1gb rdtscp lm constant_tsc rep_good nopl xtopology nonstop_tsc cpuid tsc_known_freq pni pclmulqdq ssse3 fma cx16 pcid sse4_1 sse4_2 x2apic movbe popcnt aes xsave avx f16c rdrand hypervisor lahf_lm abm 3dnowprefetch invpcid_single ssbd ibrs ibpb stibp fsgsbase tsc_adjust bmi1 hle avx2 smep bmi2 erms invpcid rtm rdseed adx smap xsaveopt arat md_clear arch_capabilities
bugs		: cpu_meltdown spectre_v1 spectre_v2 spec_store_bypass l1tf mds swapgs taa
bogomips	: 4400.00
clflush size	: 64
cache_alignment	: 64
address sizes	: 46 bits physical, 48 bits virtual
power management:

GBM 모형 학습

  • GBM 수행 시간 측정을 위해 시작 시간을 설정합니다.
# GBM 수행 시간 측정을 위함. 시작 시간 설정.
start_time = time.time()

gb_clf = GradientBoostingClassifier(n_estimators=10, # 기본값은 100이지만, 수업 시간을 고려하여 10으로 지정하였음
                                    validation_fraction=0.2,
                                    n_iter_no_change=5, tol=0.01, verbose = 1,
                                    random_state=0)
    
gb_clf.fit(X_train , y_train)
gb_pred = gb_clf.predict(X_test)
gb_accuracy = accuracy_score(y_test, gb_pred)

print('GBM 정확도: {0:.4f}'.format(gb_accuracy))
print("GBM 수행 시간: {0:.1f} 초 ".format(time.time() - start_time))
      Iter       Train Loss   Remaining Time 
         1        8274.1239           48.73s
         2        6858.4625           46.31s
         3        5818.7911           41.54s
         4        4981.6935           35.95s
         5        4331.9874           30.14s
         6        3790.2625           24.27s
         7        3336.1237           18.25s
         8        2960.1395           12.17s
         9        2626.5821            6.10s
        10        2341.0659            0.00s
GBM 정확도: 0.8907
GBM 수행 시간: 61.1 초 

하이퍼 파라미터 및 튜닝

  • 튜닝이란, 모형이 가지고 있는 여러 조건들을 변형 시키는 것
  • 대표적인 파라미터 소개
    • n_estimators: weak learner의 개수 지정, 디폴트는 100개이며, 많이 설정할수록 좋은 성능 기대 가능, 그러나 시간도 오래 소요됨
    • max_features: 최적의 분할을 위해 고려할 피처의 개수
      • int 형으로 지정 시, 대상 피처의 개수, float형으로 지정 시, 대상 피처의 퍼센트
      • 만약 전체 피처가 16개라면 분할 위해 4개 참조
    • max_depth: 트리의 최대 깊이 규정
    • min_samples_split: 자식 규칙 노드를 분할해 만들기 위한 최소한의 샘플 데이터 개수
    • min_samples_leaf: 말단 노드(Leaf)가 되기 위한 최소한의 샘플 데이터 수
    • loss: 경사 하강법에서 사용할 비용 함수 지정
    • learning_rate: GBM이 학습 진행 시 마다의 학습률. Weak Learner가 순차적으로
    • subsample: weak learner가 학습에 사용하는 데이터의 샘플링 비율, 기본값은 1이며, 이는 전체학습 데이터를 기반으로 학습한다는 의미.

그리드 서치

  • GridSearchCV API를 활용하여 모형에 사용되는 하이퍼 파라미터를 순차적으로 입력하며서 편리하게 최적의 파라미터를 도출할 수 있는 방안 제공
  • 즉, 랜덤포레스트의 파라미터를 순차적으로 변경 및 조정하면서 모형을 학습시키는 방법
  • 이를 통해, 머신러닝 모형 개발자의 코드량을 줄여주는 매우 편리한 기법
    • estimator: 머신러닝 모형의 객체가 온다.
    • param_grid: 딕셔너리 형태로 조정하며, estimator의 튜닝을 위해 파라미터명과 사용될 여러 파라미터 값 지정, 이 부분은 각 머신러닝 모형의 Manual을 참조한다.
    • scoring: 예측 성능을 측정할 평가 방법 지정하지만, 대개 별도의 성능 평가 지표 함수 활용
    • cv: 교차 검증을 위해 분할되는 학습/테스트 세트의 개수 지정
  • 이 때에는 시간이 다소 소요될 수 있다. (5-10분)
from sklearn.model_selection import GridSearchCV

start_time = time.time()

params = {
    'n_estimators':[10, 20], # 원 코드 100, 500
    'learning_rate' : [ 0.05, 0.1]
}
grid_cv = GridSearchCV(gb_clf , param_grid=params , cv=2 ,verbose=1, n_jobs = -1)
grid_cv.fit(X_train , y_train)
print('최적 하이퍼 파라미터:\n', grid_cv.best_params_)
print('최고 예측 정확도: {0:.4f}'.format(grid_cv.best_score_))

print("GBM 수행 시간: {0:.1f} 초 ".format(time.time() - start_time))
Fitting 2 folds for each of 4 candidates, totalling 8 fits


[Parallel(n_jobs=-1)]: Using backend LokyBackend with 2 concurrent workers.
[Parallel(n_jobs=-1)]: Done   8 out of   8 | elapsed:  4.2min finished


      Iter       Train Loss   Remaining Time 
         1        8274.1239            1.75m
         2        6858.4625            1.78m
         3        5818.7911            1.72m
         4        4981.6935            1.63m
         5        4331.9874            1.54m
         6        3790.2625            1.44m
         7        3336.1237            1.34m
         8        2960.1395            1.24m
         9        2626.5821            1.14m
        10        2341.0659            1.04m
        20         940.8021            0.00s
최적 하이퍼 파라미터:
 {'learning_rate': 0.1, 'n_estimators': 20}
최고 예측 정확도: 0.8921
GBM 수행 시간: 380.2 초 

입문자를 위한 머신러닝 - 랜덤 포레스트

공지

  • 본 포스트는 교재 파이썬 머신러닝 완벽 가이드 코드를 제 수업을 드는 학생들이 보다 편하게 구글 코랩에서 사용할 수 있도록 만든 예제입니다.
  • 책 구매하세요!

Random Forest

랜덤 포레스트의 개요

!wget https://archive.ics.uci.edu/ml/machine-learning-databases/00240/UCI%20HAR%20Dataset.zip
!unzip 'UCI HAR Dataset.zip'
!mv UCI\ HAR\ Dataset human_activity
--2020-11-27 05:21:51--  https://archive.ics.uci.edu/ml/machine-learning-databases/00240/UCI%20HAR%20Dataset.zip
Resolving archive.ics.uci.edu (archive.ics.uci.edu)... 128.195.10.252
Connecting to archive.ics.uci.edu (archive.ics.uci.edu)|128.195.10.252|:443... connected.
HTTP request sent, awaiting response... 200 OK
Length: 60999314 (58M) [application/x-httpd-php]
Saving to: ‘UCI HAR Dataset.zip’

UCI HAR Dataset.zip 100%[===================>]  58.17M  33.8MB/s    in 1.7s    

2020-11-27 05:21:53 (33.8 MB/s) - ‘UCI HAR Dataset.zip’ saved [60999314/60999314]

Archive:  UCI HAR Dataset.zip
   creating: UCI HAR Dataset/
  inflating: UCI HAR Dataset/.DS_Store  
   creating: __MACOSX/
   creating: __MACOSX/UCI HAR Dataset/
  inflating: __MACOSX/UCI HAR Dataset/._.DS_Store  
  inflating: UCI HAR Dataset/activity_labels.txt  
  inflating: __MACOSX/UCI HAR Dataset/._activity_labels.txt  
  inflating: UCI HAR Dataset/features.txt  
  inflating: __MACOSX/UCI HAR Dataset/._features.txt  
  inflating: UCI HAR Dataset/features_info.txt  
  inflating: __MACOSX/UCI HAR Dataset/._features_info.txt  
  inflating: UCI HAR Dataset/README.txt  
  inflating: __MACOSX/UCI HAR Dataset/._README.txt  
   creating: UCI HAR Dataset/test/
   creating: UCI HAR Dataset/test/Inertial Signals/
  inflating: UCI HAR Dataset/test/Inertial Signals/body_acc_x_test.txt  
   creating: __MACOSX/UCI HAR Dataset/test/
   creating: __MACOSX/UCI HAR Dataset/test/Inertial Signals/
  inflating: __MACOSX/UCI HAR Dataset/test/Inertial Signals/._body_acc_x_test.txt  
  inflating: UCI HAR Dataset/test/Inertial Signals/body_acc_y_test.txt  
  inflating: __MACOSX/UCI HAR Dataset/test/Inertial Signals/._body_acc_y_test.txt  
  inflating: UCI HAR Dataset/test/Inertial Signals/body_acc_z_test.txt  
  inflating: __MACOSX/UCI HAR Dataset/test/Inertial Signals/._body_acc_z_test.txt  
  inflating: UCI HAR Dataset/test/Inertial Signals/body_gyro_x_test.txt  
  inflating: __MACOSX/UCI HAR Dataset/test/Inertial Signals/._body_gyro_x_test.txt  
  inflating: UCI HAR Dataset/test/Inertial Signals/body_gyro_y_test.txt  
  inflating: __MACOSX/UCI HAR Dataset/test/Inertial Signals/._body_gyro_y_test.txt  
  inflating: UCI HAR Dataset/test/Inertial Signals/body_gyro_z_test.txt  
  inflating: __MACOSX/UCI HAR Dataset/test/Inertial Signals/._body_gyro_z_test.txt  
  inflating: UCI HAR Dataset/test/Inertial Signals/total_acc_x_test.txt  
  inflating: __MACOSX/UCI HAR Dataset/test/Inertial Signals/._total_acc_x_test.txt  
  inflating: UCI HAR Dataset/test/Inertial Signals/total_acc_y_test.txt  
  inflating: __MACOSX/UCI HAR Dataset/test/Inertial Signals/._total_acc_y_test.txt  
  inflating: UCI HAR Dataset/test/Inertial Signals/total_acc_z_test.txt  
  inflating: __MACOSX/UCI HAR Dataset/test/Inertial Signals/._total_acc_z_test.txt  
  inflating: __MACOSX/UCI HAR Dataset/test/._Inertial Signals  
  inflating: UCI HAR Dataset/test/subject_test.txt  
  inflating: __MACOSX/UCI HAR Dataset/test/._subject_test.txt  
  inflating: UCI HAR Dataset/test/X_test.txt  
  inflating: __MACOSX/UCI HAR Dataset/test/._X_test.txt  
  inflating: UCI HAR Dataset/test/y_test.txt  
  inflating: __MACOSX/UCI HAR Dataset/test/._y_test.txt  
  inflating: __MACOSX/UCI HAR Dataset/._test  
   creating: UCI HAR Dataset/train/
   creating: UCI HAR Dataset/train/Inertial Signals/
  inflating: UCI HAR Dataset/train/Inertial Signals/body_acc_x_train.txt  
   creating: __MACOSX/UCI HAR Dataset/train/
   creating: __MACOSX/UCI HAR Dataset/train/Inertial Signals/
  inflating: __MACOSX/UCI HAR Dataset/train/Inertial Signals/._body_acc_x_train.txt  
  inflating: UCI HAR Dataset/train/Inertial Signals/body_acc_y_train.txt  
  inflating: __MACOSX/UCI HAR Dataset/train/Inertial Signals/._body_acc_y_train.txt  
  inflating: UCI HAR Dataset/train/Inertial Signals/body_acc_z_train.txt  
  inflating: __MACOSX/UCI HAR Dataset/train/Inertial Signals/._body_acc_z_train.txt  
  inflating: UCI HAR Dataset/train/Inertial Signals/body_gyro_x_train.txt  
  inflating: __MACOSX/UCI HAR Dataset/train/Inertial Signals/._body_gyro_x_train.txt  
  inflating: UCI HAR Dataset/train/Inertial Signals/body_gyro_y_train.txt  
  inflating: __MACOSX/UCI HAR Dataset/train/Inertial Signals/._body_gyro_y_train.txt  
  inflating: UCI HAR Dataset/train/Inertial Signals/body_gyro_z_train.txt  
  inflating: __MACOSX/UCI HAR Dataset/train/Inertial Signals/._body_gyro_z_train.txt  
  inflating: UCI HAR Dataset/train/Inertial Signals/total_acc_x_train.txt  
  inflating: __MACOSX/UCI HAR Dataset/train/Inertial Signals/._total_acc_x_train.txt  
  inflating: UCI HAR Dataset/train/Inertial Signals/total_acc_y_train.txt  
  inflating: __MACOSX/UCI HAR Dataset/train/Inertial Signals/._total_acc_y_train.txt  
  inflating: UCI HAR Dataset/train/Inertial Signals/total_acc_z_train.txt  
  inflating: __MACOSX/UCI HAR Dataset/train/Inertial Signals/._total_acc_z_train.txt  
  inflating: __MACOSX/UCI HAR Dataset/train/._Inertial Signals  
  inflating: UCI HAR Dataset/train/subject_train.txt  
  inflating: __MACOSX/UCI HAR Dataset/train/._subject_train.txt  
  inflating: UCI HAR Dataset/train/X_train.txt  
  inflating: __MACOSX/UCI HAR Dataset/train/._X_train.txt  
  inflating: UCI HAR Dataset/train/y_train.txt  
  inflating: __MACOSX/UCI HAR Dataset/train/._y_train.txt  
  inflating: __MACOSX/UCI HAR Dataset/._train  
  inflating: __MACOSX/._UCI HAR Dataset  
import pandas as pd

def get_new_feature_name_df(old_feature_name_df):
    feature_dup_df = pd.DataFrame(data=old_feature_name_df.groupby('column_name').cumcount(),
                                  columns=['dup_cnt'])
    feature_dup_df = feature_dup_df.reset_index()
    new_feature_name_df = pd.merge(old_feature_name_df.reset_index(), feature_dup_df, how='outer')
    new_feature_name_df['column_name'] = new_feature_name_df[['column_name', 'dup_cnt']].apply(lambda x : x[0]+'_'+str(x[1]) 
                                                                                         if x[1] >0 else x[0] ,  axis=1)
    new_feature_name_df = new_feature_name_df.drop(['index'], axis=1)
    return new_feature_name_df

def get_human_dataset( ):
    
    # 각 데이터 파일들은 공백으로 분리되어 있으므로 read_csv에서 공백 문자를 sep으로 할당.
    feature_name_df = pd.read_csv('./human_activity/features.txt',sep='\s+',
                        header=None,names=['column_index','column_name'])
    
    # 중복된 피처명을 수정하는 get_new_feature_name_df()를 이용, 신규 피처명 DataFrame생성. 
    new_feature_name_df = get_new_feature_name_df(feature_name_df)
    
    # DataFrame에 피처명을 컬럼으로 부여하기 위해 리스트 객체로 다시 변환
    feature_name = new_feature_name_df.iloc[:, 1].values.tolist()
    
    # 학습 피처 데이터 셋과 테스트 피처 데이터을 DataFrame으로 로딩. 컬럼명은 feature_name 적용
    X_train = pd.read_csv('./human_activity/train/X_train.txt',sep='\s+', names=feature_name )
    X_test = pd.read_csv('./human_activity/test/X_test.txt',sep='\s+', names=feature_name)
    
    # 학습 레이블과 테스트 레이블 데이터을 DataFrame으로 로딩하고 컬럼명은 action으로 부여
    y_train = pd.read_csv('./human_activity/train/y_train.txt',sep='\s+',header=None,names=['action'])
    y_test = pd.read_csv('./human_activity/test/y_test.txt',sep='\s+',header=None,names=['action'])
    
    # 로드된 학습/테스트용 DataFrame을 모두 반환 
    return X_train, X_test, y_train, y_test
from sklearn.ensemble import RandomForestClassifier
from sklearn.metrics import accuracy_score
import pandas as pd
import warnings
warnings.filterwarnings('ignore')

# 결정 트리에서 사용한 get_human_dataset( )을 이용해 학습/테스트용 DataFrame 반환
X_train, X_test, y_train, y_test = get_human_dataset()

print("## 학습 피처 데이터 정보 ##")
print(X_train.info())
## 학습 피처 데이터 정보 ##
<class 'pandas.core.frame.DataFrame'>
RangeIndex: 7352 entries, 0 to 7351
Columns: 561 entries, tBodyAcc-mean()-X to angle(Z,gravityMean)
dtypes: float64(561)
memory usage: 31.5 MB
None
  • 간단한 랜덤포레스트 모형을 만들어 학습 시킨다.
  • 매우 간단한 모형이기 때문에 학습에 시간이 많이 걸리지는 않는다.
# 랜덤 포레스트 학습 및 별도의 테스트 셋으로 예측 성능 평가
rf_clf = RandomForestClassifier(random_state=0)
rf_clf.fit(X_train , y_train)
pred = rf_clf.predict(X_test)
accuracy = accuracy_score(y_test , pred)
print('랜덤 포레스트 정확도: {0:.4f}'.format(accuracy))
랜덤 포레스트 정확도: 0.9253

하이퍼 파라미터 및 튜닝

  • 튜닝이란, 모형이 가지고 있는 여러 조건들을 변형 시키는 것
  • 대표적인 파라미터 소개
    • n_estimators: 결정 트리의 개수 지정, 디폴트는 10개이며, 많이 설정할수록 좋은 성능 기대 가능, 그러나 시간도 오래 소요됨
    • max_features: 최적의 분할을 위해 고려할 피처의 개수
      • int 형으로 지정 시, 대상 피처의 개수, float형으로 지정 시, 대상 피처의 퍼센트
      • 만약 전체 피처가 16개라면 분할 위해 4개 참조
    • max_depth: 트리의 최대 깊이 규정
    • min_samples_split: 자식 규칙 노드를 분할해 만들기 위한 최소한의 샘플 데이터 개수
    • min_samples_leaf: 말단 노드(Leaf)가 되기 위한 최소한의 샘플 데이터 수

그리드 서치

  • GridSearchCV API를 활용하여 모형에 사용되는 하이퍼 파라미터를 순차적으로 입력하며서 편리하게 최적의 파라미터를 도출할 수 있는 방안 제공
  • 즉, 랜덤포레스트의 파라미터를 순차적으로 변경 및 조정하면서 모형을 학습시키는 방법
  • 이를 통해, 머신러닝 모형 개발자의 코드량을 줄여주는 매우 편리한 기법
    • estimator: 머신러닝 모형의 객체가 온다.
    • param_grid: 딕셔너리 형태로 조정하며, estimator의 튜닝을 위해 파라미터명과 사용될 여러 파라미터 값 지정, 이 부분은 각 머신러닝 모형의 Manual을 참조한다.
    • scoring: 예측 성능을 측정할 평가 방법 지정하지만, 대개 별도의 성능 평가 지표 함수 활용
    • cv: 교차 검증을 위해 분할되는 학습/테스트 세트의 개수 지정
  • 이 때에는 시간이 다소 소요될 수 있다. (5-10분)
from sklearn.model_selection import GridSearchCV

params = {
    'n_estimators':[100],
    'max_depth' : [6, 8, 10, 12], 
    'min_samples_leaf' : [8, 12, 18 ],
    'min_samples_split' : [8, 16, 20]
}
# RandomForestClassifier 객체 생성 후 GridSearchCV 수행
rf_clf = RandomForestClassifier(random_state=0, n_jobs=-1)
grid_cv = GridSearchCV(rf_clf , param_grid=params , cv=2, n_jobs=-1 ) # n_job=-1 현재 모든 CPU를 활용한다는 뜻. 
grid_cv.fit(X_train , y_train)

print('최적 하이퍼 파라미터:\n', grid_cv.best_params_)
print('최고 예측 정확도: {0:.4f}'.format(grid_cv.best_score_))
최적 하이퍼 파라미터:
 {'max_depth': 10, 'min_samples_leaf': 8, 'min_samples_split': 8, 'n_estimators': 100}
최고 예측 정확도: 0.9180

(옵션 체크) 구글 코랩 개발환경 확인

  • 간단하게 구글 코랩 개발환경을 확인한다.
!cat /proc/cpuinfo
processor	: 0
vendor_id	: GenuineIntel
cpu family	: 6
model		: 63
model name	: Intel(R) Xeon(R) CPU @ 2.30GHz
stepping	: 0
microcode	: 0x1
cpu MHz		: 2300.000
cache size	: 46080 KB
physical id	: 0
siblings	: 2
core id		: 0
cpu cores	: 1
apicid		: 0
initial apicid	: 0
fpu		: yes
fpu_exception	: yes
cpuid level	: 13
wp		: yes
flags		: fpu vme de pse tsc msr pae mce cx8 apic sep mtrr pge mca cmov pat pse36 clflush mmx fxsr sse sse2 ss ht syscall nx pdpe1gb rdtscp lm constant_tsc rep_good nopl xtopology nonstop_tsc cpuid tsc_known_freq pni pclmulqdq ssse3 fma cx16 pcid sse4_1 sse4_2 x2apic movbe popcnt aes xsave avx f16c rdrand hypervisor lahf_lm abm invpcid_single ssbd ibrs ibpb stibp fsgsbase tsc_adjust bmi1 avx2 smep bmi2 erms invpcid xsaveopt arat md_clear arch_capabilities
bugs		: cpu_meltdown spectre_v1 spectre_v2 spec_store_bypass l1tf mds swapgs
bogomips	: 4600.00
clflush size	: 64
cache_alignment	: 64
address sizes	: 46 bits physical, 48 bits virtual
power management:

processor	: 1
vendor_id	: GenuineIntel
cpu family	: 6
model		: 63
model name	: Intel(R) Xeon(R) CPU @ 2.30GHz
stepping	: 0
microcode	: 0x1
cpu MHz		: 2300.000
cache size	: 46080 KB
physical id	: 0
siblings	: 2
core id		: 0
cpu cores	: 1
apicid		: 1
initial apicid	: 1
fpu		: yes
fpu_exception	: yes
cpuid level	: 13
wp		: yes
flags		: fpu vme de pse tsc msr pae mce cx8 apic sep mtrr pge mca cmov pat pse36 clflush mmx fxsr sse sse2 ss ht syscall nx pdpe1gb rdtscp lm constant_tsc rep_good nopl xtopology nonstop_tsc cpuid tsc_known_freq pni pclmulqdq ssse3 fma cx16 pcid sse4_1 sse4_2 x2apic movbe popcnt aes xsave avx f16c rdrand hypervisor lahf_lm abm invpcid_single ssbd ibrs ibpb stibp fsgsbase tsc_adjust bmi1 avx2 smep bmi2 erms invpcid xsaveopt arat md_clear arch_capabilities
bugs		: cpu_meltdown spectre_v1 spectre_v2 spec_store_bypass l1tf mds swapgs
bogomips	: 4600.00
clflush size	: 64
cache_alignment	: 64
address sizes	: 46 bits physical, 48 bits virtual
power management:

모형의 개수 심기

  • 최적의 파라미터를 활용하여 n_estimators의 개수를 100개에서 300개로 늘려봅니다.
rf_clf1 = RandomForestClassifier(n_estimators=300, max_depth=10, min_samples_leaf=8, \
                                 min_samples_split=8, random_state=0)
rf_clf1.fit(X_train , y_train)
pred = rf_clf1.predict(X_test)
print('예측 정확도: {0:.4f}'.format(accuracy_score(y_test , pred)))
예측 정확도: 0.9165
import matplotlib.pyplot as plt
import seaborn as sns
%matplotlib inline

ftr_importances_values = rf_clf1.feature_importances_
ftr_importances = pd.Series(ftr_importances_values,index=X_train.columns  )
ftr_top20 = ftr_importances.sort_values(ascending=False)[:20]

plt.figure(figsize=(8,6))
plt.title('Feature importances Top 20')
sns.barplot(x=ftr_top20 , y = ftr_top20.index)
plt.show()

png

텍스트 마이닝 - 희소행렬

공지

  • 해당 포스트는 취업 준비반 대상 강의 교재로 파이썬 머신러닝 완벽가이드를 축약한 내용입니다.
    • 매우 좋은 책이니 가급적 구매하시기를 바랍니다.

개요

  • 피처 벡터화에 있어서의 희소행렬에 대해 배운다.
  • BOW 형태를 가진 언어 모델의 피처 벡터화는 대부분 희소 행렬이다.

희소행렬

  • 희소 행렬은 너무 많은 불필요한 0 값이 메모리 공간에 할당되어 메모리 공간을 많이 차지하는데 있다.
  • 다음 그림을 살펴보자.
  • 이러한 희소 행렬을 물리적으로 적은 메모리 공간을 차지할 수 있도록 변환해야 하는데, 이 때, COO와 CSR 형식이 존재한다.

(1) 희소 행렬 - COO

  • COO(Coordinate: 좌표) 형식은 0이 아닌 데이터만 별도의 데이터 배열(Array)에 저장하고, 그 데이터가 가리키는 행과 열의 위치를 별도의 배열로 저장
  • 희소행렬 변환 위해 Scipy를 활용한다.
import numpy as np
dense = np.array([[3, 0, 1], [0, 2, 0]])
dense
array([[3, 0, 1],
       [0, 2, 0]])
  • Scipy의 coo_matrix 클래스를 이용해 COO형식의 희소 행렬로 변환한다.
from scipy import sparse

# 0이 아닌 데이터 추출
data = np.array([3, 1, 2])

# 행 위치와 열 위치를 각각 배열로 생성
row_pos = np.array([0, 0, 1])
col_pos = np.array([0, 2, 1])

# sparse 패키지의 coo_matrix를 이용해 COO 형식으로 희소 행렬 생성
sparse_coo = sparse.coo_matrix((data, (row_pos, col_pos)))
sparse_coo.toarray()
array([[3, 0, 1],
       [0, 2, 0]])
  • 다시 원래의 데이터 행렬로 추출됨을 알 수 있음.

(2) 희소 행렬 - CSR 형식

  • CSR(Compressed Sparse Row) 형식은 COO 형식이 행과 열의 위치를 나타내기 위해서 반복적인 위치 데이터를 사용해야 하는 문제점을 해결한 방식
from numpy import array
from scipy.sparse import csr_matrix

# 매트릭스
A = array([[1, 0, 0, 1, 0, 0], [0, 0, 2, 0, 0, 1], [0, 0, 0, 2, 0, 0]])
print(A)

# CSR method
S = csr_matrix(A)
print(S)

# reconstruct dense matrix
B = S.todense()
print(B)
[[1 0 0 1 0 0]
 [0 0 2 0 0 1]
 [0 0 0 2 0 0]]
  (0, 0)	1
  (0, 3)	1
  (1, 2)	2
  (1, 5)	1
  (2, 3)	2
[[1 0 0 1 0 0]
 [0 0 2 0 0 1]
 [0 0 0 2 0 0]]
  • COOCSR이 어떻게 희소 행렬의 메모리를 줄일 수 있는지 예제를 통해서 살펴보았다.
  • 간단하게 정리를 하면 다음과 같다.
from numpy import array
from scipy import sparse
dense = array([[1, 0, 0, 1, 0, 0], [0, 0, 2, 0, 0, 1], [0, 0, 0, 2, 0, 0]])

coo = sparse.coo_matrix(dense)
print(coo)
  (0, 0)	1
  (0, 3)	1
  (1, 2)	2
  (1, 5)	1
  (2, 3)	2
csr = sparse.csr_matrix(dense)
print(csr)
  (0, 0)	1
  (0, 3)	1
  (1, 2)	2
  (1, 5)	1
  (2, 3)	2

옵션

  • 사이킷런의 CountVectorizerTfidfVectorizer 클래스로 변환된 피처 벡터화 행렬은 모두 ScipyCSR형태의 희소 행렬이다.

‘This implementation produces a sparse representation of the counts using scipy.sparse.csr_matrix.’ from https://scikit-learn.org/stable/modules/generated/sklearn.feature_extraction.text.CountVectorizer.html

텍스트 마이닝 - Bag of Words

공지

  • 해당 포스트는 취업 준비반 대상 강의 교재로 파이썬 머신러닝 완벽가이드를 축약한 내용입니다.
    • 매우 좋은 책이니 가급적 구매하시기를 바랍니다.

I. 개요

  • 문서가 가지는 모든 단어(Words)를 문맥이나 순서를 무시하고 일괄적으로 단어에 대해 빈도 값을 부여하여 피처 값을 추출하는 모델을 말한다.
  • 아래와 같은 세 개의 문장이 있다고 가정해본다.
    • Doc 1: I love dogs.
    • Doc 2: I hate dogs and knitting.
    • Doc 3: Knitting is my hobby and passion.
  • 위 문장을 각각의 행렬로 표현하면 아래와 같다.
  • BOW 모델의 장점은 쉽고 빠른 구축에 있기 때문에, 활용도는 높은 편이지만, BOW 기반의 NLP 연구는 잘 되지 않는다.
    • 문맥 의미 부족
    • 희소 행렬 문제, 위 그림에서 공백은 0을 의미하며, 이는 문장이 많으면 많을 수록 0의 값도 계속 늘어나는데, 이를 해결하기 위해 COO(Coordinate) 또는 CSR(Compressed Sparse Row)형식의 기법을 활용한다.

II. BOW 피처 벡터화

  • 피처 벡터화는 간단하게 말하면 문서 내 텍스트를 단어의 횟수나 정규화된 빈도 값으로 데이터 세트 모델로 변경하는 것을 말한다.
  • 보통 문서를 M이라고 하고, 단어를 N이라고 한다면, 행렬은 전체 문서의 개수 (M) X 전체 단어의 개수(N)으로 구성한다.
  • 일반적으로 BOW의 피처 벡터화는 두 가지 방식이 존재한다.
    • 카운트 기반의 벡터화
    • TF-IDF(Term Frequency - Inverse Document Prequency) 기반의 벡터화

(1) 카운트 기반의 벡터화

  • 단어 피처에 값을 부여하는 경우를 말한다. 간단한 예시를 활용한다.
from collections import Counter
import nltk
from nltk import word_tokenize
nltk.download('punkt')

# 텍스트
text = """Yesterday I went fishing. I don't fish that often, 
so I didn't catch any fish. I was told I'd enjoy myself, 
but it didn't really seem that fun."""

# 토큰화
tokens = word_tokenize(text)

# 모든 단어를 소문자화
lower_tokens = [t.lower() for t in tokens]

# Counter화
bow_simple = Counter(lower_tokens)

# 상위 10개의 단어 추출
print(bow_simple.most_common(10))
[nltk_data] Downloading package punkt to /root/nltk_data...
[nltk_data]   Unzipping tokenizers/punkt.zip.
[('i', 5), ('.', 3), ("n't", 3), ('fish', 2), ('that', 2), (',', 2), ('did', 2), ('yesterday', 1), ('went', 1), ('fishing', 1)]
  • 단어 피처에 값을 부여할 때 각 문서에서 해당 언어가 나타나는 횟수, 즉 Count를 부여하는 경우를 카운트 벡터화라고 한다.

텍스트 마이닝 - 텍스트 전처리

I. 개요

  • NLP(Natural Language Processing): 기계가 인간의 언어를 이해하고 해석하는 데 중점
    • 활용예제: 기계 번역, 챗봇, 질의응답 시스템 (딥러닝)
  • Text Analysis: 비정형 텍스트에서 의미 있는 정보를 추출하는 것에 중점
    • 활용예제: 비즈니스 인텔리전스, 예측분석 (머신러닝)
  • 텍스트 분석의 예
    • 텍스트 분류: 문서가 특정 분류 또는 카테고리에 속하는 것을 예측하는 기법
    • 감성 분석: 텍스트에서 나타나는 감정/판단/믿음/의견 등의 주관적인 요소 분석하는 기법
    • 텍스트 요약: 텍스트 내에서의 중요한 주제나 중심 사상 추출(Topic Modeling)
    • 텍스트 군집화(Clustering)와 유사도 측정: 비슷한 유형의 문서에 대해 군집화를 수행하는 기법. 텍스트 분류를 비지도학습으로 수행하는 방법

II. 텍스트 분석 개요

  • 텍스트를 의미있는 숫자로 표현하는 것이 핵심
  • 영어 키워드: Feature Vectorization 또는 Feature Extraction.
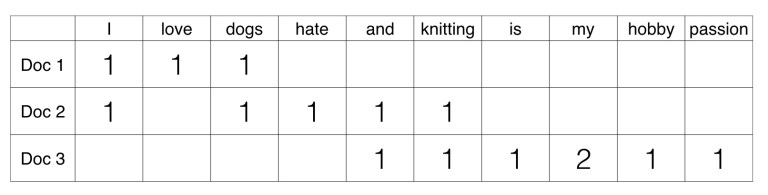
  • 텍스트를 Feature Vectorization에는 BOW(Bag of Words)와 Word2Vec 두가지 방법이 존재.
  • 머신러닝을 수행하기 전에 반드시 선행되어야 함.

(1) 텍스트 분석 수행 방법

  • 1단계: 데이터 전처리 수행. 클렌징, 대/소문자 변경, 특수문자 삭제. 단어 등의 토큰화 작업, 의미 없는 단어(Stop word) 제거 작업, 어근 추출(Stemming/Lemmdatization)등의 텍스트 정규화 작업 필요
  • 2단계: 피처 벡터화/추출: 가공된 텍스트에서 피처 추출 및 벡터 값 할당.
    • Bag of Words: Count 기반 or TF-IDF 기반 벡터화
  • 3단계: ML 모델 수립 및 학습/예측/평가를 수행.

(2) 파이썬 기반의 NLP, 텍스트 분석 패키지

  • NTLK: 파이썬의 가장 대표적인 NLP 패키지. 방대한 데이터 세트와 서브 모듈 보유. 그러나, 속도가 느리다는 단점 존재
  • ‘Gensim’: 토픽 모델링 분야에서 주로 사용되는 패키지. Word2Vec 구현도 가능
  • SpaCY: 최근 가장 주목을 받는 NLP 패키지.

III. 텍스트 전처리 - 정규화

  • 텍스트 자체를 바로 피처로 만들 수는 없다. 텍스트를 가공하기 위한 클렌징, 토큰화, 어근화 등이 필요.
  • 정규화 작업의 종류는 다음과 같음
    • 클렌징: 불필요한 문자,기호 등을 사전제거 (정규표현식 주로 활용)
    • 토큰화
    • 필터링/스톱 워드 제거/철자 수정
    • Stemming
    • Lemmatization

(1) 문장 토큰화

  • 문장 토큰화(sentence tokenization)는 문장의 마침표, 개행문자(\n) 등 문장의 마지막을 뜻하는 기호에 따라 분리하는 것이 일반적임
  • 아래 샘플코드는 문장 토큰화에 관한 것임
  • punkt는 마침표, 개행 문자 등의 데이터 세트를 다운로드 받는다.
from nltk import sent_tokenize
import nltk

nltk.download("punkt")
[nltk_data] Downloading package punkt to /root/nltk_data...
[nltk_data]   Unzipping tokenizers/punkt.zip.


True
text_sample = "The Matrix is everywhere its all around us, here even in this wroom. \
               You can see it out your window or on your television. \
               You feel it when you go to work, or go to church or pay your taxes."

sentences = sent_tokenize(text = text_sample)
print(type(sentences), len(sentences))
print(sentences)
<class 'list'> 3
['The Matrix is everywhere its all around us, here even in this wroom.', 'You can see it out your window or on your television.', 'You feel it when you go to work, or go to church or pay your taxes.']
  • 위 코드에서 확인할 수 있는 것은 sent_tokenize가 반환하는 것은 각각의 문장으로 구성된 list 객체이며, 이 객체는 3개의 문장으로 된 문자열을 가지고 있음을 알 수 있다.

(2) 단어 토큰화

  • 단어 토큰화(Word Tokenization)는 문장을 단어로 토큰화하는 것을 말하며, 기본적으로 공백, 콤마(,), 마침표(.), 개행문자 등으로 단어를 분리하지만, 정규 표현식을 이용해 다양한 유형으로 토큰화를 수행할 수 있다.
  • 단어의 순서가 중요하지 않은 경우에는 Bag of Word를 사용해도 된다.
  • 이제 코드를 구현해본다.
from nltk import word_tokenize

sentence = "The Matrix is everywhere its all around us, here even in this room."
words = word_tokenize(sentence)
print(type(words), len(words))
print(words)
<class 'list'> 15
['The', 'Matrix', 'is', 'everywhere', 'its', 'all', 'around', 'us', ',', 'here', 'even', 'in', 'this', 'room', '.']
  • 이번에는 문장 및 단어 토큰화를 함수로 구현해보도록 한다.
    • 우선, 문장별로 토큰을 분리한 후
    • 분리된 문장별 단어를 토큰화로 진행하는 코드를 구현한다 (for loop 활용)
from nltk import word_tokenize, sent_tokenize

# 여러 개의 문장으로 된 입력 데이터를 문장별로 단어 토큰화하게 만드는 함수
def tokenize_text(text):

  # 문장별로 분리 토큰
  sentences = sent_tokenize(text)

  # 분리된 문장별 단어 토큰화
  word_tokens = [word_tokenize(sentence) for sentence in sentences]
  return word_tokens

# 여러 문장에 대해 문장별 단어 토큰화 수행
word_tokens = tokenize_text(text_sample)
print(type(word_tokens), len(word_tokens))
print(word_tokens)
<class 'list'> 3
[['The', 'Matrix', 'is', 'everywhere', 'its', 'all', 'around', 'us', ',', 'here', 'even', 'in', 'this', 'wroom', '.'], ['You', 'can', 'see', 'it', 'out', 'your', 'window', 'or', 'on', 'your', 'television', '.'], ['You', 'feel', 'it', 'when', 'you', 'go', 'to', 'work', ',', 'or', 'go', 'to', 'church', 'or', 'pay', 'your', 'taxes', '.']]
  • 각각의 개별 리스트는 해당 문장에 대한 토큰화된 단어를 요소로 가진다.
  • 문장을 단어별로 하나씩 토큰화 할 경우 문맥적인 의미는 무시될 수 밖에 없는데.. 이러한 문제를 해결하기 위해 도입된 개념이 n-gram이다.
  • N-gram은 연속된 N개의 단어를 하나의 토큰화 단위로 분리해 내는 것.
    • 예시) I Love You
    • (I, Love), (Love, You)

IV. 텍스트 전처리 - 스톱 워드(불용어) 제거

  • 의미가 없는 be동사 등을 제거 할 때 사용함
    • 이런 단어들은 매우 자주 나타나는 특징이 있음
  • NTLK의 스톱 워드에 기본적인 세팅이 저장되어 있음
import nltk
nltk.download("stopwords")
[nltk_data] Downloading package stopwords to /root/nltk_data...
[nltk_data]   Unzipping corpora/stopwords.zip.


True
  • 총 몇개의 stopwords가 있는지 알아보고, 그중 20개만 확인해본다.
print("영어 stop words 개수:", len(nltk.corpus.stopwords.words("english")))
print(nltk.corpus.stopwords.words("english")[:20])
영어 stop words 개수: 179
['i', 'me', 'my', 'myself', 'we', 'our', 'ours', 'ourselves', 'you', "you're", "you've", "you'll", "you'd", 'your', 'yours', 'yourself', 'yourselves', 'he', 'him', 'his']
  • 이번에는 stopwords를 필터링으로 제거하여 분석을 위한 의미 있는 단어만 추출하도록 함.
import nltk
stopwords = nltk.corpus.stopwords.words("english")
all_tokens = []

# 위 예제에서 3개의 문장별로 얻은 word_tokens list에 대해 불용어 제거하는 반복문 작성
for sentence in word_tokens:
  filtered_words = [] # 빈 리스트 생성

  # 개별 문장별로 토큰화된 문장 list에 대해 스톱 워드 제거
  for word in sentence:

    # 소문자로 모두 변환
    word = word.lower()

    # 토큰화된 개별 단어가 스톱 워드의 단어에 포함되지 않으면 word_tokens에 추가
    if word not in stopwords:
      filtered_words.append(word)
  all_tokens.append(filtered_words)
  
print(all_tokens)
[['matrix', 'everywhere', 'around', 'us', ',', 'even', 'wroom', '.'], ['see', 'window', 'television', '.'], ['feel', 'go', 'work', ',', 'go', 'church', 'pay', 'taxes', '.']]
  • is, this와 같은 불용어가 처리된 것 확인됨

V. 텍스트 전처리 - 어간(Stemming) 및 표제어(Lemmatization)

  • 동사의 변화
    • 예) Love, Loved, Loving
  • 어근 및 표제어는 단어의 원형을 찾는 것.
  • 그런데, 표제어 추출(Lemmatization)이 어근(Stemming)보다는 보다 더 의미론적인 기반에서 단어의 원형을 찾는다.

(1) 어간(Stemming)

  • Stemming은 원형 단어로 변환 시, 어미를 제거하는 방식을 사용한다.
    • 예) worked에서 ed를 제거하는 방식을 사용
  • Stemming기법에는 크게 Porter, Lancaster, Snowball Stemmer가 있음.
  • 소스코드 예시는 아래와 같음
from nltk.stem import PorterStemmer
from nltk.stem import LancasterStemmer
porter = PorterStemmer()
lancaster = LancasterStemmer()

word_list = ["friend", "friendship", "friends", "friendships","stabil","destabilize","misunderstanding","railroad","moonlight","football"]
print("{0:20}{1:20}{2:20}".format("Word","Porter Stemmer","lancaster Stemmer"))
for word in word_list:
    print("{0:20}{1:20}{2:20}".format(word,porter.stem(word),lancaster.stem(word)))
Word                Porter Stemmer      lancaster Stemmer   
friend              friend              friend              
friendship          friendship          friend              
friends             friend              friend              
friendships         friendship          friend              
stabil              stabil              stabl               
destabilize         destabil            dest                
misunderstanding    misunderstand       misunderstand       
railroad            railroad            railroad            
moonlight           moonlight           moonlight           
football            footbal             footbal             
  • LancasterStemmer 간단하지만, 가끔 지나치게 over-stemming을 하는 경향이 있다. 이는 문맥적으로는 큰 의미가 없을수도 있기 때문에 주의를 요망한다.
print("For Lancaster:", lancaster.stem("destabilized"))
print("For Porter:", porter.stem("destabilized"))
For Lancaster: dest
For Porter: destabil
  • 위와 같이 destabilized(불안정한) 뜻을 가진 단어가 destabil(불안정)이 아닌 dest(목적지)로 변환되기도 한다.

(2) 표제어 추출(Lemmatization)

  • 표제어 추출은 품사와 같은 문법적인 요소와 더 의미적인 부분을 감안하여 정확한 철자로 된 어근 단어를 찾아준다.
  • 어근을 보통 Lemma라고 부르며, 이 때의 어근은 Canoical Form, Dictionary Form, Citation Form 이라고 부른다.
  • 간단하게 예를 들면, loves, loving, loved는 모두 love에서 파생된 것이며, 이 때 loveLemma라고 부른다.
from nltk.stem import WordNetLemmatizer
import nltk
nltk.download('wordnet')
[nltk_data] Downloading package wordnet to /root/nltk_data...
[nltk_data]   Package wordnet is already up-to-date!


True
  • 간단하게 단어들을 확인해본다.
lemma = WordNetLemmatizer()
print(lemma.lemmatize('amusing', 'v'), lemma.lemmatize('amuses', 'v'), lemma.lemmatize('amused', 'v'))
print(lemma.lemmatize('happier', 'v'), lemma.lemmatize('happiest', 'v'))
print(lemma.lemmatize('fancier', 'a'), lemma.lemmatize('fanciest', 'a'))
amuse amuse amuse
happier happiest
fancy fancy
  • 이번에는 조금 긴 문장을 활용하여 작성하도록 한다.
import nltk
from nltk.stem import WordNetLemmatizer
wordnet_lemmatizer = WordNetLemmatizer()

sentence = "He was running and eating at same time. He has bad habit of swimming after playing long hours in the Sun."
punctuations="?:!.,;" # 해당되는 부호는 제외하는 코드를 만든다. 
sentence_words = nltk.word_tokenize(sentence)
for word in sentence_words:
    if word in punctuations:
        sentence_words.remove(word)

sentence_words
print("{0:20}{1:20}".format("Word","Lemma"))
for word in sentence_words:
    print ("{0:20}{1:20}".format(word,wordnet_lemmatizer.lemmatize(word)))
Word                Lemma               
He                  He                  
was                 wa                  
running             running             
and                 and                 
eating              eating              
at                  at                  
same                same                
time                time                
He                  He                  
has                 ha                  
bad                 bad                 
habit               habit               
of                  of                  
swimming            swimming            
after               after               
playing             playing             
long                long                
hours               hour                
in                  in                  
the                 the                 
Sun                 Sun                 
  • 지금까지 진행한 것은 텍스트 전처리의 일환으로 활용한 것이다. 각각의 정규화, 불용어, 어간 및 표제어 등은 각각 함수로 작성하는 것을 권한다.

VI. Reference

List to Pandas

강의 홍보

개요

  • List는 파이썬 데이터 타입의 기본 자료형이다.
  • Pandas 데이터 분석을 위한 기본적인 자료형이다.
  • List에서 Pandas로 변환하는 작업의 다양한 방법을 활용해본다.

방법 1. 기초

  • List를 생성한 후, 데이터프레임으로 변환한다.
  • 여기에서는 columnindex값을 확인해본다.
import pandas as pd

lst = ["Korea", "Japan", "USA", "China", "Russia"]
data = pd.DataFrame(lst)
print(data)
        0
0   Korea
1   Japan
2     USA
3   China
4  Russia

방법 2. Column & Index 추가

  • 이번에는 columnindex를 추가한다.
lst = ["Korea", "Japan", "USA", "China", "Russia"]
country_index = ["a", "b", "c", "d", "e"]
data = pd.DataFrame(lst, index = country_index, columns=["Country"])
print(data)
  Country
a   Korea
b   Japan
c     USA
d   China
e  Russia

방법 3. 두개의 리스트와 Zip 활용

  • 이번에는 zip()함수를 활용하기에 앞서서, zip() 함수를 이해한다.
a = ["김", "심", "홍"]
b = ["길동", "청이", "길동"]

x = zip(a, b)
print(list(x))
[('김', '길동'), ('심', '청이'), ('홍', '길동')]
  • 위 결과값이 말해주는 것처럼 동일한 개수로 이루어진 자료향을 묶어 주는 역할을 한다.
  • 이를 활용하여 두개의 리스트를 판다스 데이터프레임으로 변환해준다.
full_name = pd.DataFrame(list(zip(a, b)), 
                         columns = ["성", "이름"])

print(full_name)
   성  이름
0  김  길동
1  심  청이
2  홍  길동

방법 4. Dictionary 활용

  • ListDictionary를 활용하여 데이터 프레임을 작성한다.
# 3개의 리스트
name = ["홍길동", "심청이", "임꺽정"]
age = [30, 40, 50]
gender = ["남성", "여성", "남성"]

# 딕셔너리 생성
dict = {"성함": name, "나이": age, "성별": gender}

class_df = pd.DataFrame(dict)
print(class_df)
    성함  나이  성별
0  홍길동  30  남성
1  심청이  40  여성
2  임꺽정  50  남성

엑셀로 내보내기

  • 이렇게 생성된 데이터를 엑셀로 내보내기를 해본다.
class_df.to_excel("class_df.xlsx", sheet_name='1반', index = False)
  • 실제로 내보내기가 되었는지 확인해본다.
%ls
class_df.xlsx 

Reference

Shivam_k. (2018). Create a Pandas DataFrame from Lists. Retreived from https://www.geeksforgeeks.org/create-a-pandas-dataframe-from-lists/